Let’s connect everything we have learned from the previous section, and get our hands dirty. 💪
All the code for this article can be found on jacobhjkim/declarative-eks-tutorial.
Table of Contents
move to section architecture Architecture
In this tutorial, we will create three EKS clusters: central, dev, and prod. I will get into the details of each cluster later. We use Terraform to deploy AWS infrastructure and try to follow the Infrastructure as Code best practices. Argo CD to deploy Helm charts to the EKS clusters. HashiCorp Vault to manage secrets.
Overall, the architecture looks like this:
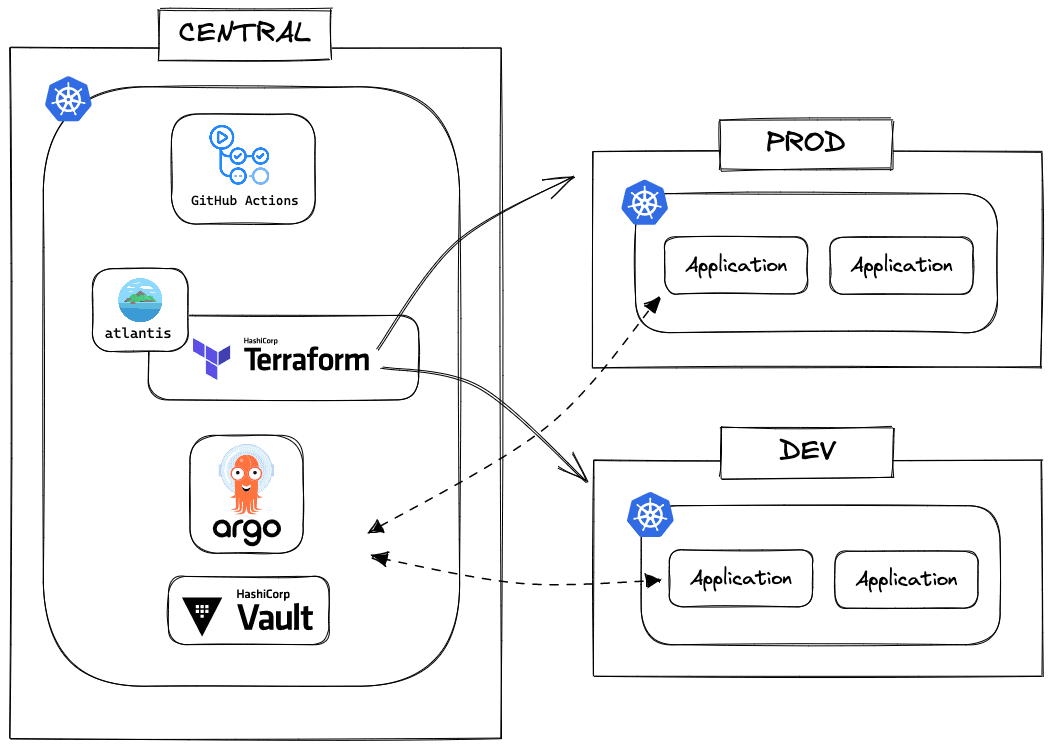
I will explain each part in detail.
Kubernetes Clusters
Let’s start with the three Kubernetes clusters: central, dev, and prod. And explore the differences between them.
Central
The central cluster manages the other two clusters. What does it mean to say manage other clusters? It’s simple; the central cluster controls what gets deployed to the other clusters. Not only that, but the central cluster is also in charge of monitoring the metrics of the other clusters with tools like Prometheus and Thanos. Our secret manager, Vault, is also deployed to the central cluster. Whenever the other clusters need to access Vault, they will do so through the central cluster.
The central cluster is in AWS’s ap-northeast-2 region since that’s closer to where I physically live. You might want to deploy the central cluster in a different region. For example, if you live in the US, you might want to deploy the central cluster in regions like us-east-1 or us-west-2. I have debated whether to put the central cluster in the same region as the prod cluster, but I decided to put it in the region that’s closest to me:
- Web applications like Argo CD dashboard and Grafana become noticeably faster when they are deployed in the same region as me.
- Our GitHub Enterprise Server is in
ap-northeast-2. Argo CD being a GitOps tool, it communicates with GitHub Enterprise Server a lot. - If you want to expand globally, you will have prod clusters in many regions as well. Since you can’t have a central cluster in every region, it’s better to have a central cluster in the region that’s closest to you.
Dev
The dev cluster deploys applications that are in development. It is a testbed for new features and ensures everything works before deploying to the prod cluster. Unlike the central or the prod cluster, developers have more access to the dev cluster.
The dev cluster is in ap-northeast-2 as well.
Prod
The prod cluster is where the production applications are deployed. It is the most secure cluster out of the three. Developers have the least access to the prod cluster. Only the CI/CD pipeline has access to the prod cluster.
The prod cluster is in us-east-1. If you are running a global service or want high availability, you can have prod clusters in many regions. But for this article, for the sake of simplicity, we only have one prod cluster in us-east-1.
move to section prerequisite Prerequisite
To follow this tutorial, you need to have CLI tools listed below, an AWS account with enough permissions, and a copy of jacobhjkim/declarative-eks-tutorial repository.
CLI Tools
Here is the list of CLI tools that you need to install.
If you are using macOS, you can install them like this:
$ brew install terraform awscli kubectl helmAWS Account and IAM
Your AWS account needs to have AdministratorAccess policy attached to the user you are using. You can create a new user with AdministratorAccess policy in the IAM console. If you don’t have an AWS account, you can create one for free here.
Configure the AWS CLI with your AWS credentials. Check this link for more information: Configuring the AWS CLI.
To make sure everything is working, run the following commands and make sure you don’t get any errors:
$ terraform version
$ aws --version
$ aws sts get-caller-identity
$ kubectl version --client
$ helm version
Clone the Tutorial Code
Clone the code from the GitHub repository. The code is in the jacobhjkim/declarative-eks-tutorial repository. The repo you just cloned should look like this:
.
├── README.md
├── docs
│   └── images
├── kubernetes
│   ├── README.md
│   └── charts
├── terraform
│   ├── README.md
│   ├── central
│   ├── dev
│   └── prod
└── web-app
    ├── ...
Now we are ready to start this journey of deploying a multi-region EKS cluster the declarative way. 🚀
move to section central-aws-infra-setup Central AWS Infra Setup
This is our first step! Let’s set up our AWS infrastructure for the central cluster.
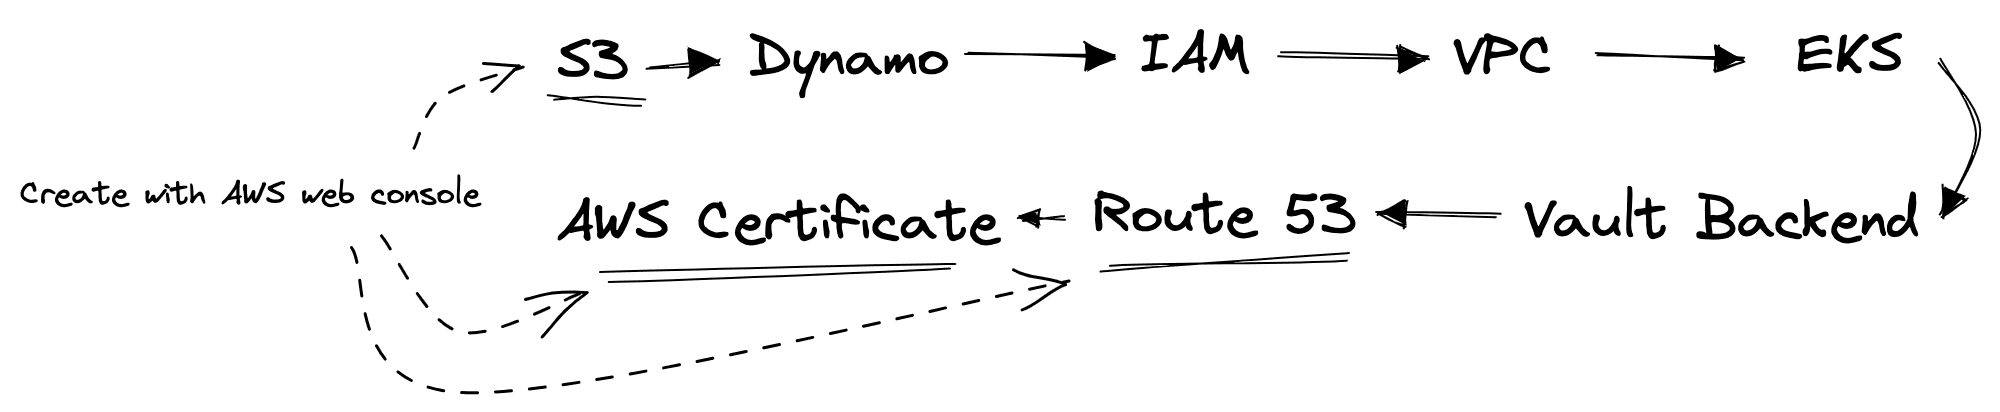
AWS infrastructure has to be set up with a specific order. The order is shown in the diagram above. Most infrastructures will be created using Terraform, except for the S3 bucket, Route 53 domain, and AWS Certificate.
Be Aware of Your AWS Bill!
While I tried my best to minimize the cost of this tutorial, you might still end up with a small bill. Once you are done with this tutorial, make sure to delete all the resources you created in this tutorial to avoid unnecessary costs.
S3
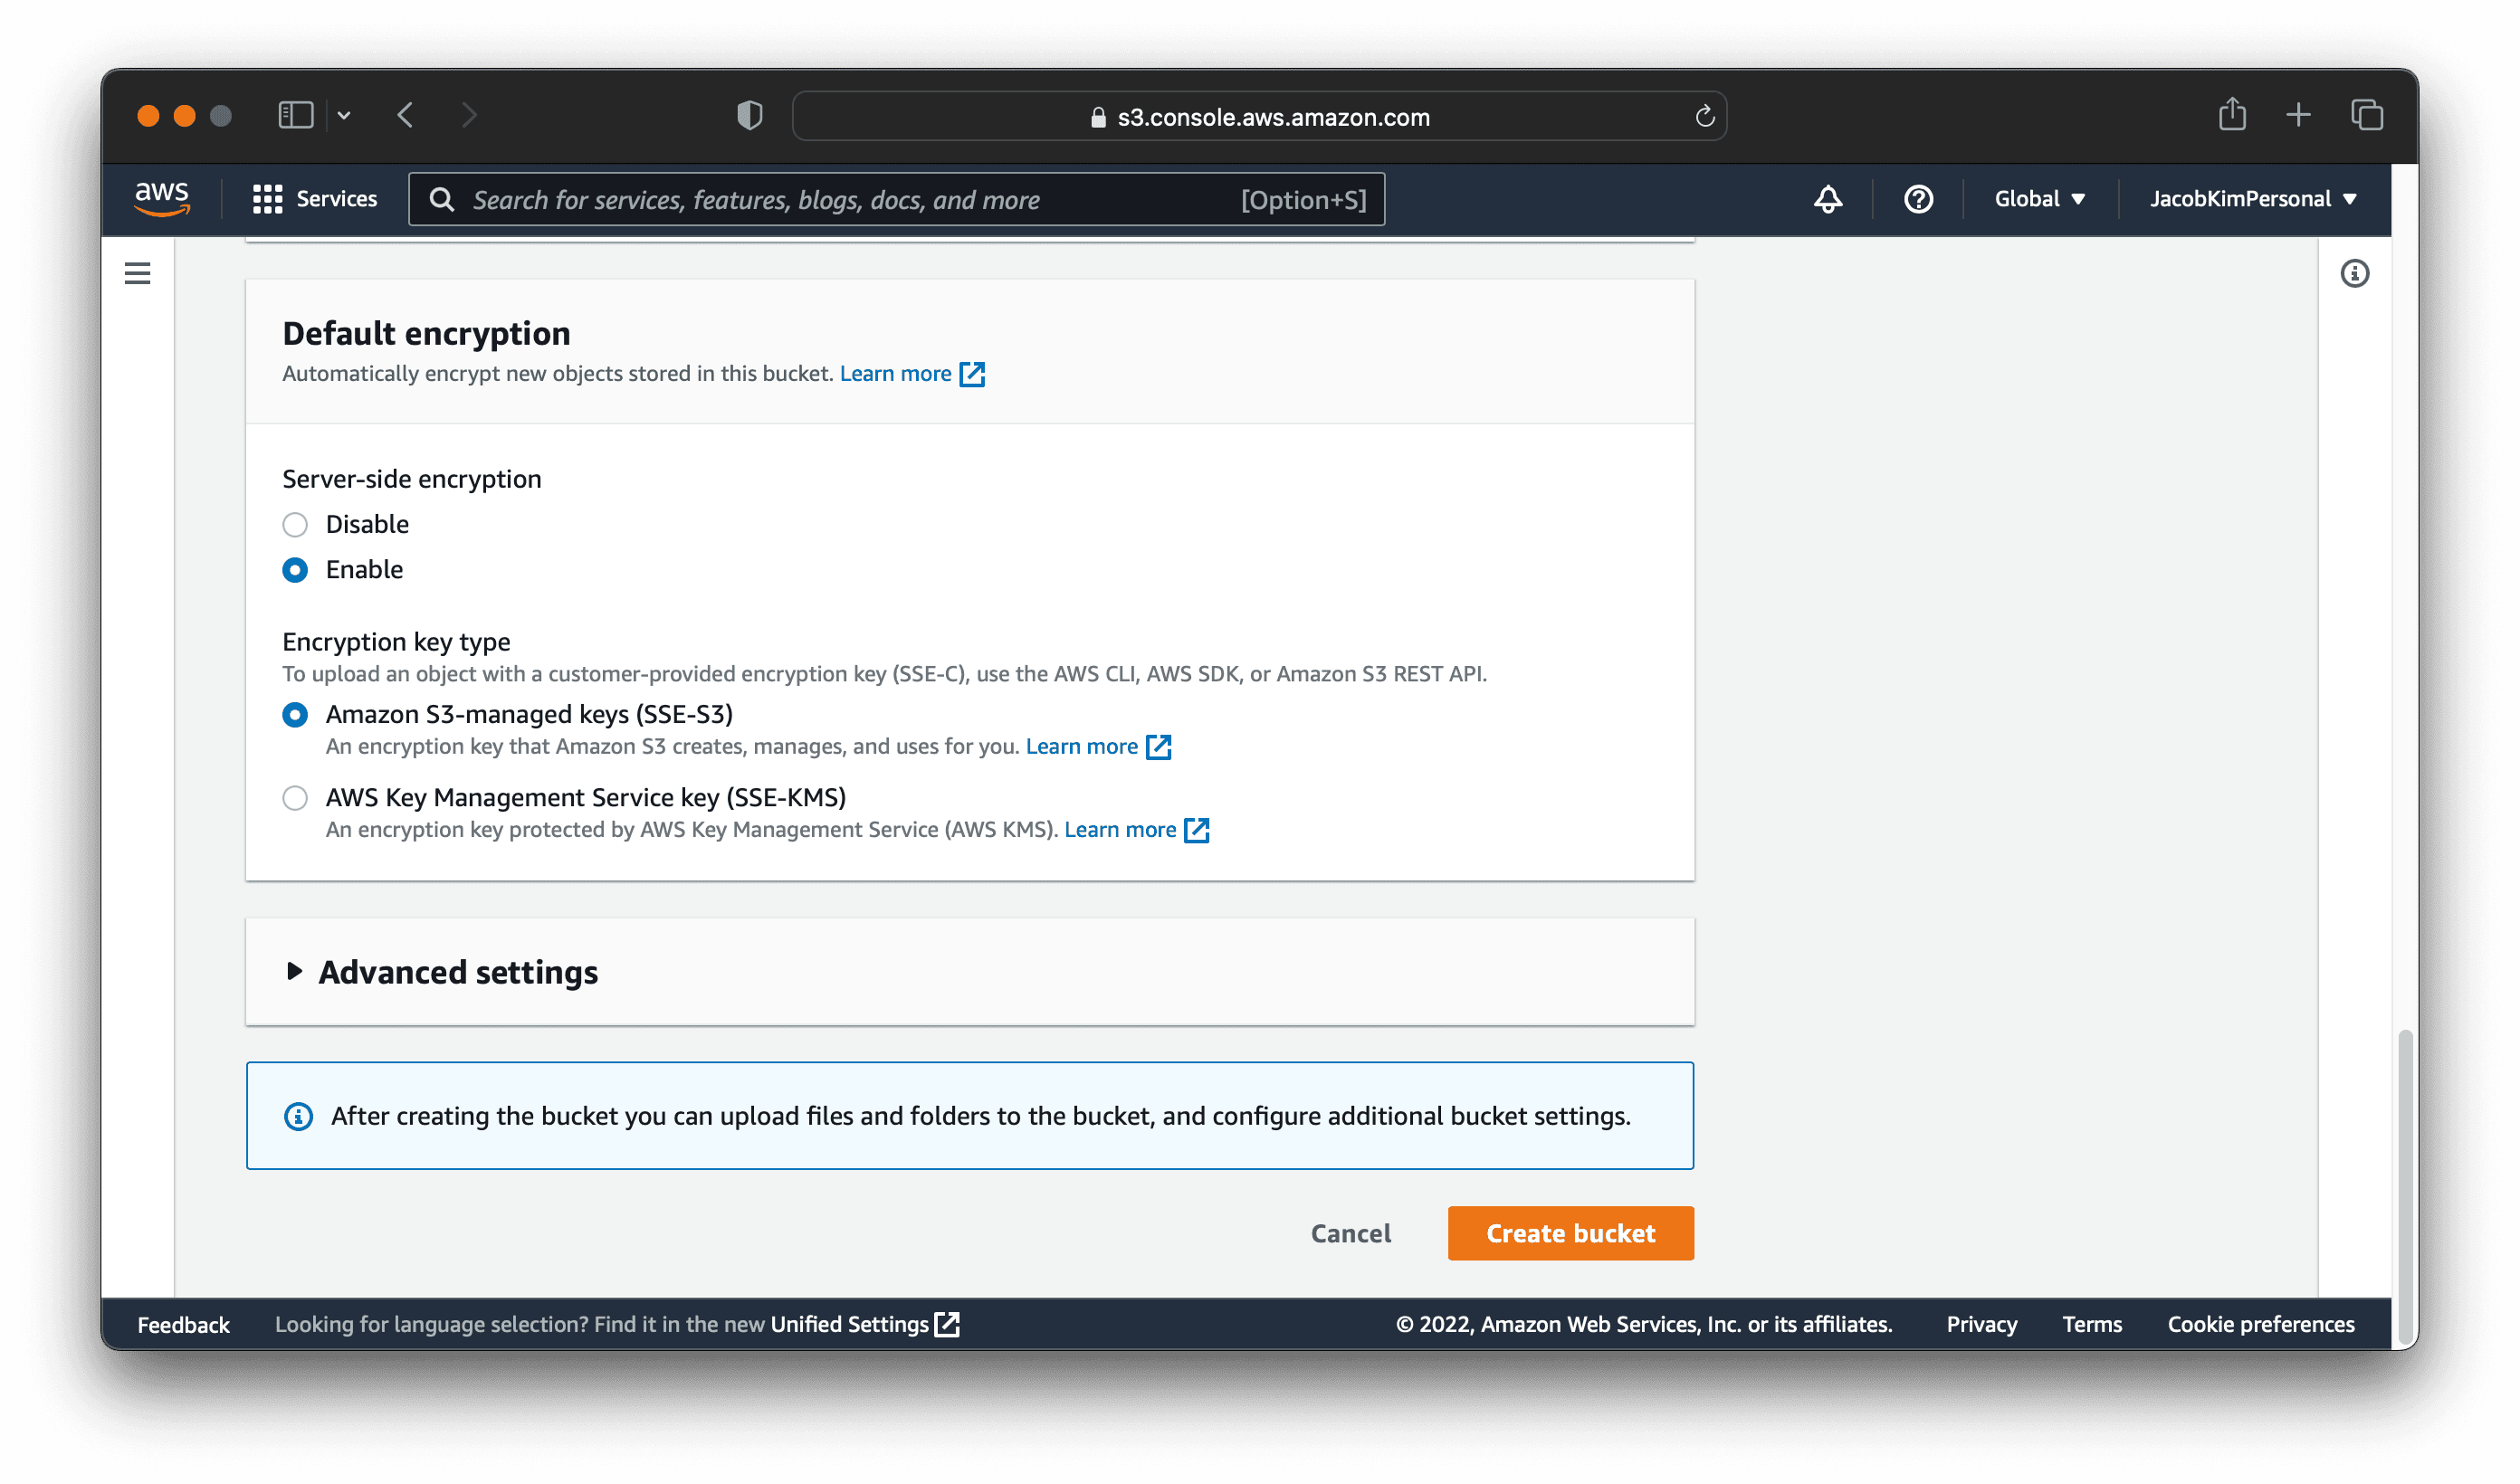
To create our S3 bucket for storing Terraform states, go to the S3 console. Click Create bucket and enter the following information:
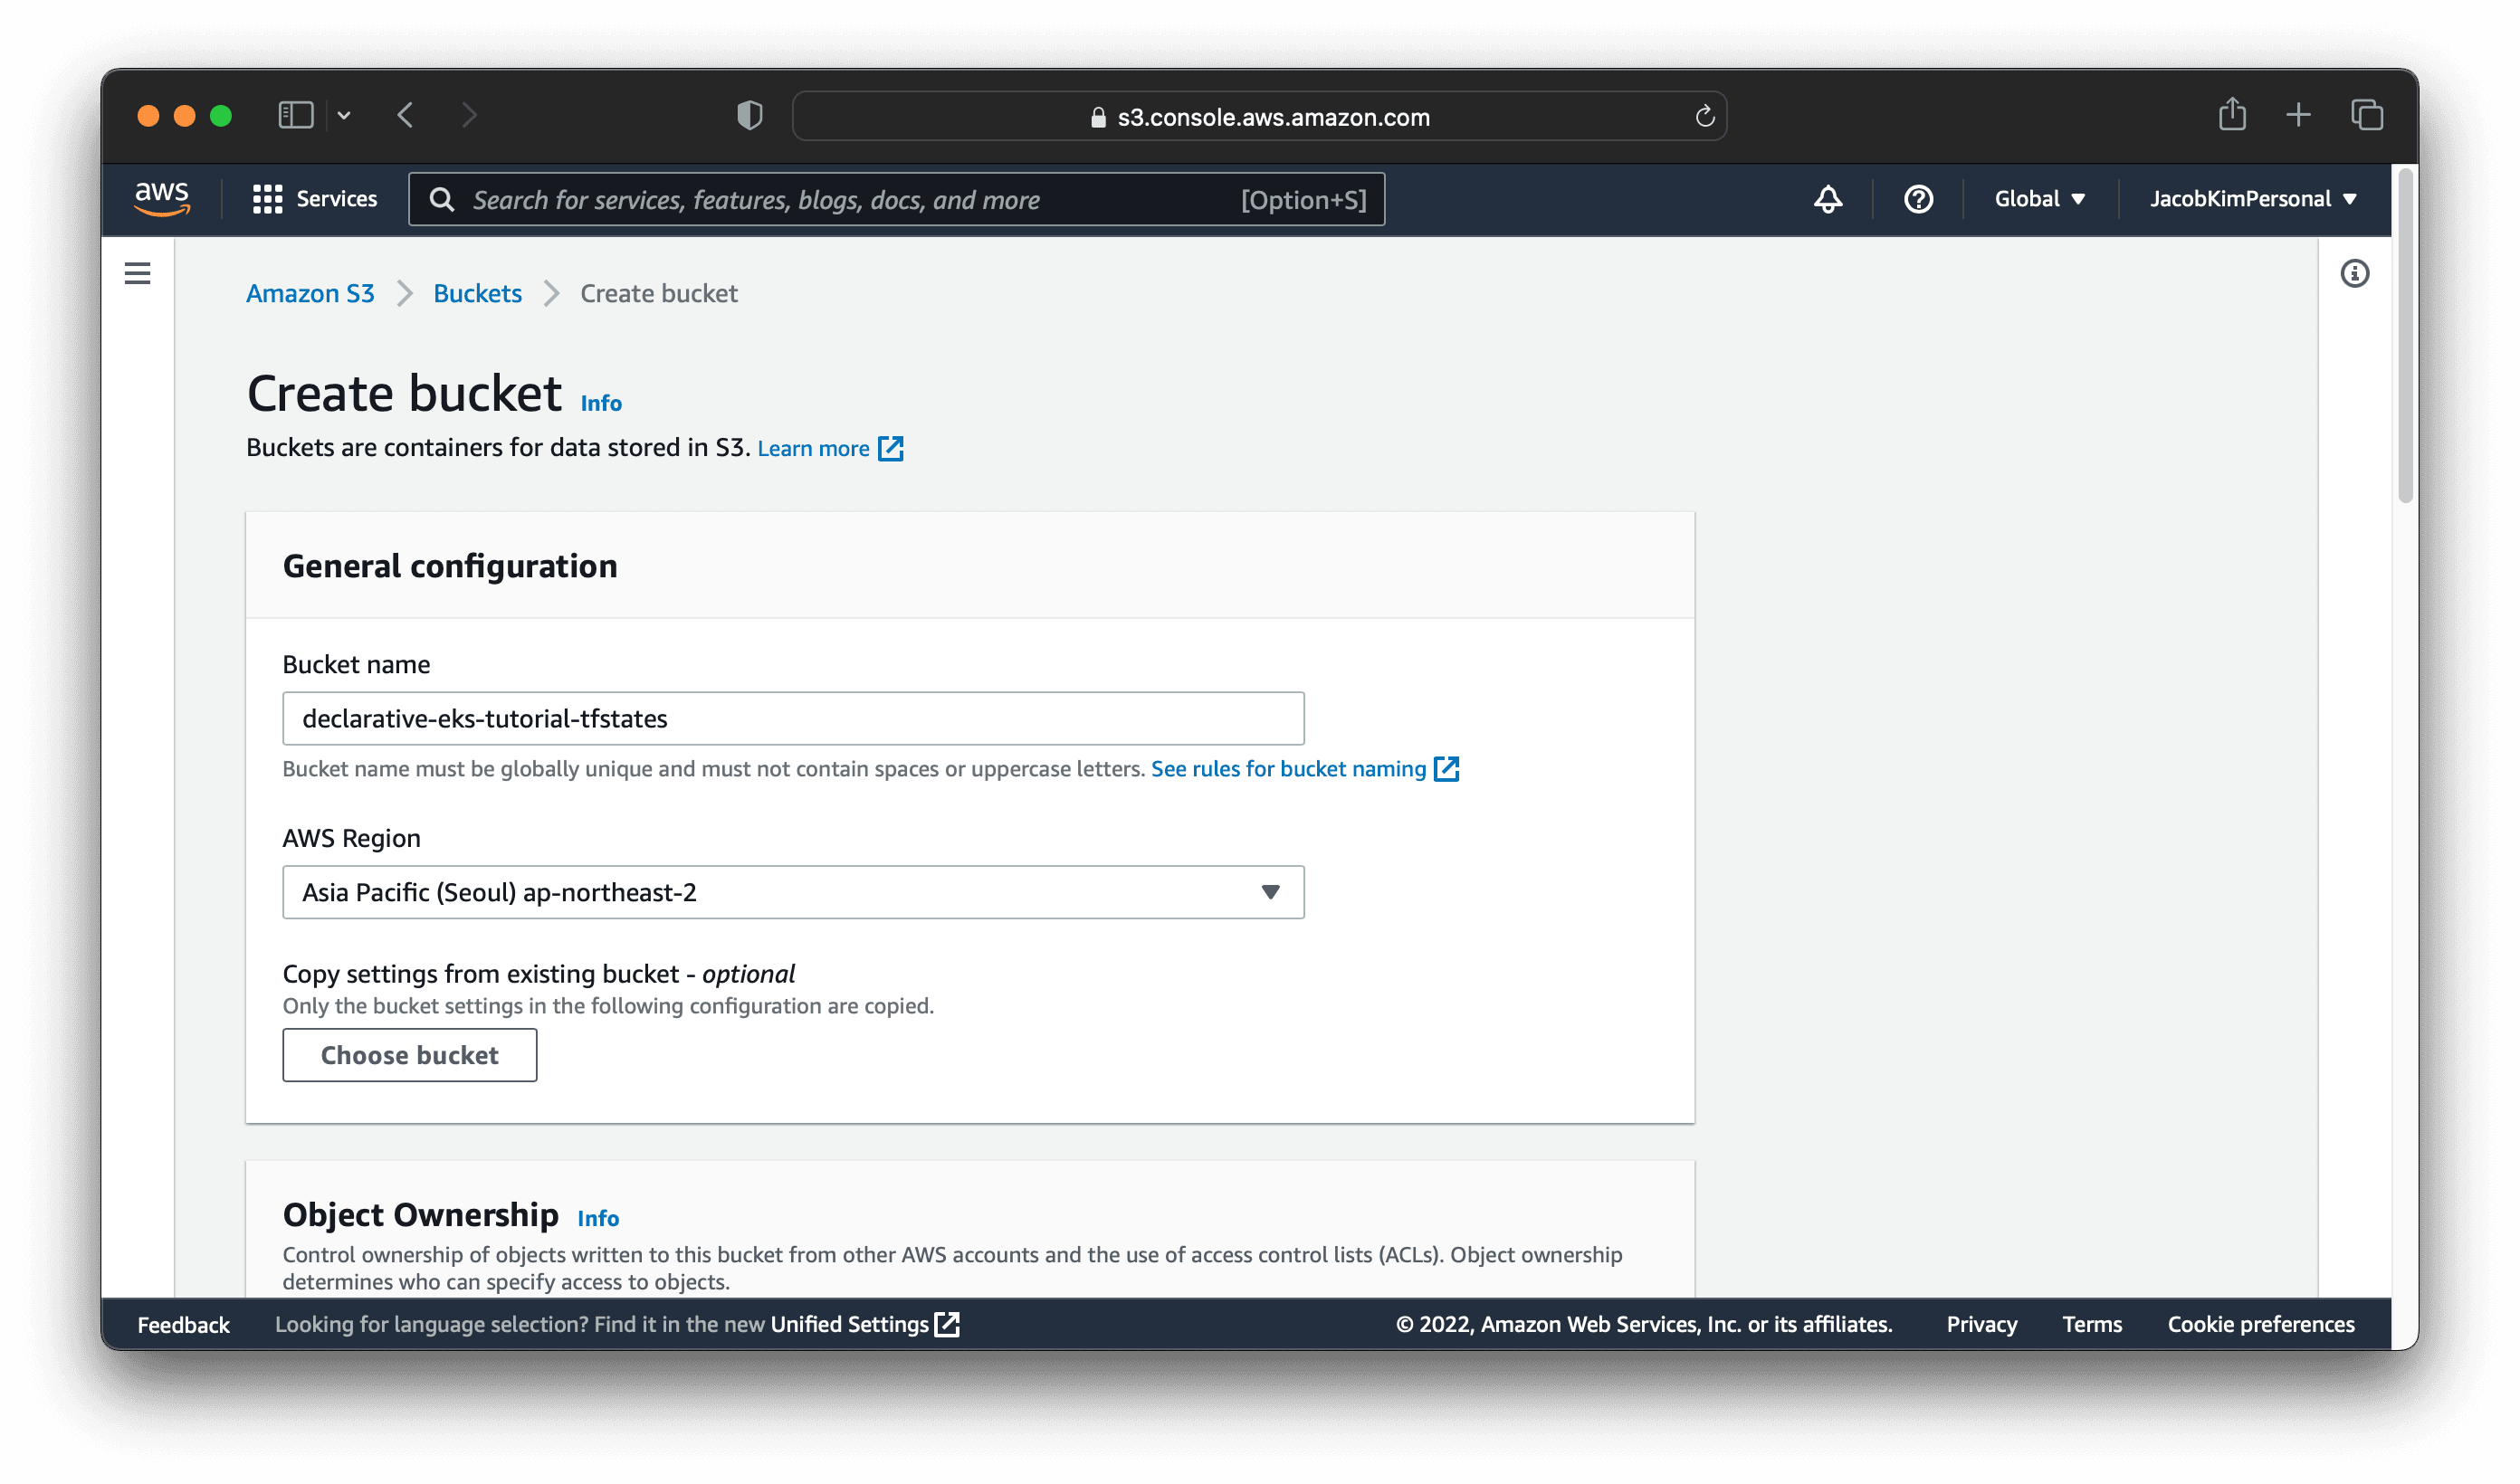
I named my S3 bucket declarative-eks-tutorial-tfstates. You can name it whatever you want. Make sure you select the region in that you want to deploy the central cluster. I selected ap-northeast-2.
Dynamo
We will use the following terraform code to create our Dynamo DB table for the Terraform state lock. Change directory to terraform/central. You will see a file called versions.tf. Open it and change the following lines according to the region you set and the name of the S3 bucket you created.
1terraform {
2  required_version = ">= 1.3.0"
3
4  backend "s3" {
5    region = "ap-northeast-2"  # TODO: Change to your region
6    bucket = "declarative-eks-tutorial-tfstates"  # TODO: Change to your bucket name
7    key    = "central/dynamo.tfstate"
8  }
9...
Also, change the region in the locals.tf file.
1locals {
2  region = "ap-northeast-2"  # TODO: Change to your region
3}
From now on, whenever we use Terraform, you will need to change values in the versions.tf and locals.tf. I have marked the lines that you need to change with TODO comments.
Better ways to change variables in Teraform
Now that we have updated the Terraform files, we can create the Dynamo DB table. Run the following command:
$ cd central/dynamo
$ terraform init
$ terraform apply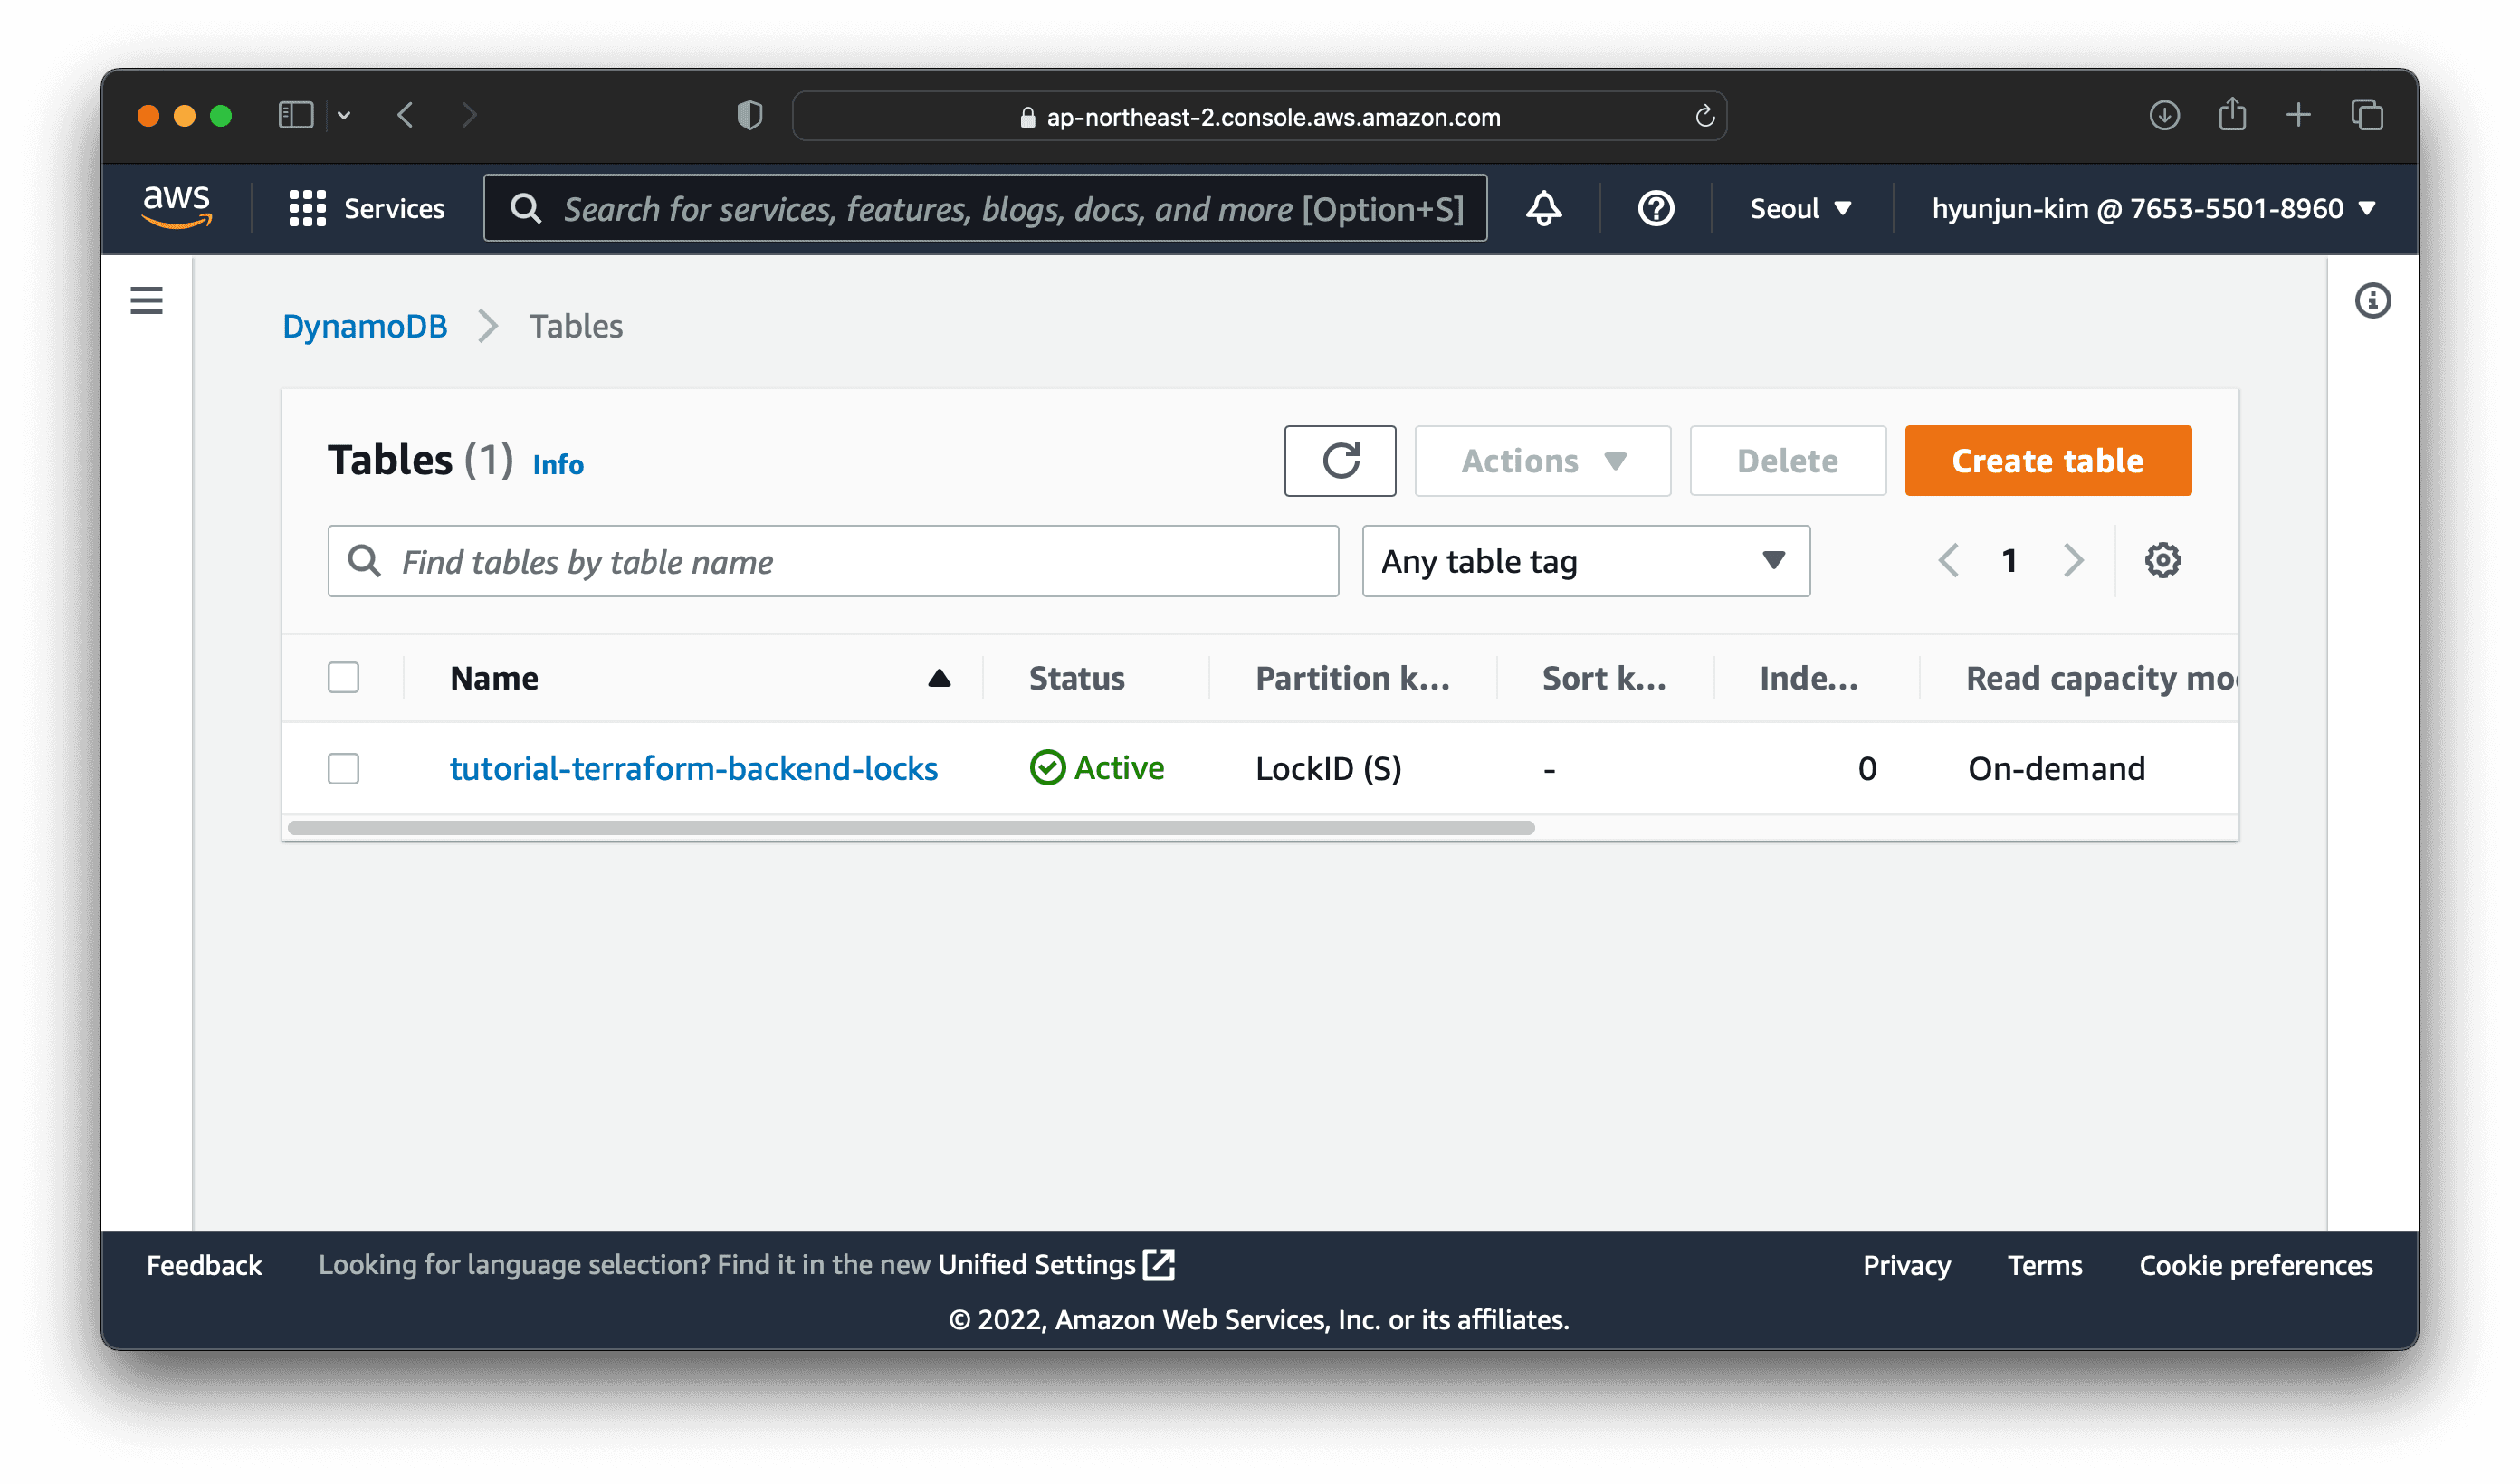
Once you have created the Dynamo DB table, you can check the table in the Dynamo DB console like the image above.
IAM
Create the IAM roles and policies for the central cluster. Change directory to central/iam and update the versions.tf and locals.tf files. This time you also need to provide your AWS account ID.
Once you have updated the files, run the following command:
$ cd ../iam  # Assuming you're in the central/dynamo directory
$ terraform init
$ terraform apply
VPC
Create the VPC for the central cluster. We are using terraform-aws-vpc module. Change directory to central/vpc and update Terraform files as you did before. Then, run the following commands:
$ cd ../vpc  # Assuming you're in the central/iam directory
$ terraform init
$ terraform apply
EKS
Now that we have created the VPC, we can create the central EKS cluster. We are using terraform-aws-eks module. Change directory to central/eks, and again, make sure to update the Terraform files. Then, run the following commands:
$ cd ../eks  # Assuming you're in the central/vpc directory
$ terraform init
$ terraform apply
Once you have created the EKS cluster, you can check the cluster in the EKS console. You should also check if you can connect to the cluster with kubectl. Run the following command:
$ aws eks --region ap-northeast-2 update-kubeconfig --name central
$ kubectl get nodes
NAME                                            STATUS   ROLES    AGE     VERSION
ip-10-99-78-2.ap-northeast-2.compute.internal   Ready    <none>   7m24s   v1.23.9-eks-ba74326
Voila! 🎊 You have successfully created and connected to the central cluster.
Vault Backend
Create another Dynamo DB table to use it as a backend database for Vault. Change directory to central/vault-backend and run the following commands:
$ cd ../vault-resources  # Assuming you're in the central/eks directory
$ terraform init
$ terraform apply
Route 53 Domain Registration
To publish web applications to the internet, we need a Route 53 public-hosted zone. You can skip this step if you already have a domain registered with Route 53. If you don’t have a domain, go to the Route 53 console. Click Register Domain. Enter the domain name you want to use. I used jacobkim.io. You will need to pay for the domain name.
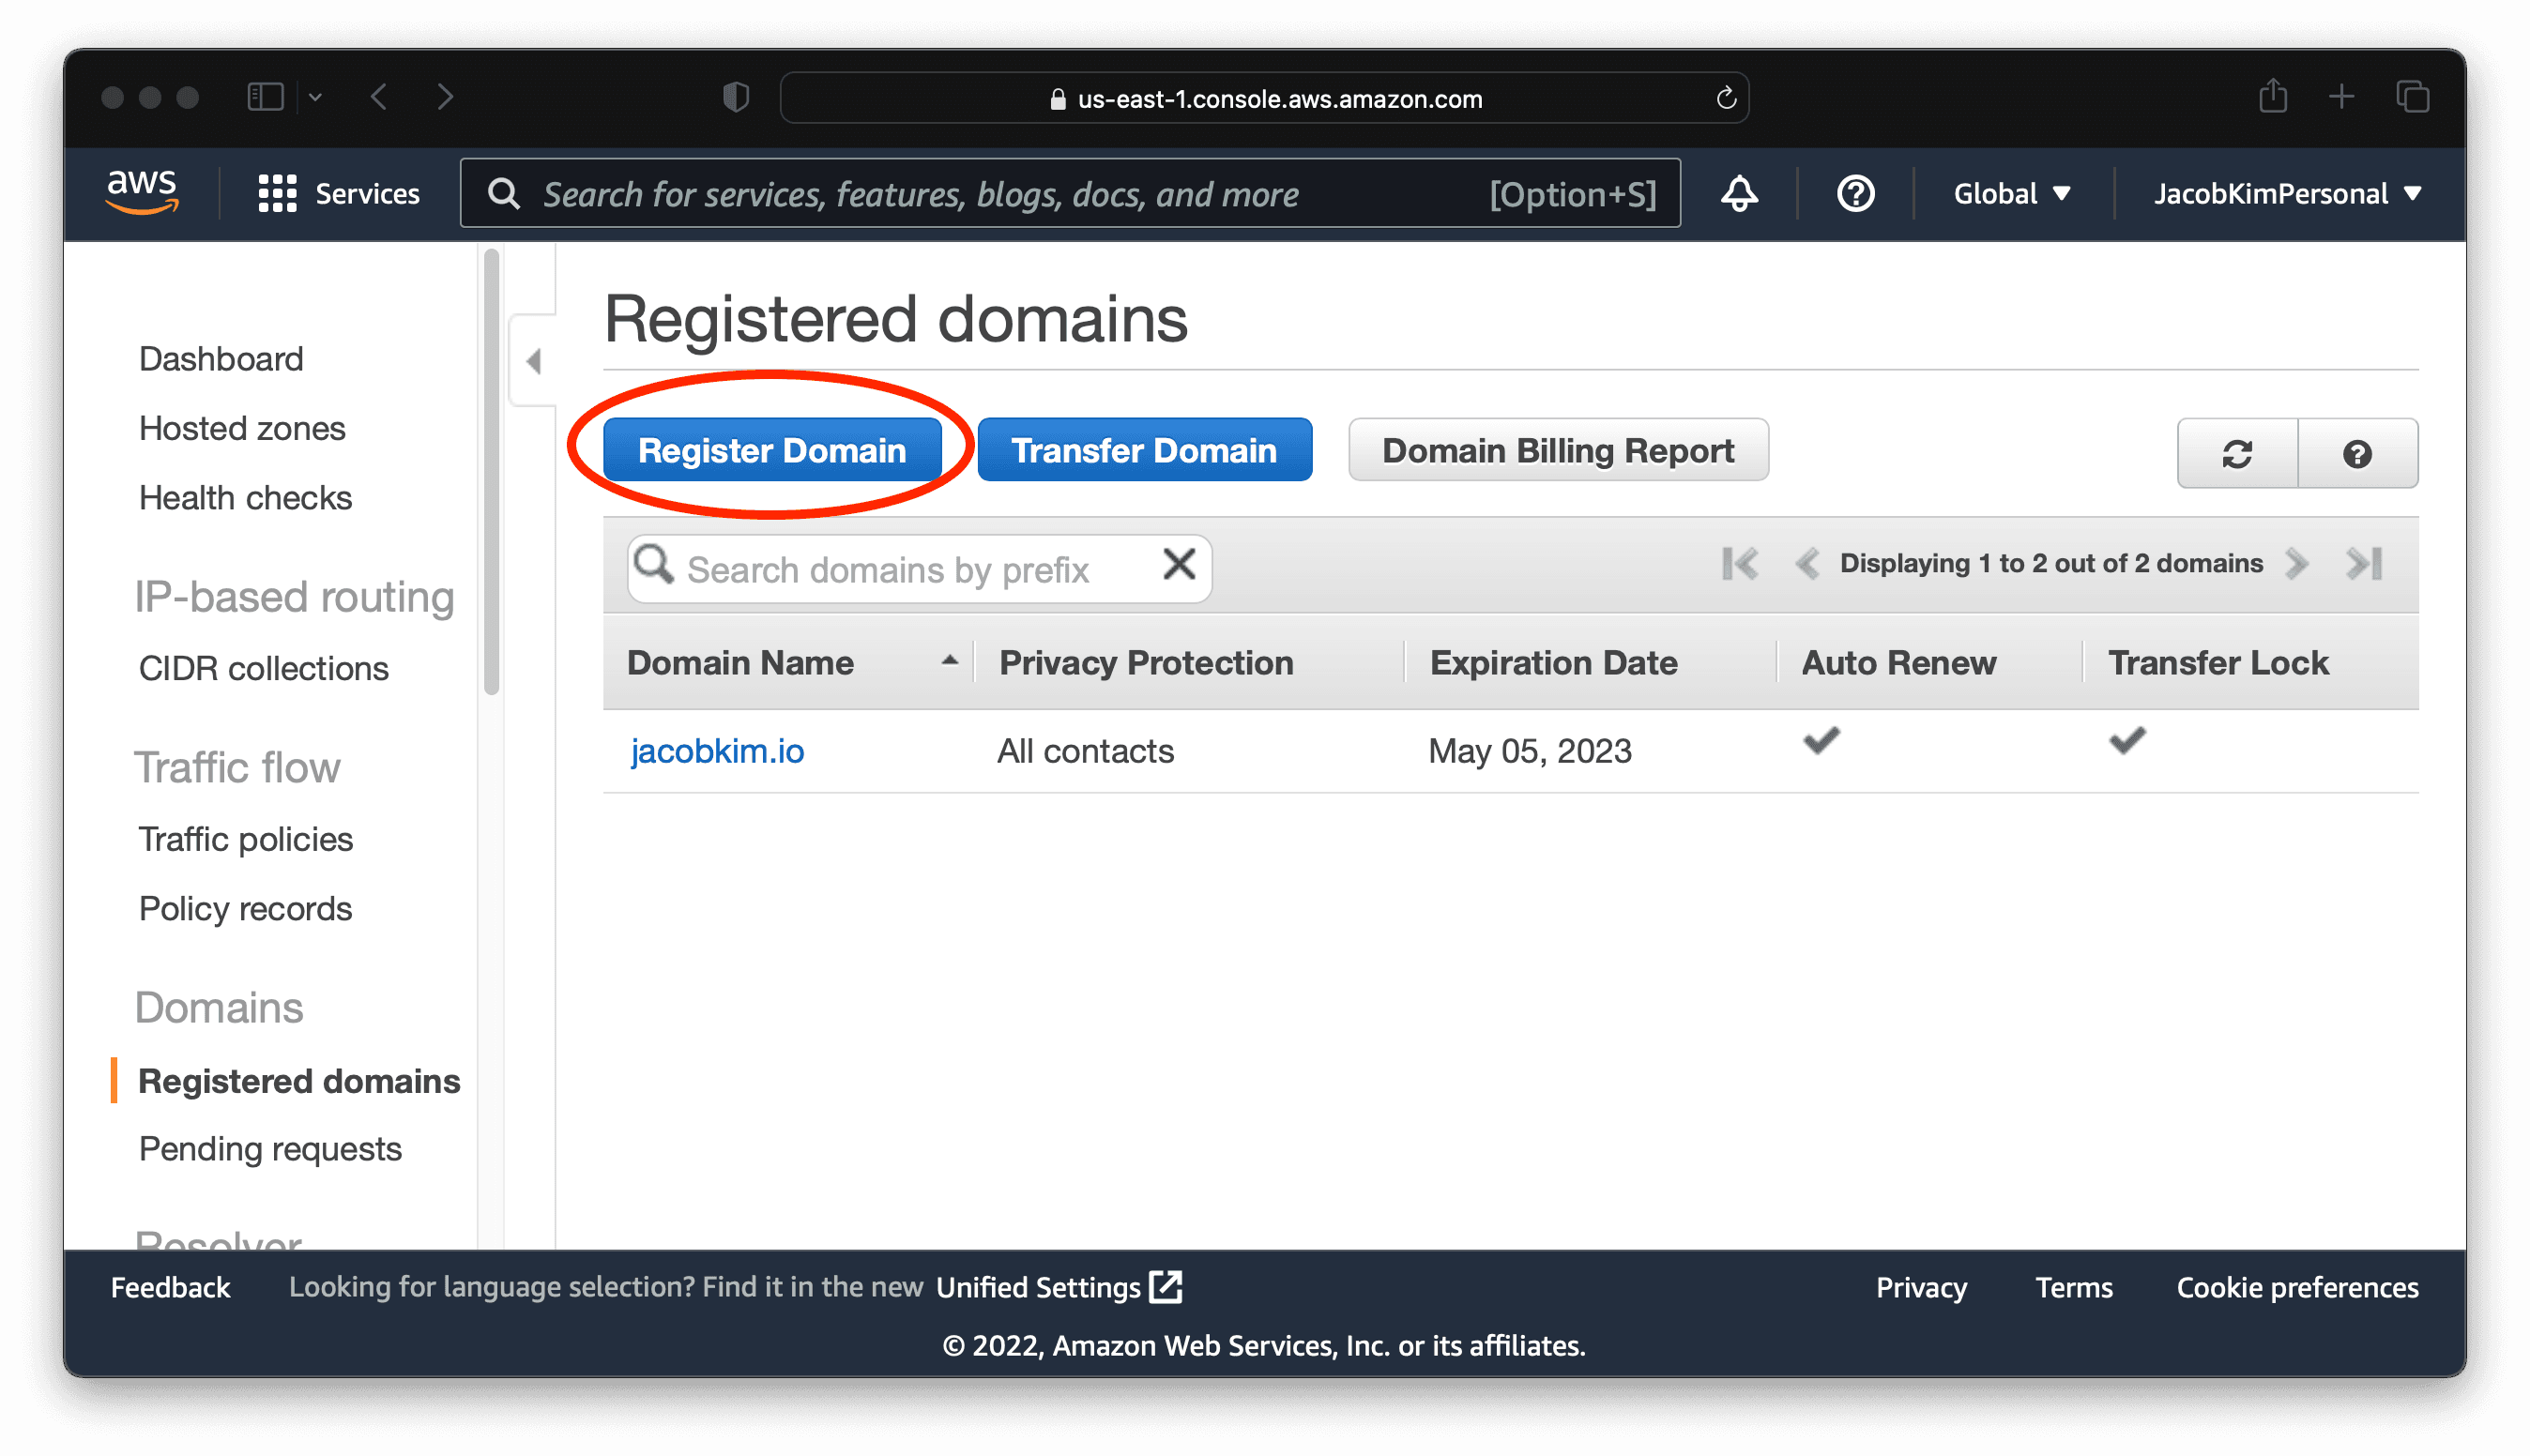
Once you have registered the domain, you will see the domain in the Hosted zones tab. Congratulation 🎉! If this is your first time buying a domain name, you now own your place on the internet.
Certificate
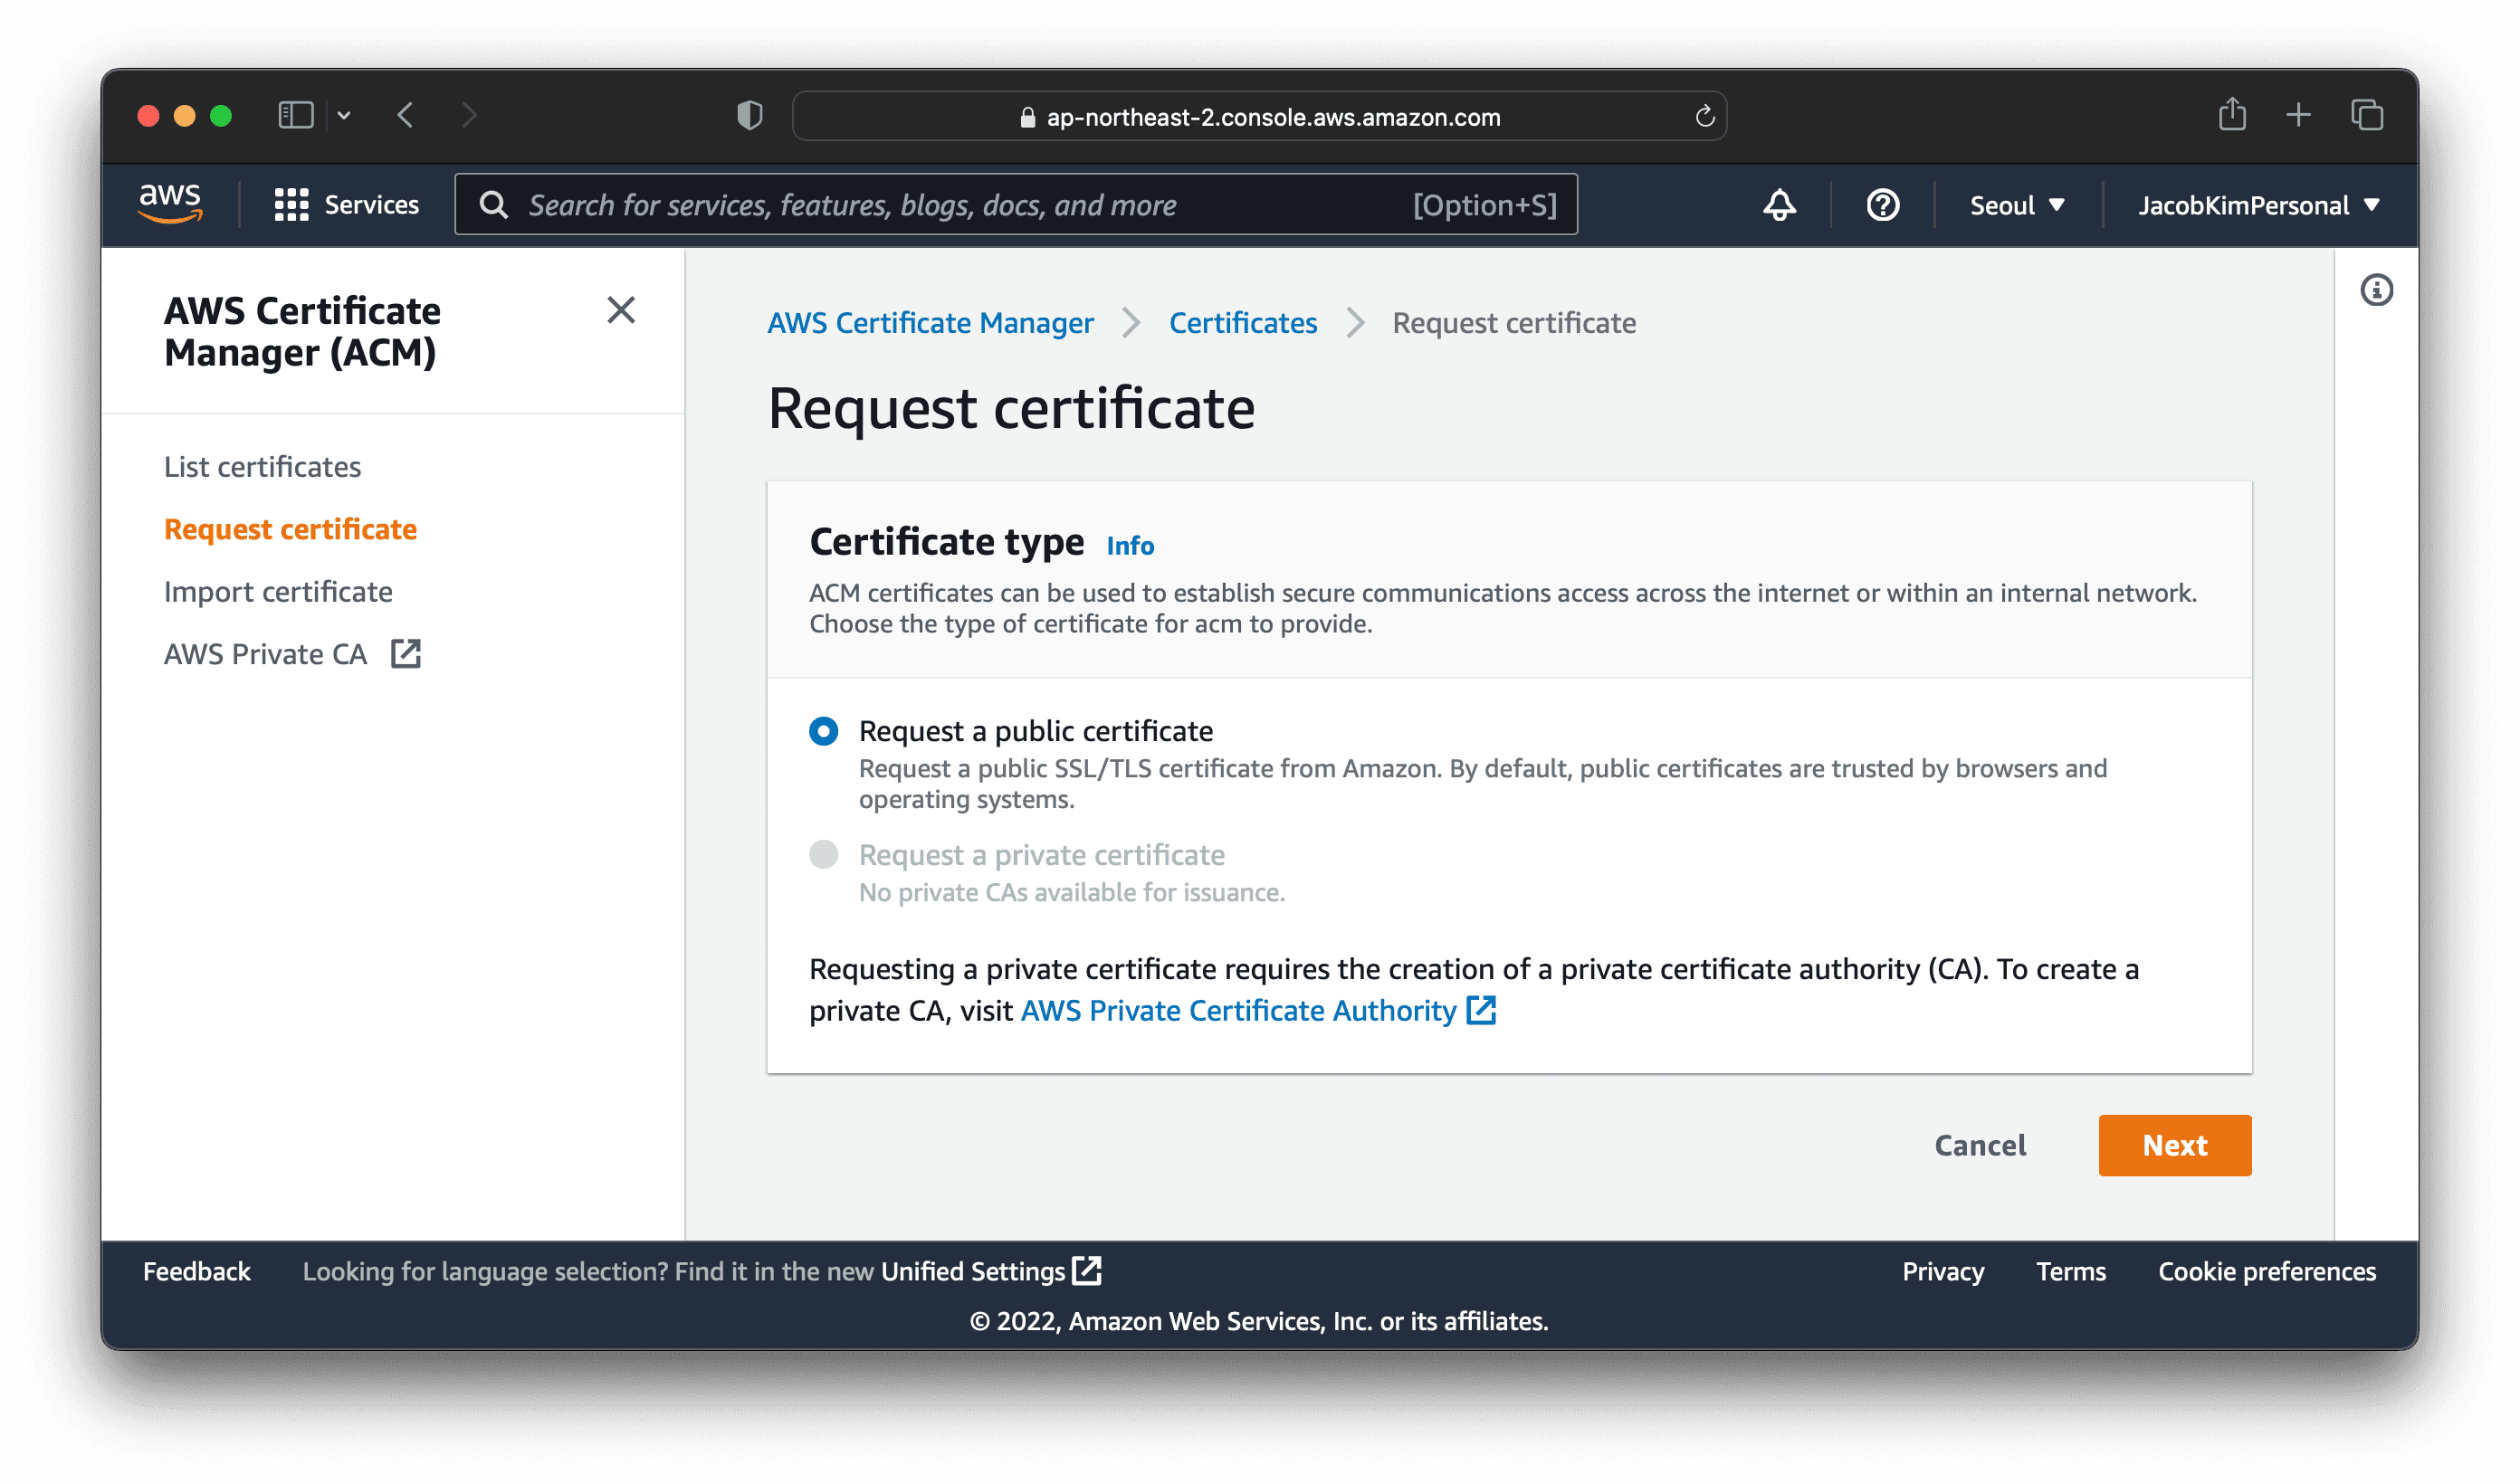
We will use the AWS Certificate Manager to create a certificate for our domain. Go to the AWS Certificate Manager console. Click Request certificate, and choose Request a public certificate.
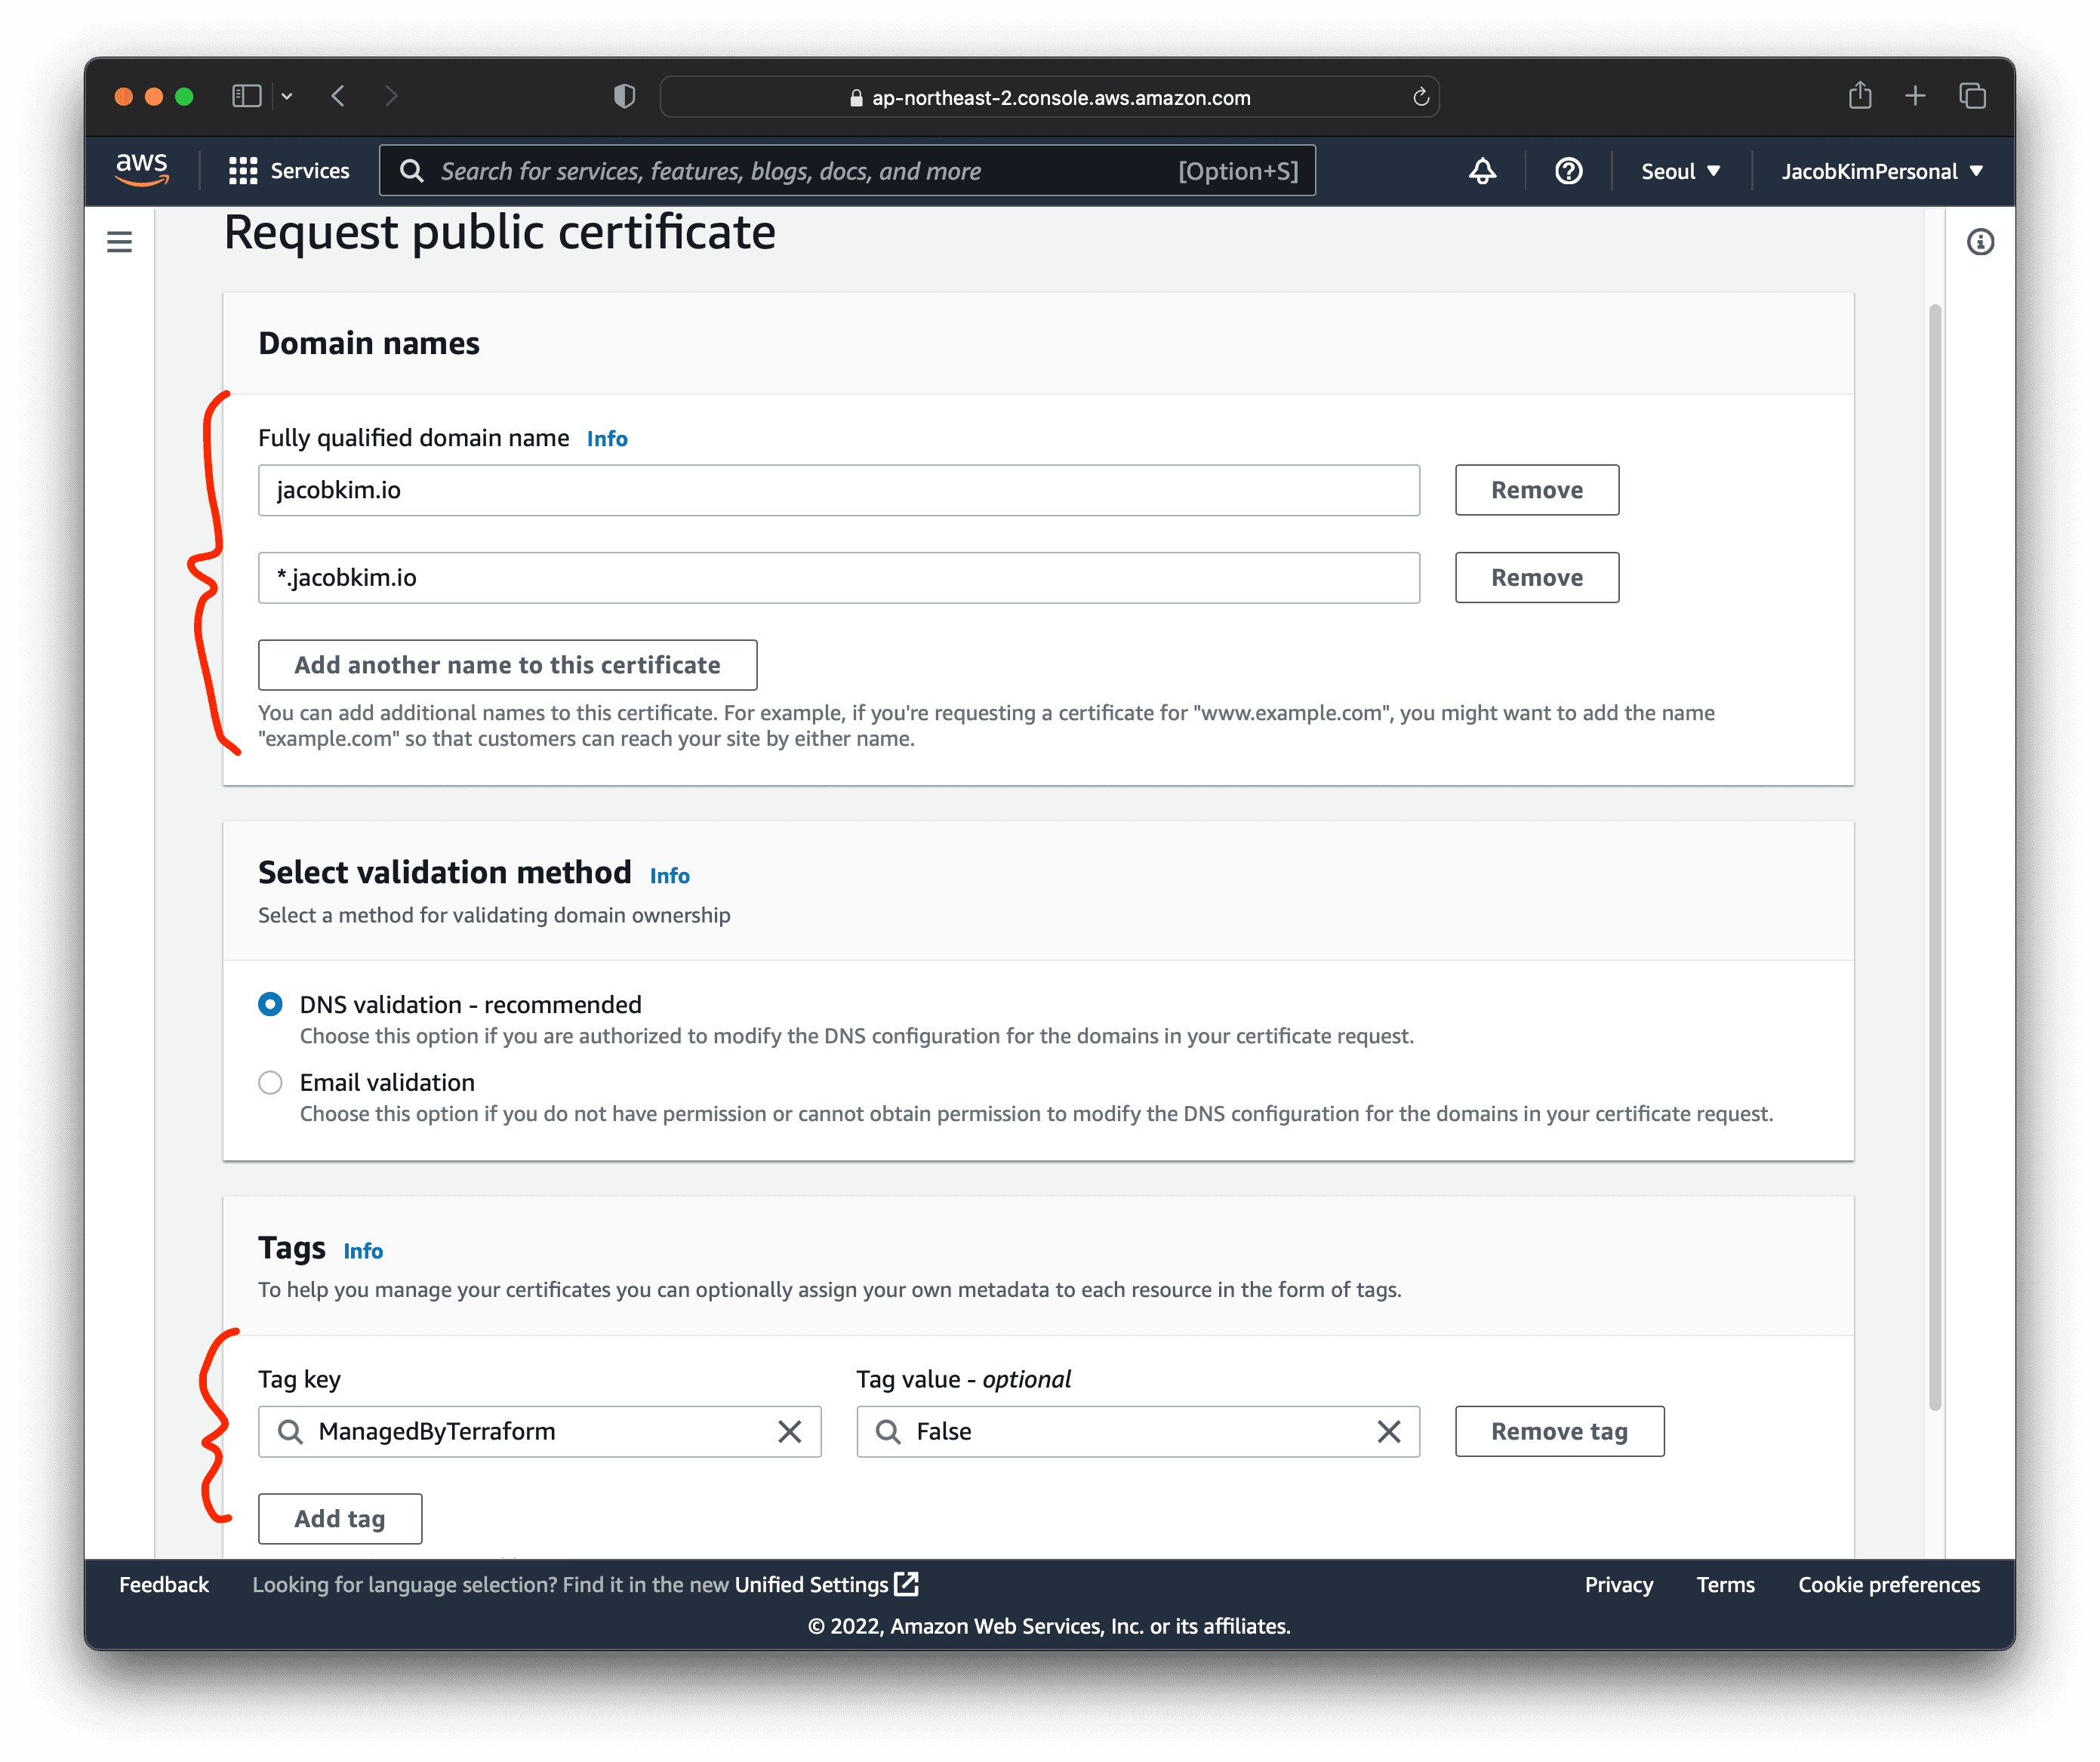
Enter the domain name you want to use. Make sure to add both *.example.com and example.com. I used *.jacobkim.io and jacobkim.io.
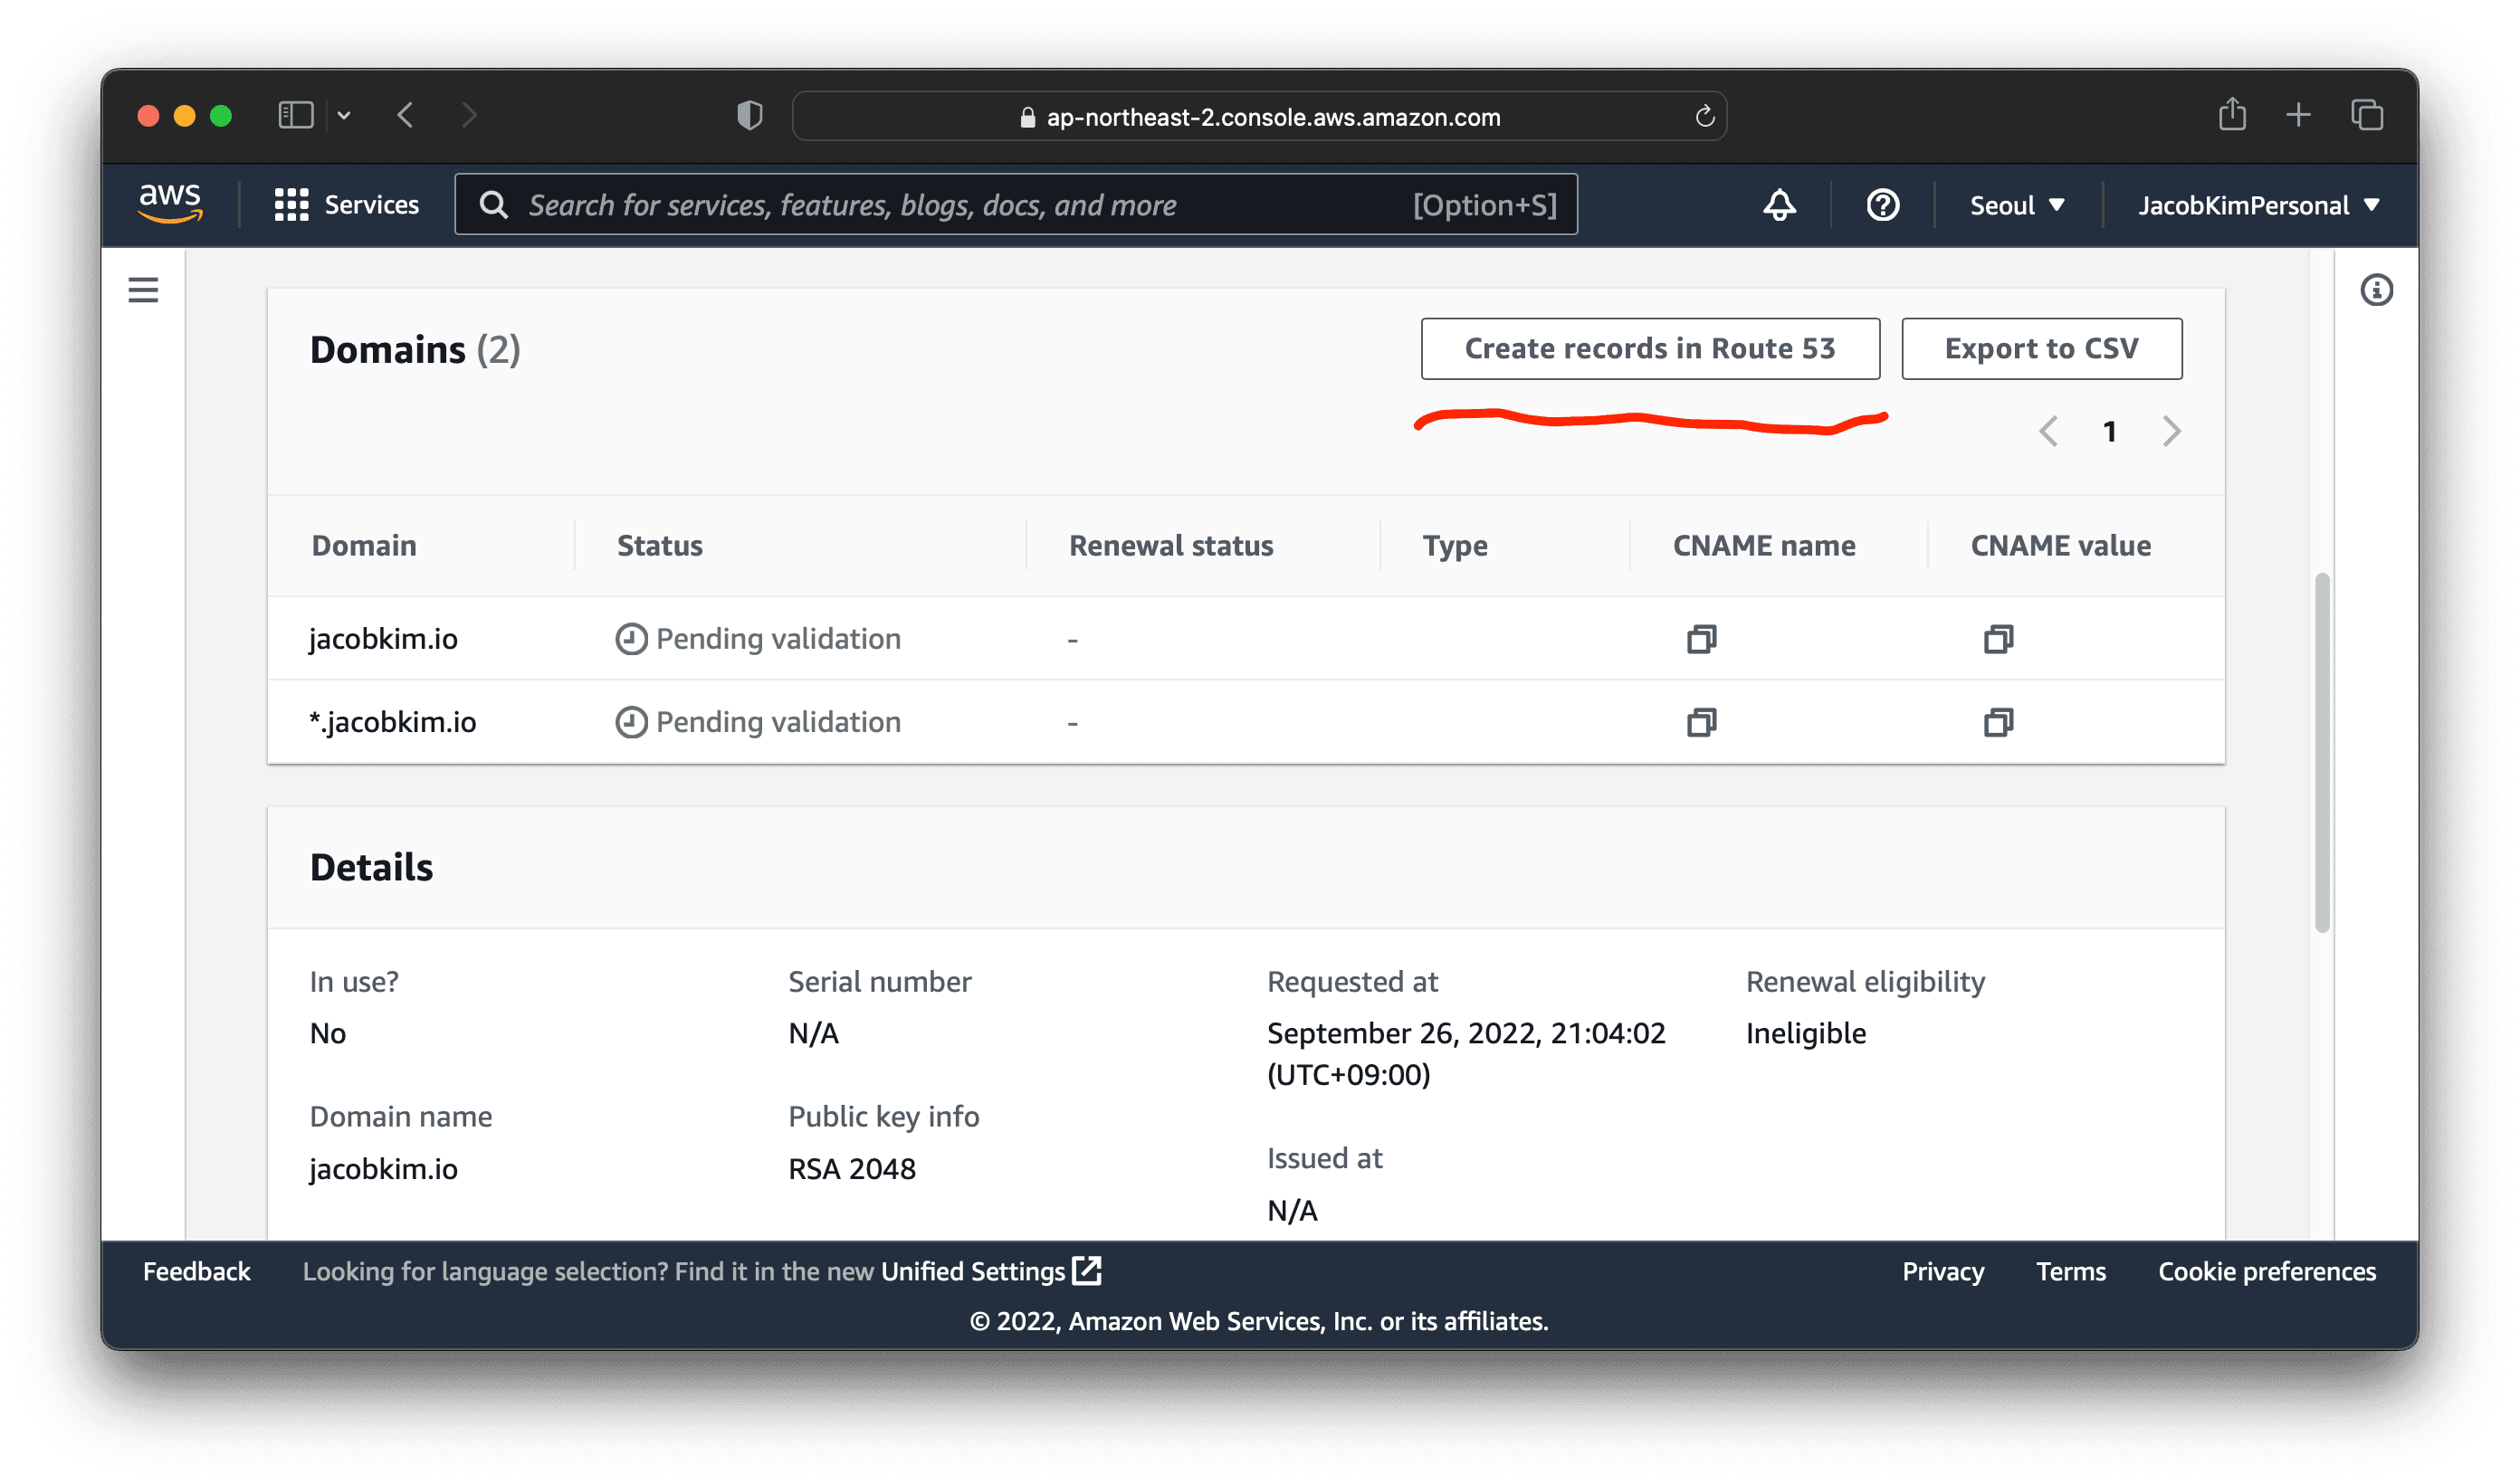
Since we used Route 53 to register the domain, we can easily use DNS validation. Click Create records in Route 53. This will create the necessary DNS records for the certificate validation.
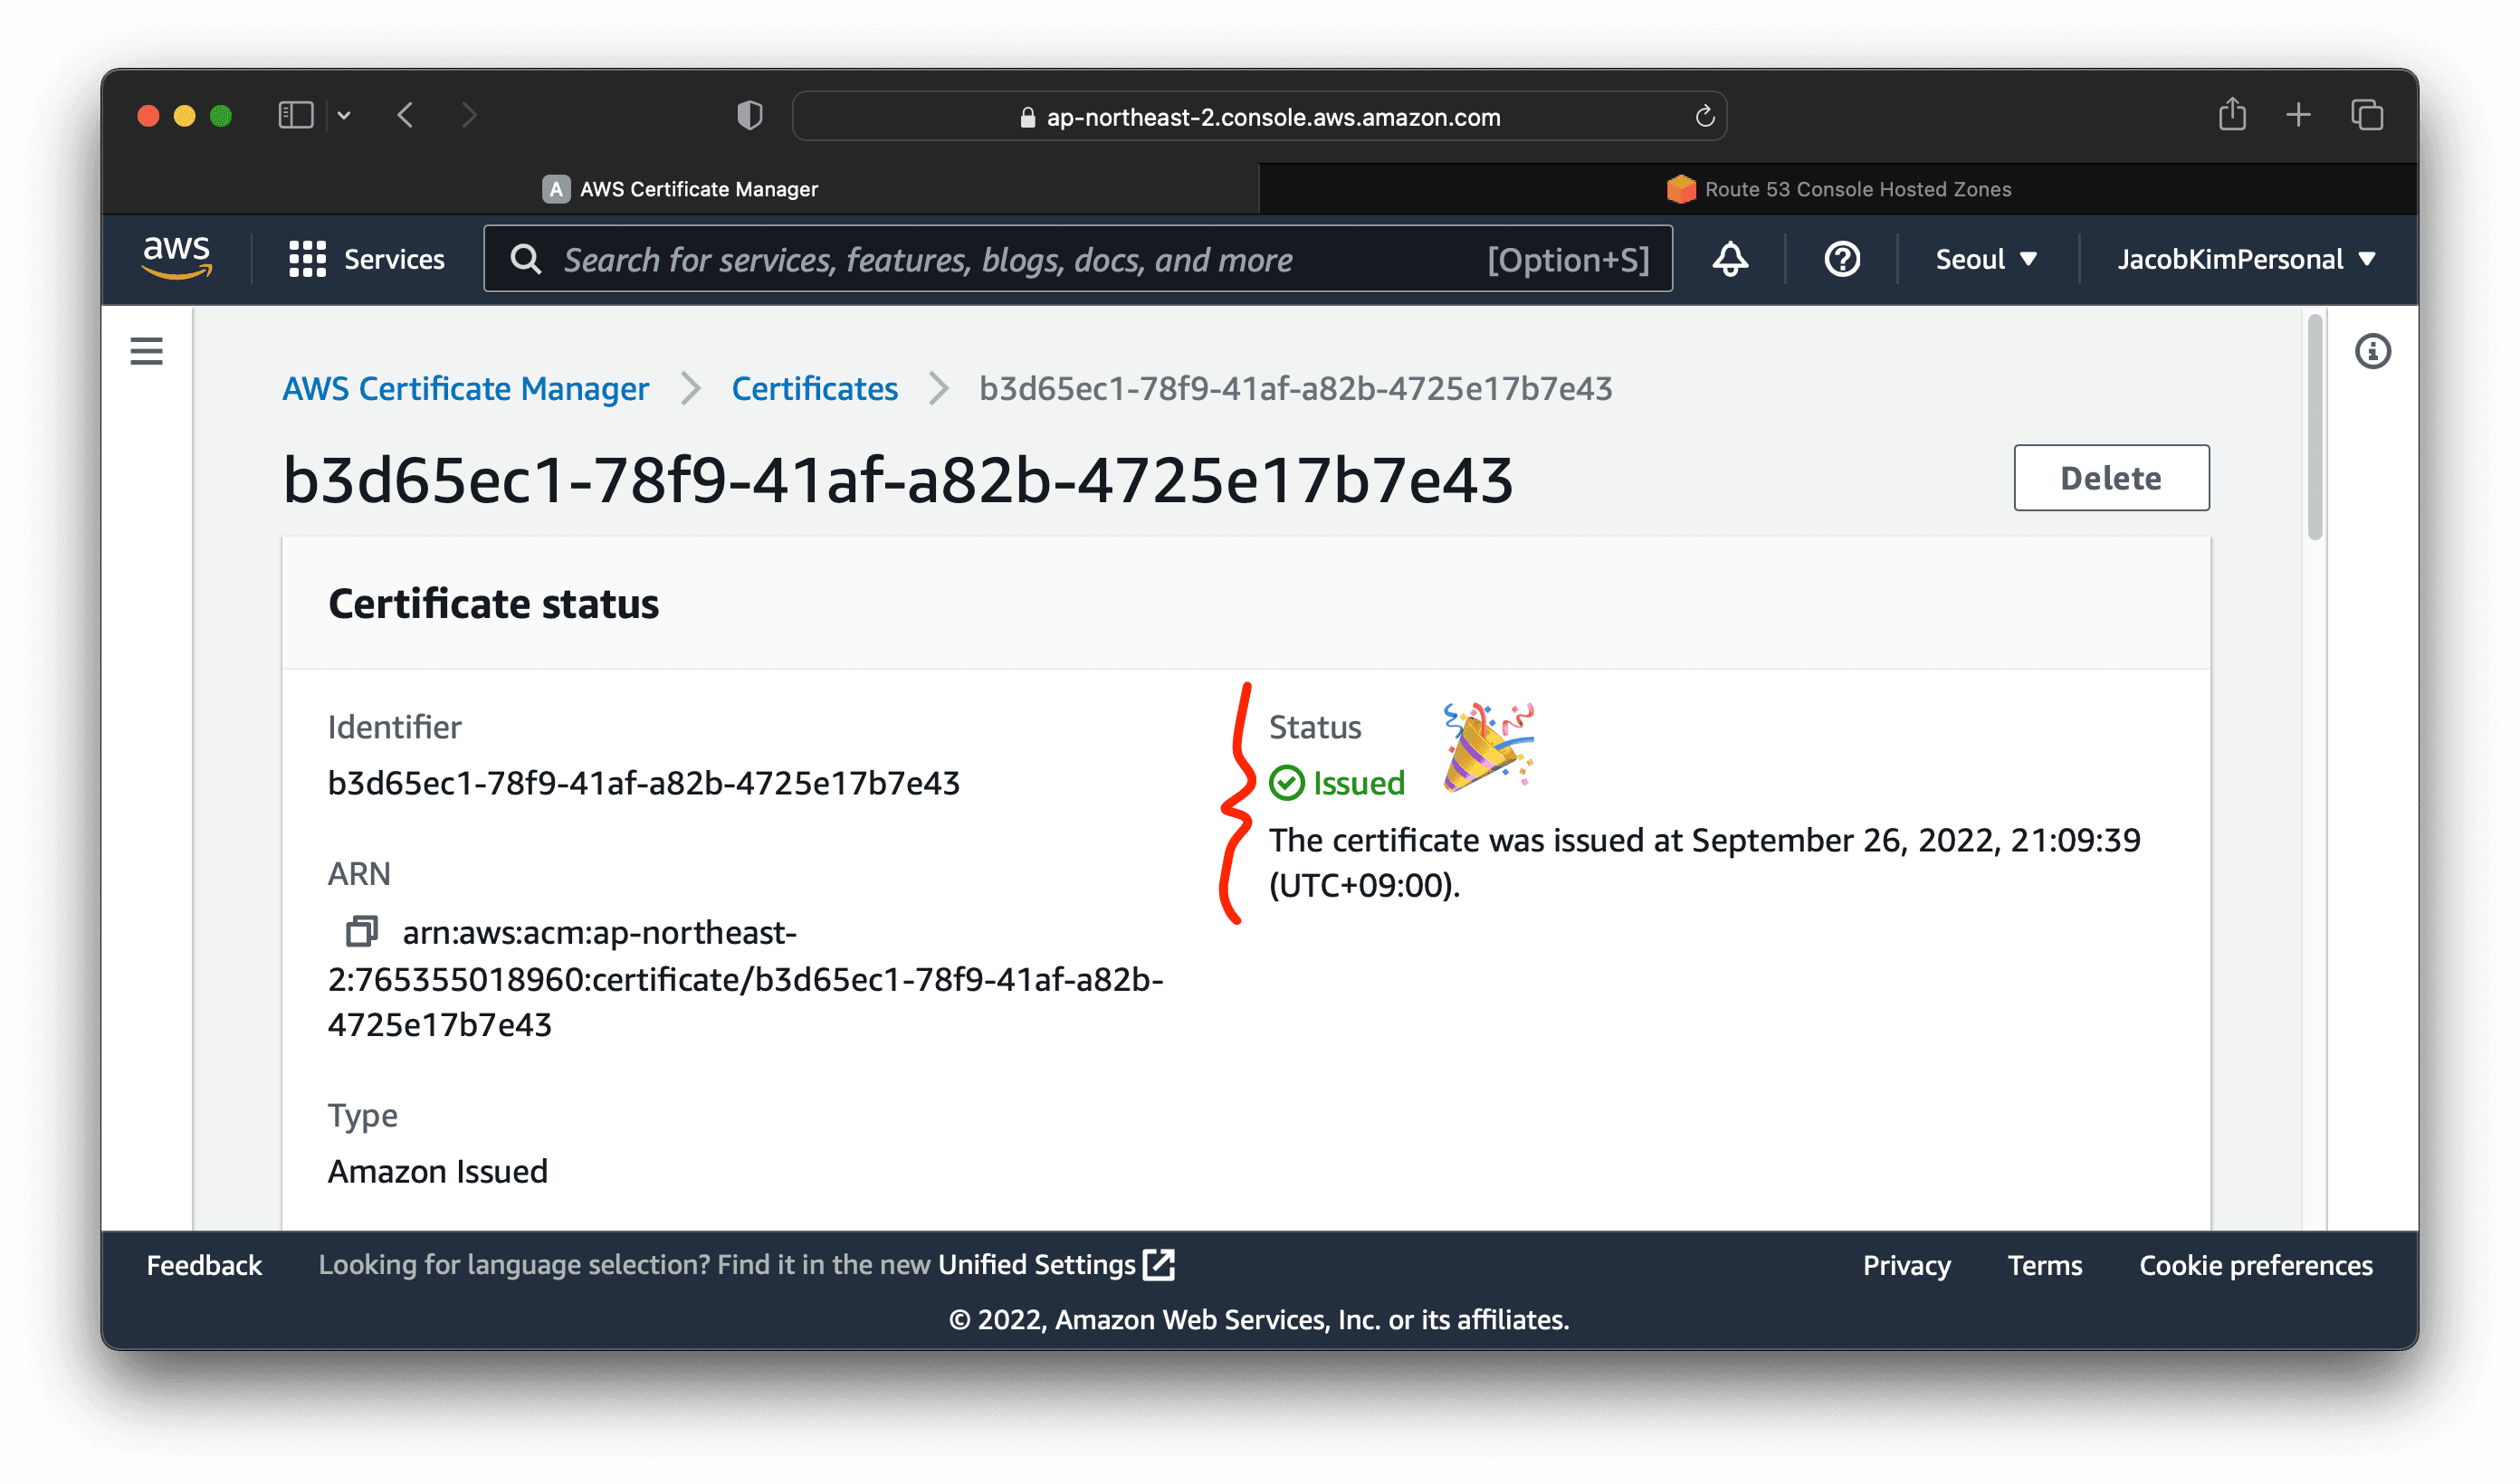
After a few minutes, you will see the certificate successfully issued. Now you are ready to deploy your web application to the internet.
Vault Auth
Vault Auth is Vault specification for Vault policies and users. We can set up Vault Auth once a Vault instance is up and running. We will come back to this step later in section 2.
Other Declarative Multi-region EKS Series :
- Manage multi-region EKS the Declarative Way - Part 0: Introduction
- Manage multi-region EKS the Declarative Way - Part 2: Central Helm
- Manage multi-region EKS the Declarative Way - Part 3: Dev & Prod Clusters
- Manage multi-region EKS the Declarative Way - Part 4: CI/CD