Now that we have a central infrastructure, we can start deploying Kubernetes applications to our central cluster.
All the code for this article can be found on jacobhjkim/declarative-eks-tutorial.
Table of Contents
- Central Cluster Helm Chart
- Helm Chart Installation Prerequisite
- Central Helm Chart Installation
- Well Done!
move to section central-cluster-helm-chart Central Cluster Helm Chart
Now that we have our central cluster up and running, we can deploy the Helm chart for the central cluster. Currently, our central cluster only runs a few applications like CoreDNS and VPC CNI plugin, which are added as EKS addons. Now we will deploy the rest of the applications like Vault, AWS ALB Ingress Controller, External DNS, etc.
move to section helm-chart-installation-prerequisite Helm Chart Installation Prerequisite
Before deploying Helm charts to the central cluster, change directory to kubernetes. Run the following commands to double-check that you have the correct AWS credentials and kubectl context:
$ kubectl get pods -A
NAMESPACE     NAME                      READY   STATUS    RESTARTS   AGE
kube-system   aws-node-2mpvf            1/1     Running   0          17h
kube-system   coredns-d596d9655-v7n2g   1/1     Running   0          17h
kube-system   coredns-d596d9655-wpm7m   1/1     Running   0          17h
kube-system   kube-proxy-cwfrd          1/1     Running   0          17h

$ kubectl get current-context
arn:aws:eks:ap-northeast-2:765355018960:cluster/central
Inside the kubernetes directory, you will find charts directory. This directory contains the Helm charts we are going to deploy to our clusters. Most charts are going to be deployed via Argo CD. However, there are a few charts that we need to deploy manually. Those charts are the bear necessities for running Argo CD. Once we have Argo CD up and running, we will be able to deploy the rest of the applications using Argo CD. Until then, we will use the Helm CLI to deploy charts.
Helm Repo Add
Remember that Helm’s other superpower is being able to use charts developed by the open-source community? To install Helm charts from remote repositories, you first need to add them. Run the following commands:
$ helm repo add external-dns https://kubernetes-sigs.github.io/external-dns/
$ helm repo add eks https://aws.github.io/eks-charts
$ helm repo add karpenter https://charts.karpenter.sh/
$ helm repo add argo https://argoproj.github.io/argo-helm
$ helm repo add hashicorp https://helm.releases.hashicorp.com
$ helm repo add external-secrets https://charts.external-secrets.io
move to section central-helm-chart-installation Central Helm Chart Installation
We can start installing the Helm charts to the central cluster.
External DNS
Now we are ready to deploy some applications to Kubernetes clusters. Let’s start with installing External DNS. External DNS configures DNS records for Kubernetes Ingresses and Services. Before installing External DNS, update the values.yaml file in the charts/external-dns directory.
1external-dns:
2  serviceAccount:
3    annotations:
4        eks.amazonaws.com/role-arn: arn:aws:iam::[YOUR_AWS_ACCOUNT_ID]:role/central-external-dns
5  policy: upsert-only
6  txtOwnerId: central
7  extraArgs:
8    - --aws-zone-type=public
Once you have updated the values.yaml file, run the following command to install External DNS:
$ cd kubernetes  # Assuming you're in the top directory.
$ helm dependency update charts/external-dns
$ helm install external-dns charts/external-dns -f charts/external-dns/values-central.yaml --namespace kube-system
NAME: external-dns
NAMESPACE: kube-system
STATUS: deployed
REVISION: 1
TEST SUITE: None
We just deployed our first application to a Kubernetes cluster! 👏
AWS ALB Ingress Controller
Next, we will deploy the AWS ALB Ingress Controller. Again, update the values.yaml file in the charts/aws-load-balancer-controller directory.
1aws-load-balancer-controller:
2  serviceAccount:
3    name: aws-load-balancer-controller
4    annotations:
5      eks.amazonaws.com/role-arn: "arn:aws:iam::[YOUR_AWS_ACCOUNT_ID]:role/central-load-balancer-controller"
6  clusterName: central
Once you have updated the values.yaml file, run the following command to install the AWS ALB Ingress Controller:
$ helm install aws-load-balancer-controller charts/aws-load-balancer-controller -f charts/aws-load-balancer-controller/values-central.yaml --namespace kube-system
NAME: aws-load-balancer-controller
NAMESPACE: kube-system
STATUS: deployed
REVISION: 1
TEST SUITE: None
Echo Server
The echo server isn’t a core application, but it serves as a test application for our cluster. It is a simple HTTP server that returns the request headers and body as a JSON response. We will use this application to check if our external-dns and alb-ingress-controller are working properly.
Update the charts/echo-server/values-central.yaml file. We need to specify the domain name we want to use for the application. We will use the domain name that you registered earlier. Additionally, we need to specify the certificate ARN that we created earlier. You can get the certificate ARN from the AWS Certificate Manager console.
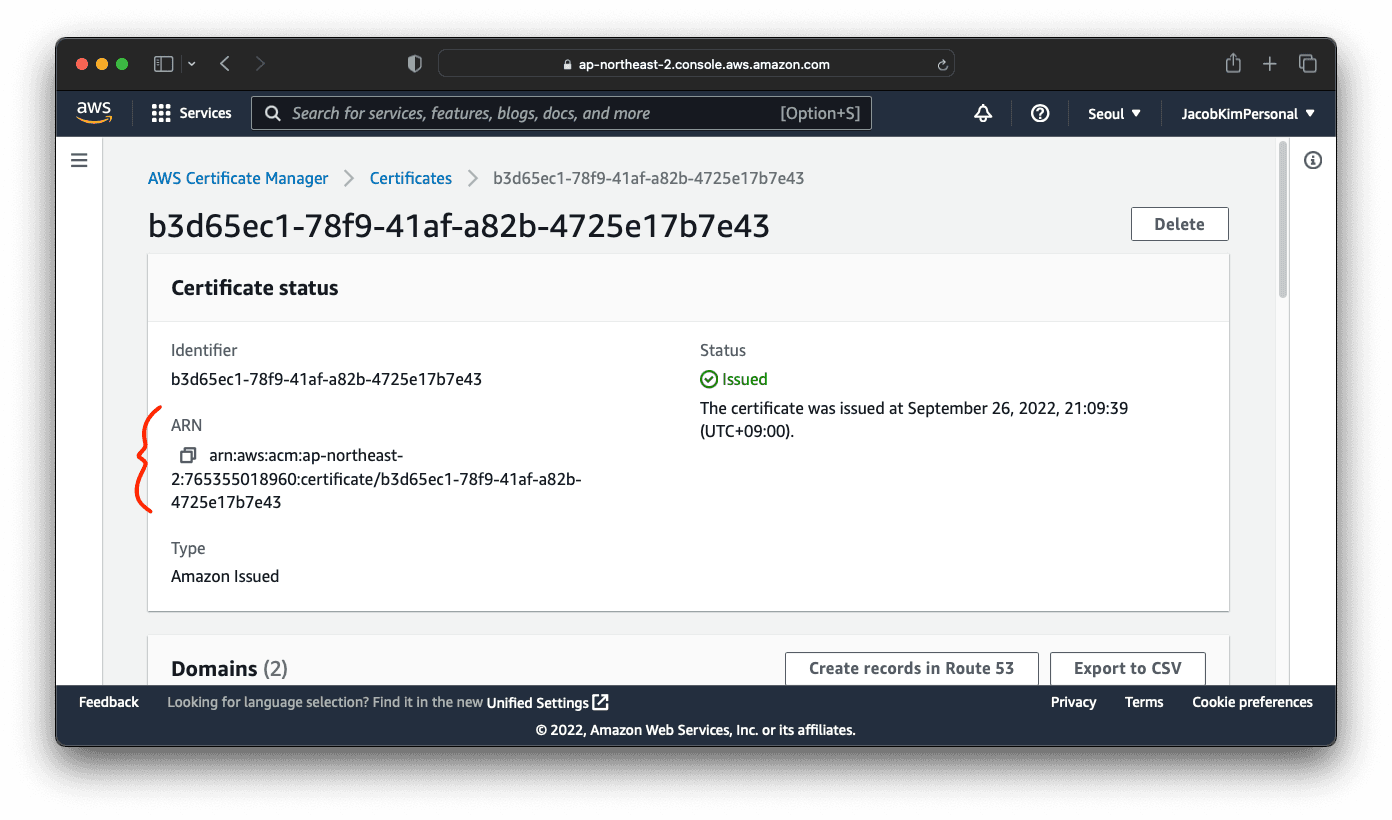
1certificateArn: [YOUR_CERTIFICATE_ARN]
2domainName: [YOUR_DOMAIN_NAME]  # I used jacobkim.io for this tutorial
3clusterName: central
Install the echo server.
$ helm install echo-server charts/echo-server -f charts/echo-server/values-central.yaml --namespace default
NAME: echo-server
NAMESPACE: default
STATUS: deployed
REVISION: 1
TEST SUITE: None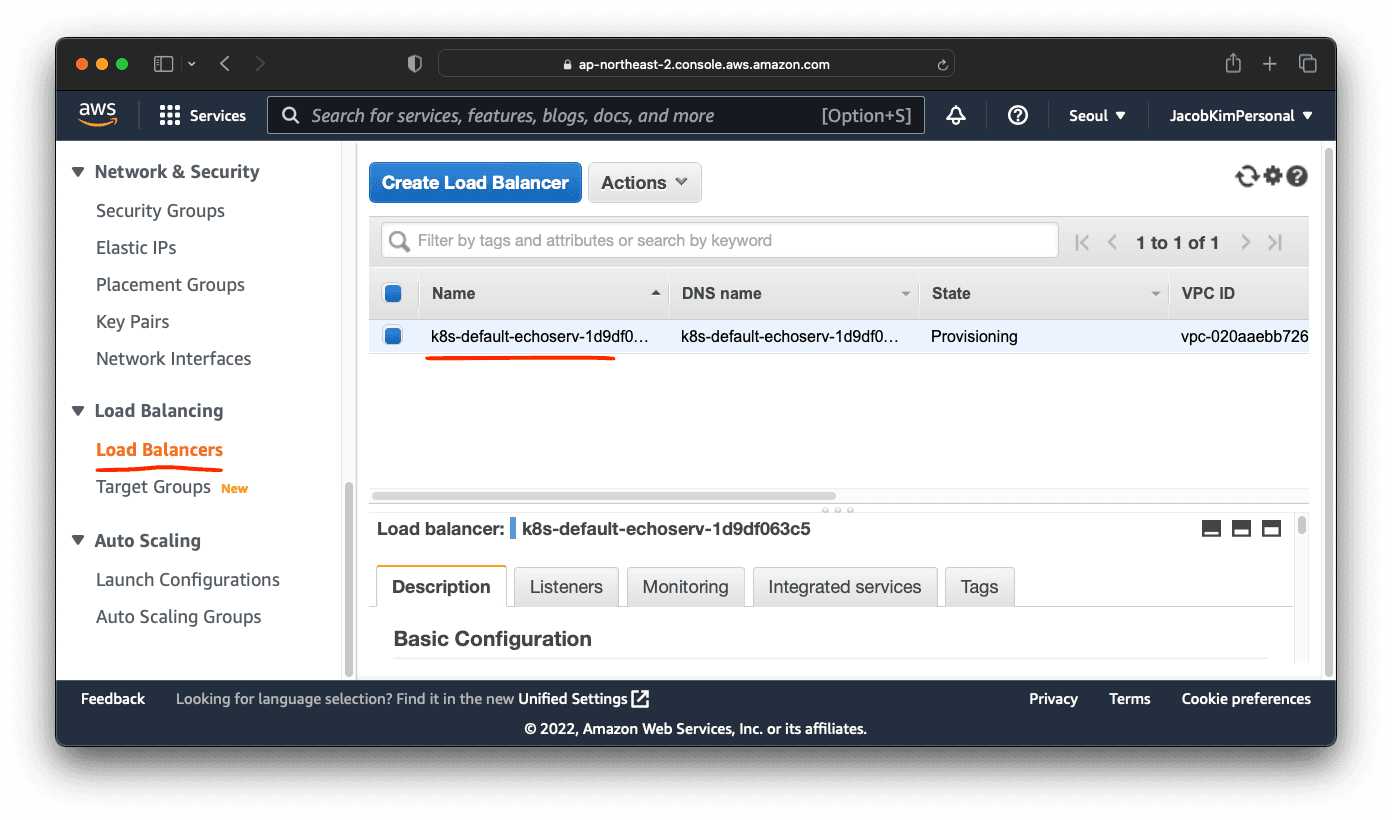
If your aws-load-balancer-controller is installed properly, you should be able to see a loadbalancer provisioned for our echo-server.
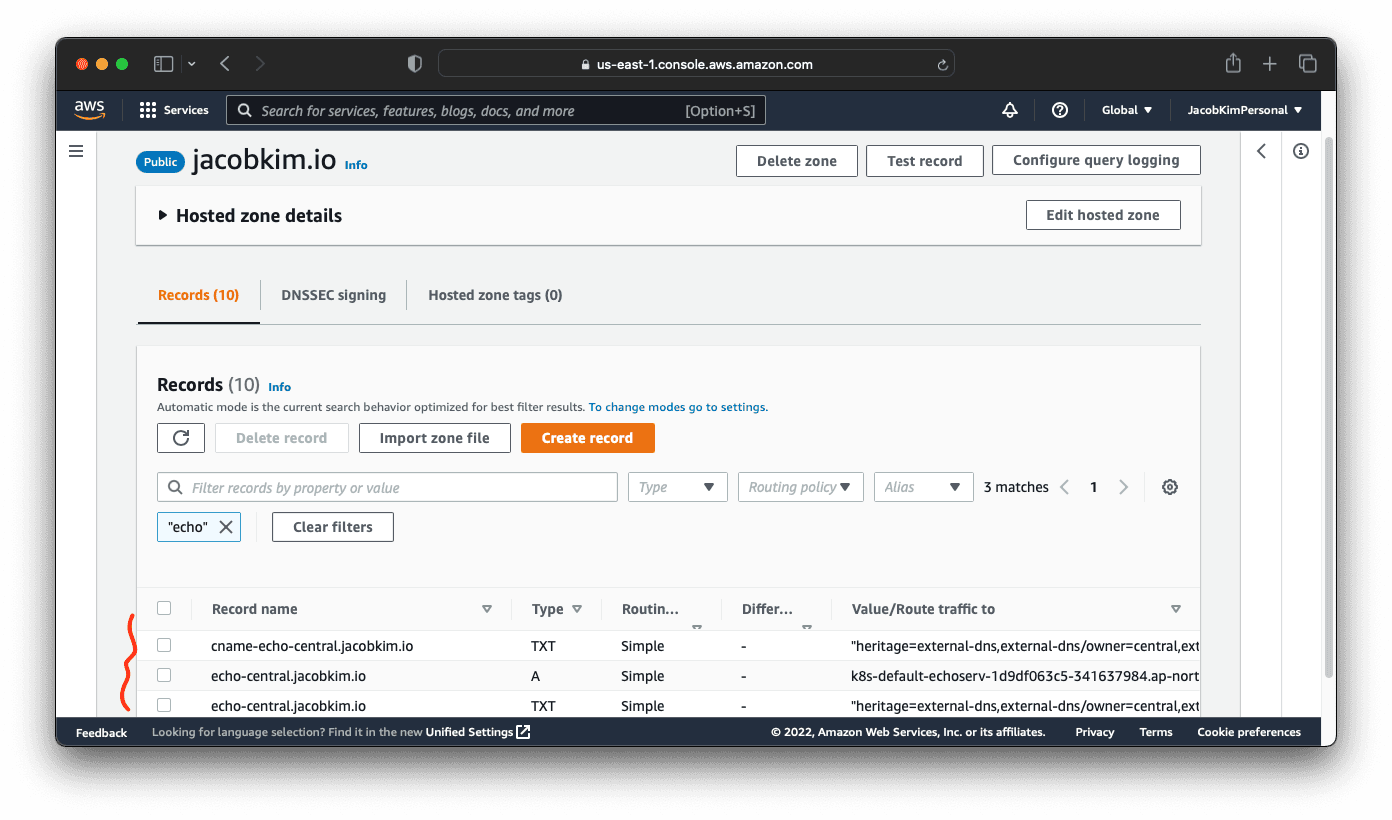
You can also check if the DNS record is created properly by checking the Route53 console. If it isn’t created, check the logs of the external-dns.
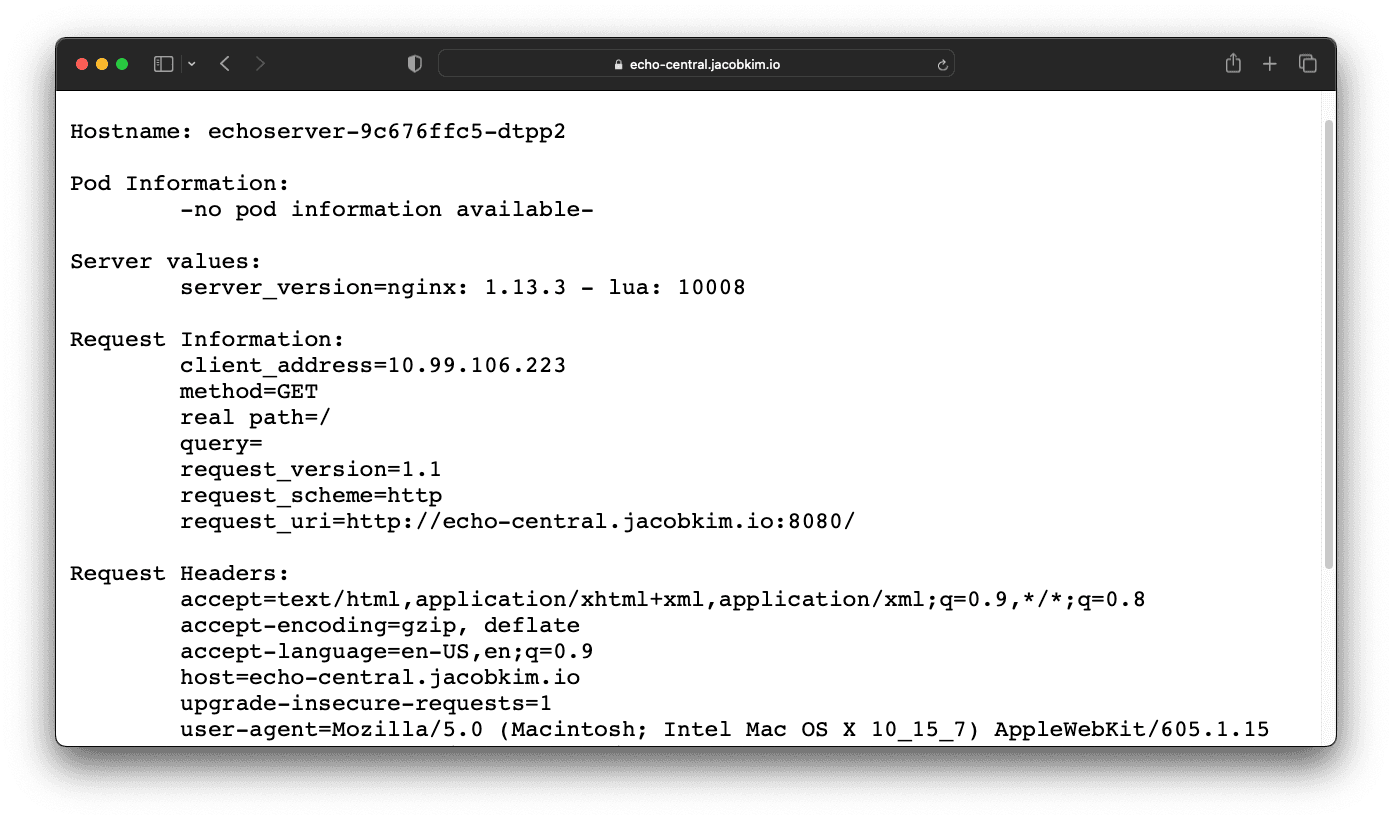
Visit the URL of your echo server. Its URL should be echo-central.[YOUR_DOMAIN_NAME]. You should see a JSON response.
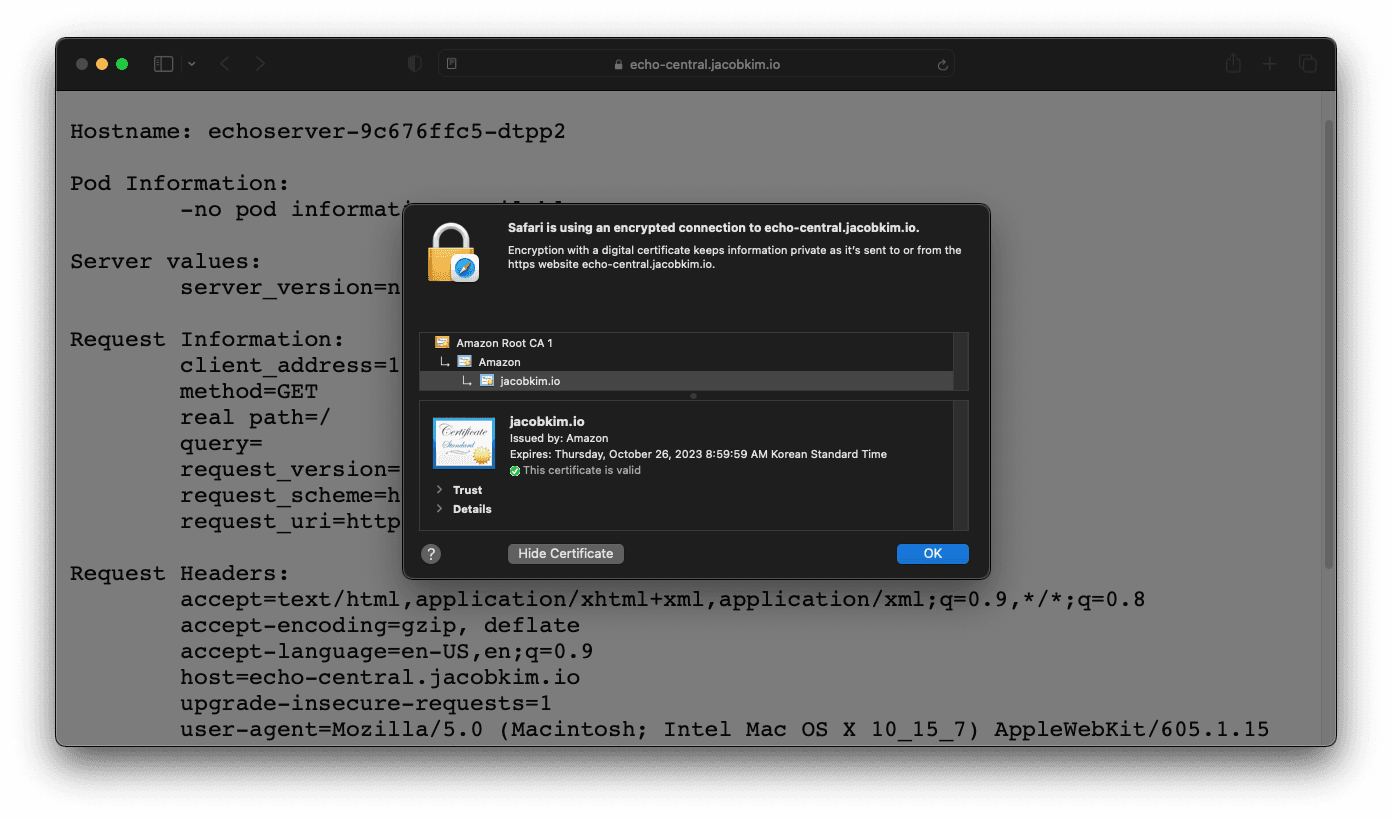
If you click the certificate information in the browser, you should see a valid certificate issued by Amazon.
Karpenter
Let’s install Karpenter, which we discussed earlier. To install Karpenter, we first need to get the central cluster’s endpoint. You can get the endpoint by running the following command:
$ aws eks describe-cluster --name central --region ap-northeast-2 --query 'cluster.endpoint'Now update the charts/karpenter/values-central.yaml file with the endpoint.
1clusterName: central
2
3karpenter:
4  serviceAccount:
5    annotations:
6      eks.amazonaws.com/role-arn: arn:aws:iam::[YOUR_AWS_ACCOUNT_ID]:role/central-karpenter-controller
7  clusterName: central
8  clusterEndpoint: https://1AB9994614C7BC2A072A9C85EA33B1E8.gr7.ap-northeast-2.eks.amazonaws.com
9  aws:
10    defaultInstanceProfile: KarpenterNodeInstanceProfile-central
Now we can install Karpenter.
$ helm install karpenter charts/karpenter -f charts/karpenter/values-central.yaml --namespace kube-system
NAME: karpenter
NAMESPACE: kube-system
STATUS: deployed
REVISION: 1
TEST SUITE: None
Missing Service Linked Role
aws iam create-service-linked-role --aws-service-name spot.amazonaws.comAWS EBS CSI Driver
For newly created version 1.23 and later clusters, we recommend installing the Amazon EBS CSI driver as part of your cluster creation process. We also recommend only using StorageClasses based on the ebs.csi.aws.com provisioner.
Starting from EKS 1.23, we need to install the AWS EBS CSI Driver. It allows you to use Amazon EBS volumes as persistent volumes in Kubernetes. You can install it as an EKS addon; however, it is tricky to set up IRSA if it is added as an add-on. Which is why we will install it manually.
Update the charts/aws-ebs-csi-driver/values-central.yaml file.
1aws-ebs-csi-driver:
2  controller:
3    serviceAccount:
4      annotations:
5        eks.amazonaws.com/role-arn: arn:aws:iam::[YOUR_AWS_ACCOUNT_ID]:role/central-ebs-csi-driver
Install the AWS EBS CSI Driver.
$ helm install aws-ebs-csi-driver charts/aws-ebs-csi-driver -f charts/aws-ebs-csi-driver/values-central.yaml --namespace kube-system
NAME: aws-ebs-csi-driver
NAMESPACE: kube-system
STATUS: deployed
REVISION: 1
TEST SUITE: None
Vault
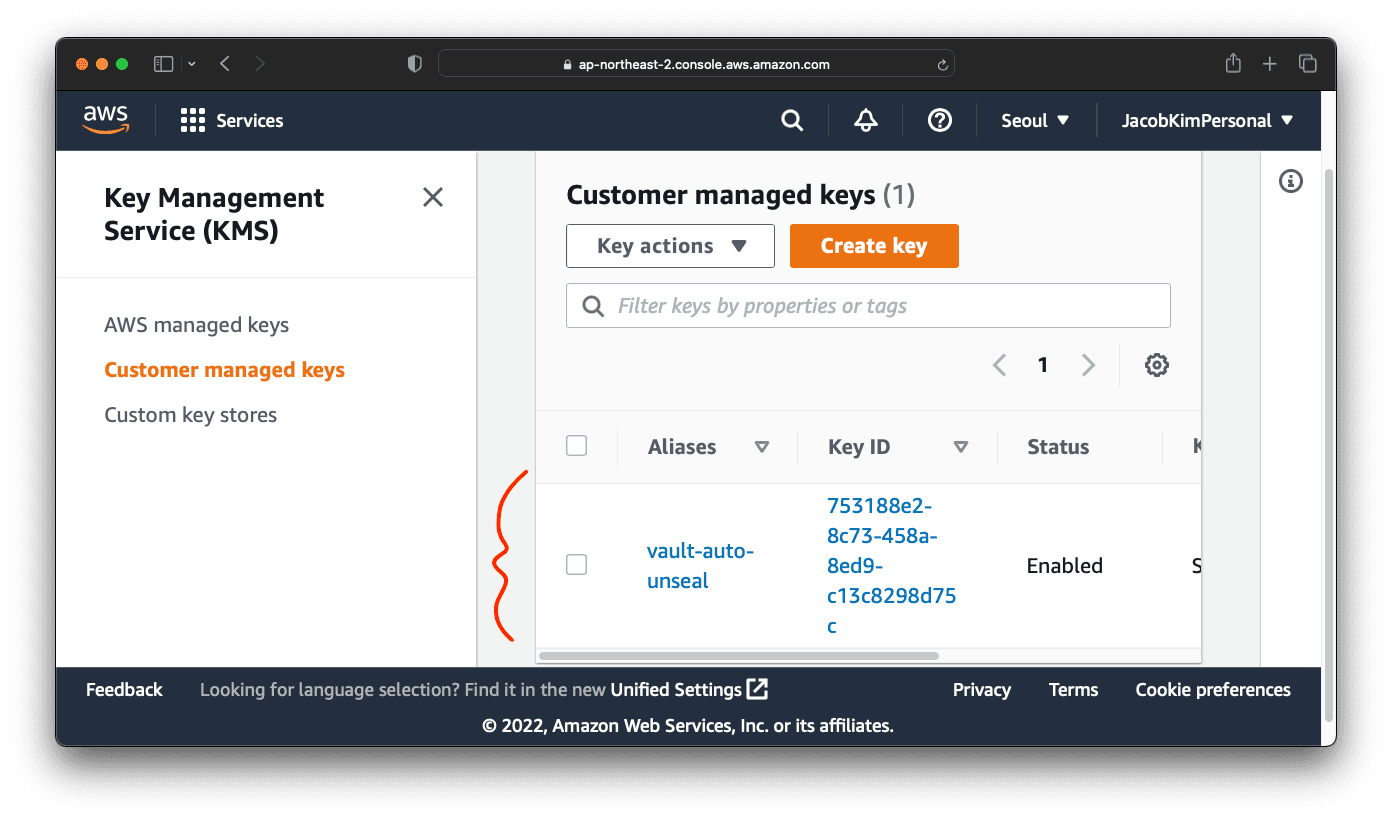
We talked about Vault a lot in this article. It’s finally time to install it. Update the charts/vault/values-central.yaml file. You need to get KMS id from the AWS KMS console like the image below.
1ingress:
2  ingressClassName: alb
3  annotations:
4    alb.ingress.kubernetes.io/scheme: internet-facing
5    alb.ingress.kubernetes.io/certificate-arn: [YOUR_CERTIFICATE_ARN]
6    alb.ingress.kubernetes.io/target-type: ip
7    alb.ingress.kubernetes.io/listen-ports: '[{"HTTP": 80}, {"HTTPS":443}]'
8    alb.ingress.kubernetes.io/ssl-redirect: '443'
9  hosts:
10    - host: vault.[YOUR_DOMAIN_NAME]
11      paths:
12        - path: /
13          pathType: Prefix
14          backend:
15            service:
16              name: vault
17              port:
18                number: 8200
19
20vault:
21  injector:
22    enabled: false
23  server:
24    logLevel: info
25    serviceAccount:
26      annotations:
27        eks.amazonaws.com/role-arn: "arn:aws:iam::[YOUR_AWS_ACCOUNT_ID]:role/central-vault-cluster"
28    ingress:
29      enabled: false
30    ha:
31      enabled: true
32      replicas: 3
33      config: |
34        disable_mlock = true
35        plugin_directory = "/vault/plugins/"
36        ui = true
37
38        listener "tcp" {
39          tls_disable = 1
40          address = "[::]:8200"
41          cluster_address = "[::]:8201"
42          telemetry {
43            unauthenticated_metrics_access = "true"
44          }
45        }
46        seal "awskms" {
47          region = "[YOUR_AWS_REGION]"
48          kms_key_id = "[YOUR_KMS_KEY_ID]"
49        }
50        storage "dynamodb" {
51          ha_enabled = "true"
52          region     = "[YOUR_AWS_REGION]"
53          table      = "vault-backend-prod"
54        }
55        telemetry {
56          prometheus_retention_time = "12h",
57          disable_hostname = true
58        }
59        ...
Once you have updated the values-central.yaml file, run the following command to install Vault:
$ helm install vault charts/vault -f charts/vault/values-central.yaml --namespace vault --create-namespace
NAME: vault
NAMESPACE: vault
STATUS: deployed
REVISION: 1
Once you have installed Vault, you can check that Vault pods are not in a Ready state.
$ kubectl get pods -l app.kubernetes.io/name=vault -n vault
NAME      READY   STATUS    RESTARTS   AGE
vault-0   0/1     Running   0          4m40s
vault-1   0/1     Running   0          4m40s
vault-2   0/1     Running   0          4m40s
They are not ready because we haven’t initialized Vault yet. To initialize Vault, run the following command:
$ kubectl exec -ti vault-0 -n vault -- vault operator init
Recovery Key 1: 4UyI7w1vd19d+efZsoO1X85cD9INx7elbrTZ2Fxfawel
Recovery Key 2: lFbRkBok1nc19WUXIbK3t8W0azuReRZnJ5OpYQfr1qpC
Recovery Key 3: fuJK3Tlr4k4/1gJxOVcFzjd63VYm4jQmBir6UWYw1xSR
Recovery Key 4: scqs7u6961fpdgCZ3F1WGml4aY0qUjZs7UD1IveCJWQj
Recovery Key 5: MmsBaITTKot+WlvoGDYH0VuoiL7kvpS2ifkr3bbyjOQC

Initial Root Token: hvs.QRD4PZKroM3JX0Husmsqllk4

Success! Vault is initialized

Recovery key initialized with 5 key shares and a key threshold of 3. Please
securely distribute the key shares printed above.
Do not expose Vault Token
Your Vault token is a sensitive piece of information. Do not expose it to the public. I have exposed it here because this is a demo cluster.
Save the unseal keys and root token in a safe place. You will need them later. Now run the following command to unseal Vault:
$ kubectl exec -ti vault-0 -n vault -- vault operator unseal 4UyI7w1vd19d+efZsoO1X85cD9INx7elbrTZ2Fxfawel
Key                      Value
---                      -----
Recovery Seal Type       shamir
Initialized              true
Sealed                   false
Total Recovery Shares    5
Threshold                3
Version                  1.11.3
Build Date               2022-08-26T10:27:10Z
Storage Type             dynamodb
Cluster Name             vault-cluster-b27f5f6c
Cluster ID               66fb6dcf-1db2-6476-ebe8-ccb91b262594
HA Enabled               true
HA Cluster               https://vault-0.vault-internal:8201
HA Mode                  active

$ kubectl exec -ti vault-0 -n vault -- vault operator unseal # ... Unseal Key 2
$ kubectl exec -ti vault-0 -n vault -- vault operator unseal # ... Unseal Key 3
After unsealing Vault with at least three keys, recheck the status of Vault pods. You should see that they are in a Ready state.
$ kubectl get pods -l app.kubernetes.io/name=vault -n vault
NAME READY STATUS RESTARTS AGE
vault-0 1/1 Running 0 7m10s
vault-1 1/1 Running 0 7m10s
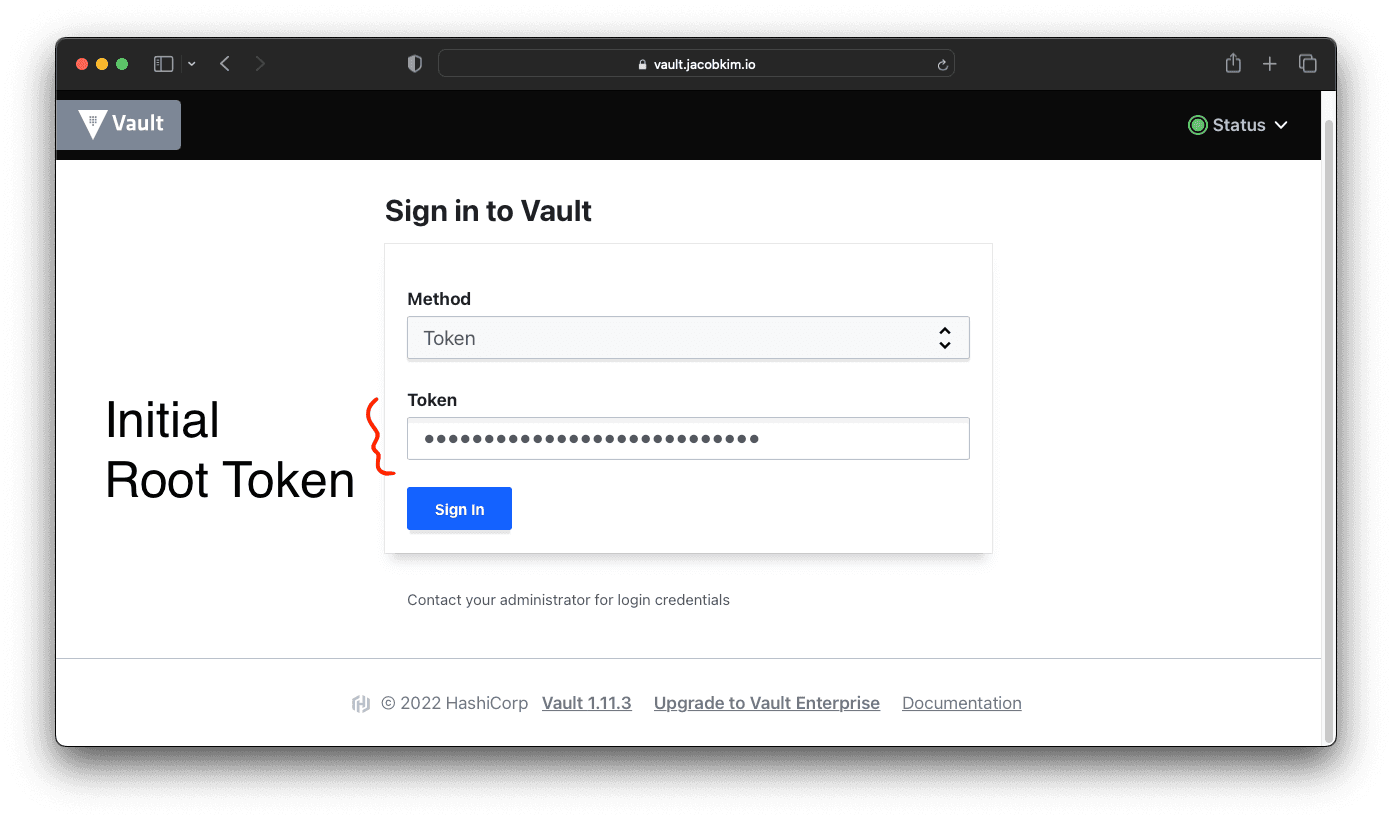
vault-2 1/1 Running 0 7m10sOnce you are done, you can check the Vault UI by visiting the URL https://vault.[YOUR_DOMAIN_NAME]. You will be greeted with a login screen. Enter the root token you saved earlier to log in.
Tada 🎉! You have successfully installed Vault. You can now start using Vault to store secrets.
Create a Vault KV Secret Engine
Now create a KV secret engine at secret/ path.
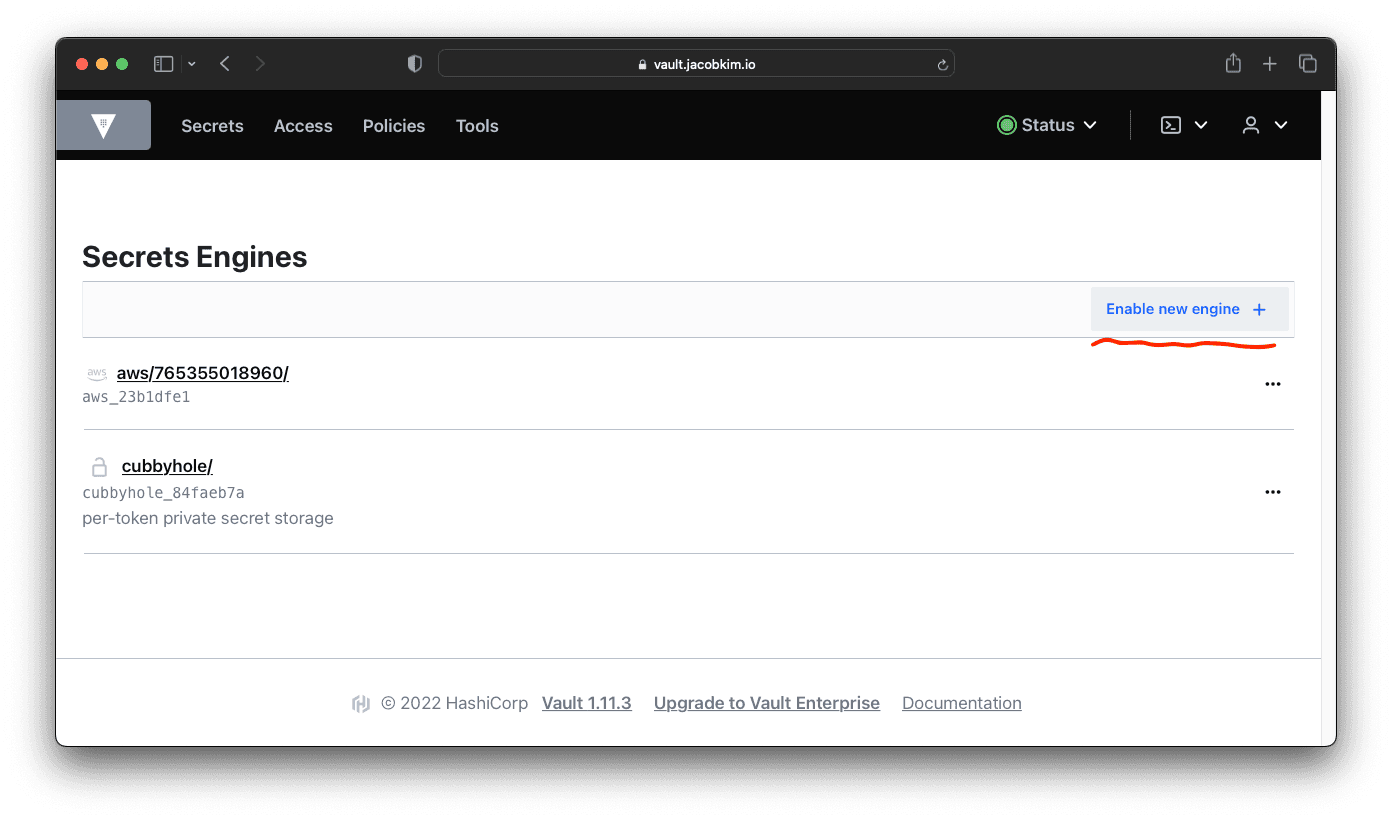
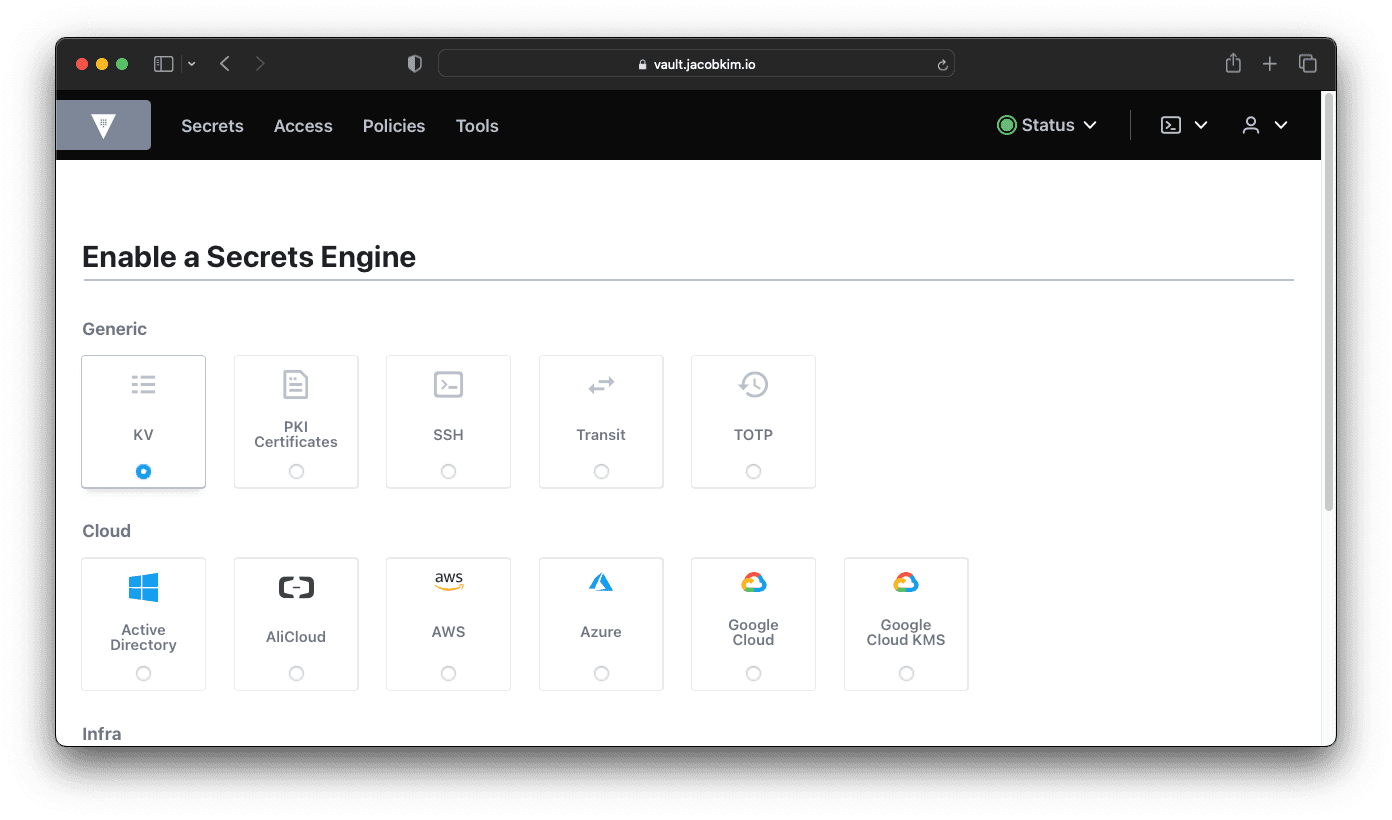
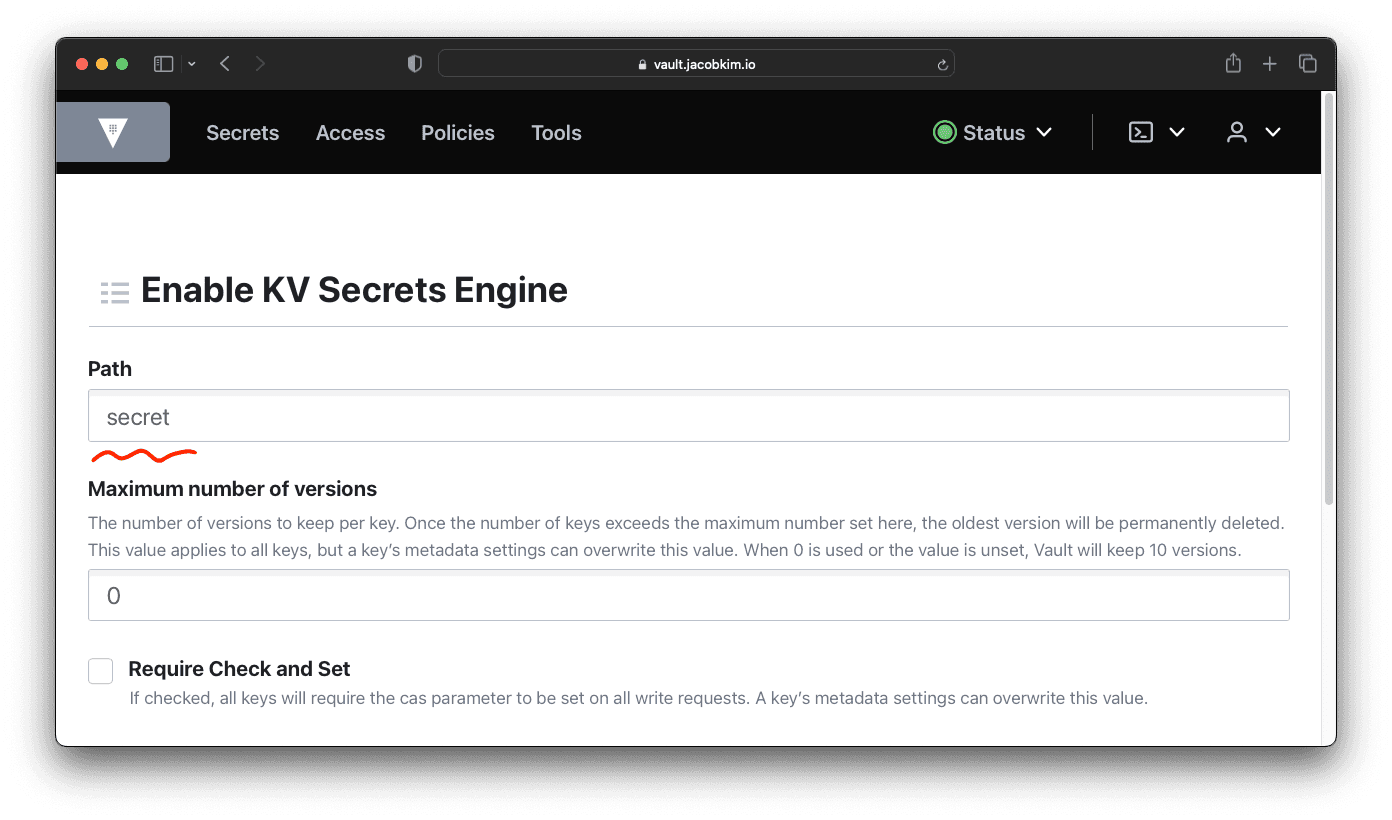
Later, we will use this secret engine to store credentials for Argo CD, Kubernetes clusters, and many other things.
Vault Auth Terraform
We talked about Vault Auth Terraform configuration in the previous section. It’s time to install it since we have installed Vault. Go back to the terraform/central/vault-auth folder and update the locals.tf and versions.tf file. Apply the Terraform configuration. If Terraform successfully applies the configuration, you will see a new secret engine and a bunch of polices created.
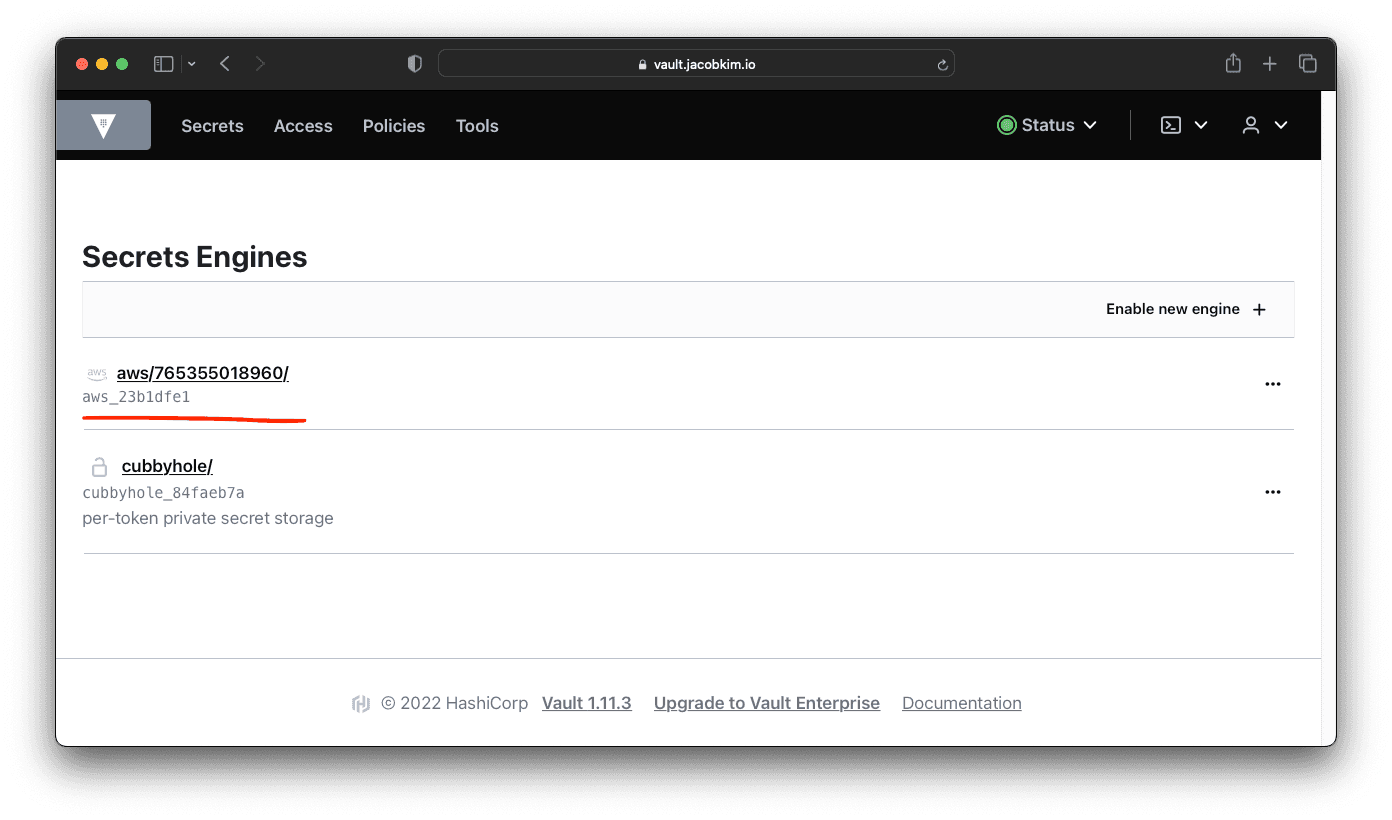
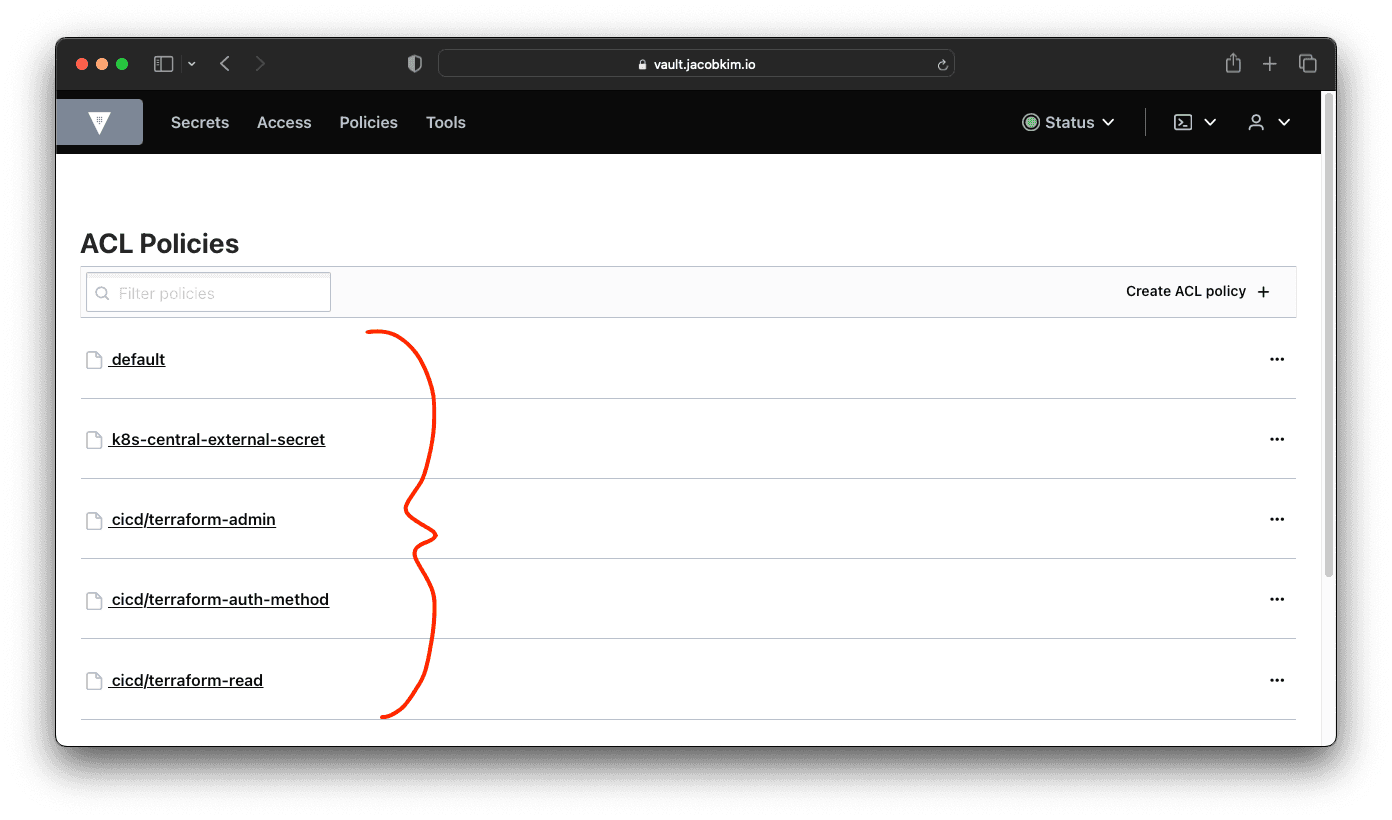
With the Vault Auth setup, we can now apply Terraform configuration with Vault authentication.
Login to Vault via Azure AD
If your enterprise uses an OIDC provider like Auth0, Azure AD, or Okta you can follow this guide from the Vault documentation to configure authentication with OIDC.
External Secrets
We are going to install External Secrets to use secrets from Vault in Kubernetes. Update the charts/external-secrets/values-central.yaml file. Install External Secrets with the following command:
$ helm install external-secrets-operator charts/external-secrets-operator -f charts/external-secrets-operator/values-central.yaml --namespace external-secrets --create-namespace
NAME: external-secrets-operator
NAMESPACE: external-secrets
STATUS: deployed
REVISION: 1
TEST SUITE: None
Helm Install Failure
If you get an error like below, you can just re-install it with $ helm upgrade .... This error happens when Helm tries to install External Secrets CRD before the webhook is ready.
Error: INSTALLATION FAILED: failed post-install: warning: Hook post-install external-secrets/templates/cluster-secret-stores.yaml failed: Internal error occurred: failed calling webhook "validate.clustersecretstore.external-secrets.io": failed to call webhook: Post "https://external-secrets-operator-webhook.external-secrets.svc:443/validate-external-secrets-io-v1beta1-clustersecretstore?timeout=5s": no endpoints available for service "external-secrets-operator-webhook"

$ helm upgrade external-secrets-operator charts/external-secrets-operator -f charts/external-secrets-operator/values-central.yaml --namespace external-secrets
Release "external-secrets-operator" has been upgraded. Happy Helming!
NAME: external-secrets-operator
NAMESPACE: external-secrets
STATUS: deployed
REVISION: 2
TEST SUITE: None
Argo CD
Argo CD is a bit tricky to install. There are multiple steps involved.
1. Create a GitHub Repository
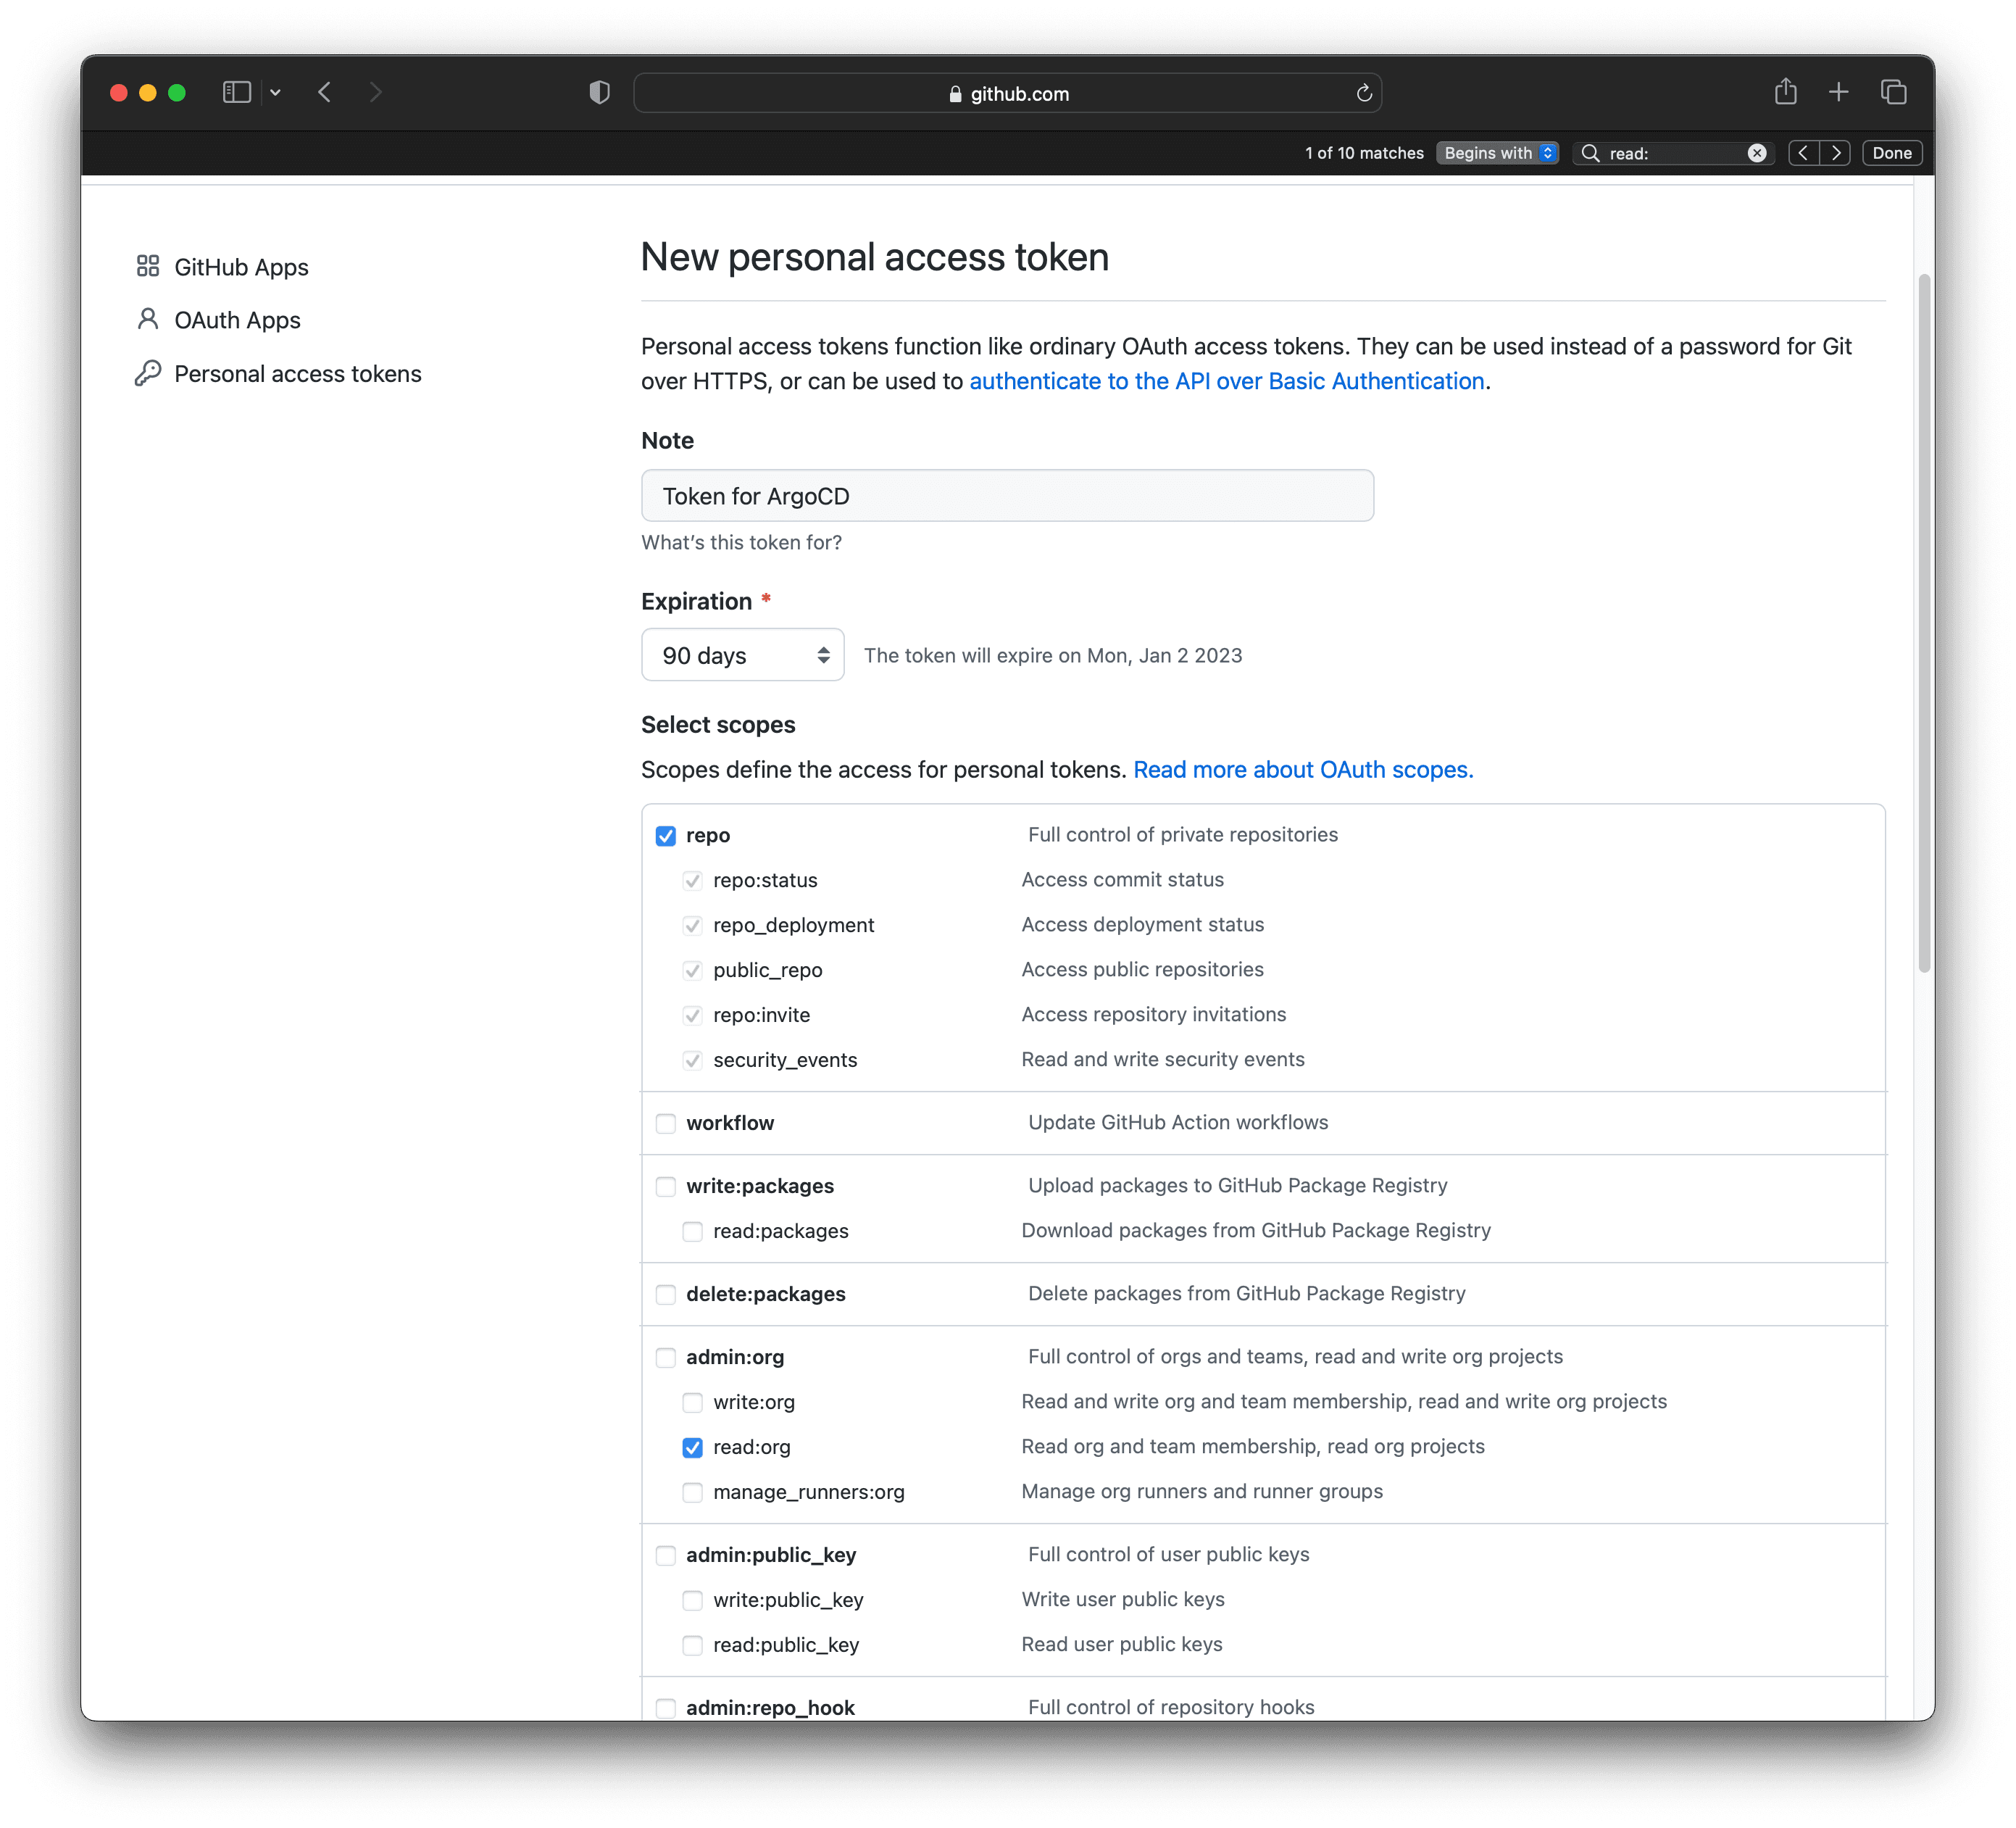
Argo CD being a GitOps tool we need a git repository. Create a GitHub repository. I will use the demo repository. Then, you need to create a token to allow access to the repository. You can create a token by going to github.com/settings/tokens/new. Give it a name and select repo and read:org scope. Copy the token and save it somewhere safe.
2. Argo CD Secrets
let’s generate an admin password for Argo CD. There are many ways to generate passwords, but the Argo CD documentation recommends using offline tools like using the Python bcrypt like below.
$ pip3 install bcrypt
$ python3 -c "import bcrypt; print(bcrypt.hashpw(b'YOUR_ADMIN_PASSWORD', bcrypt.gensalt()).decode())"

$2b$12$SVEC80wcYOWJ3rkl4kiCJO0uNMBPiv1FsPJjKP0IoaycFV4qGrXBm
Then, we need to generate secret for Argo CD server. Use the following command to generate the secret:
$ echo -n your_passsword | sha256sum | awk '{ print $1 }'
15e29bac4474da8b732ea4eea23baa87e7eecd8a2523984516d2f697f439f023
# You might have to use this command if you are on OSX
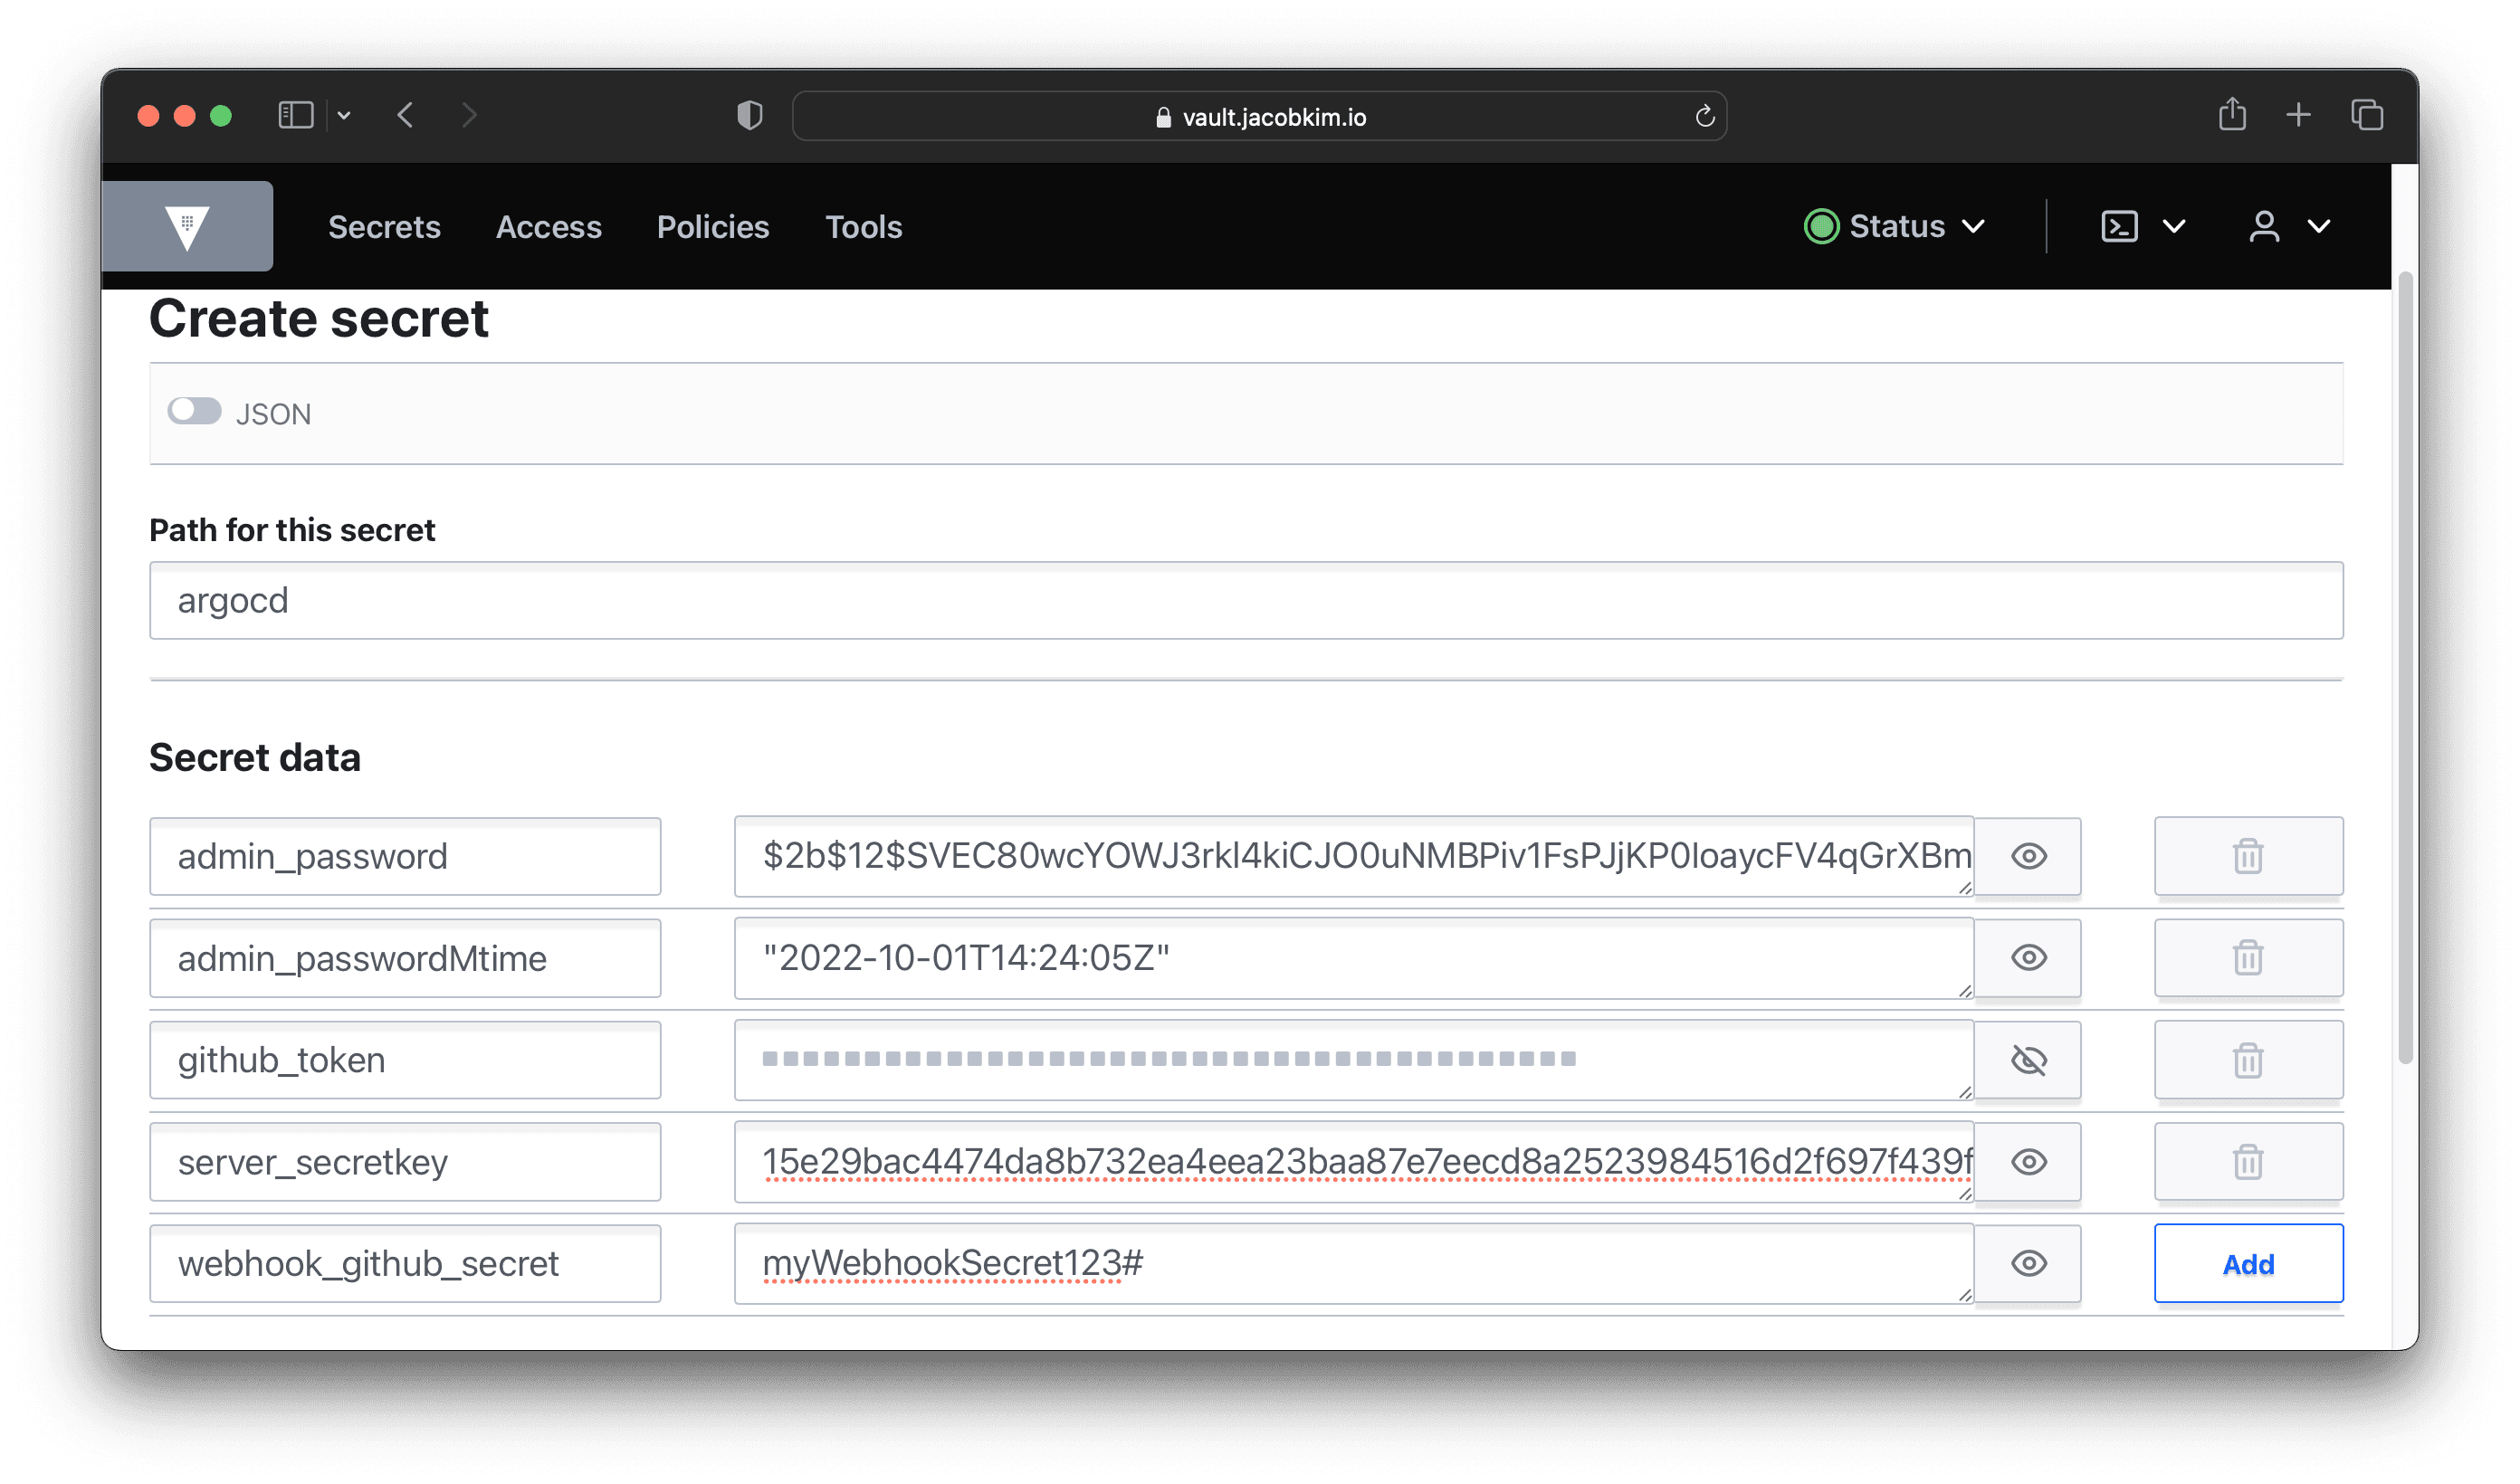
$ echo -n your_passsword | shasum -a 256 | awk '{ print $1 }'Create secret/argocd and add our secrets like below. You can use the current time for admin_passwordMtime and choose your password for webhook_github_secret.
3. Update Argo CD’s values-central.yaml
Update charts/argocd/values-central.yaml file with appropriate values.
Deploy Argo CD with the following command:
$ helm install argocd charts/argocd -f charts/argocd/values-central.yaml --namespace argocd --create-namespace
NAME: argocd
NAMESPACE: argocd
STATUS: deployed
REVISION: 1
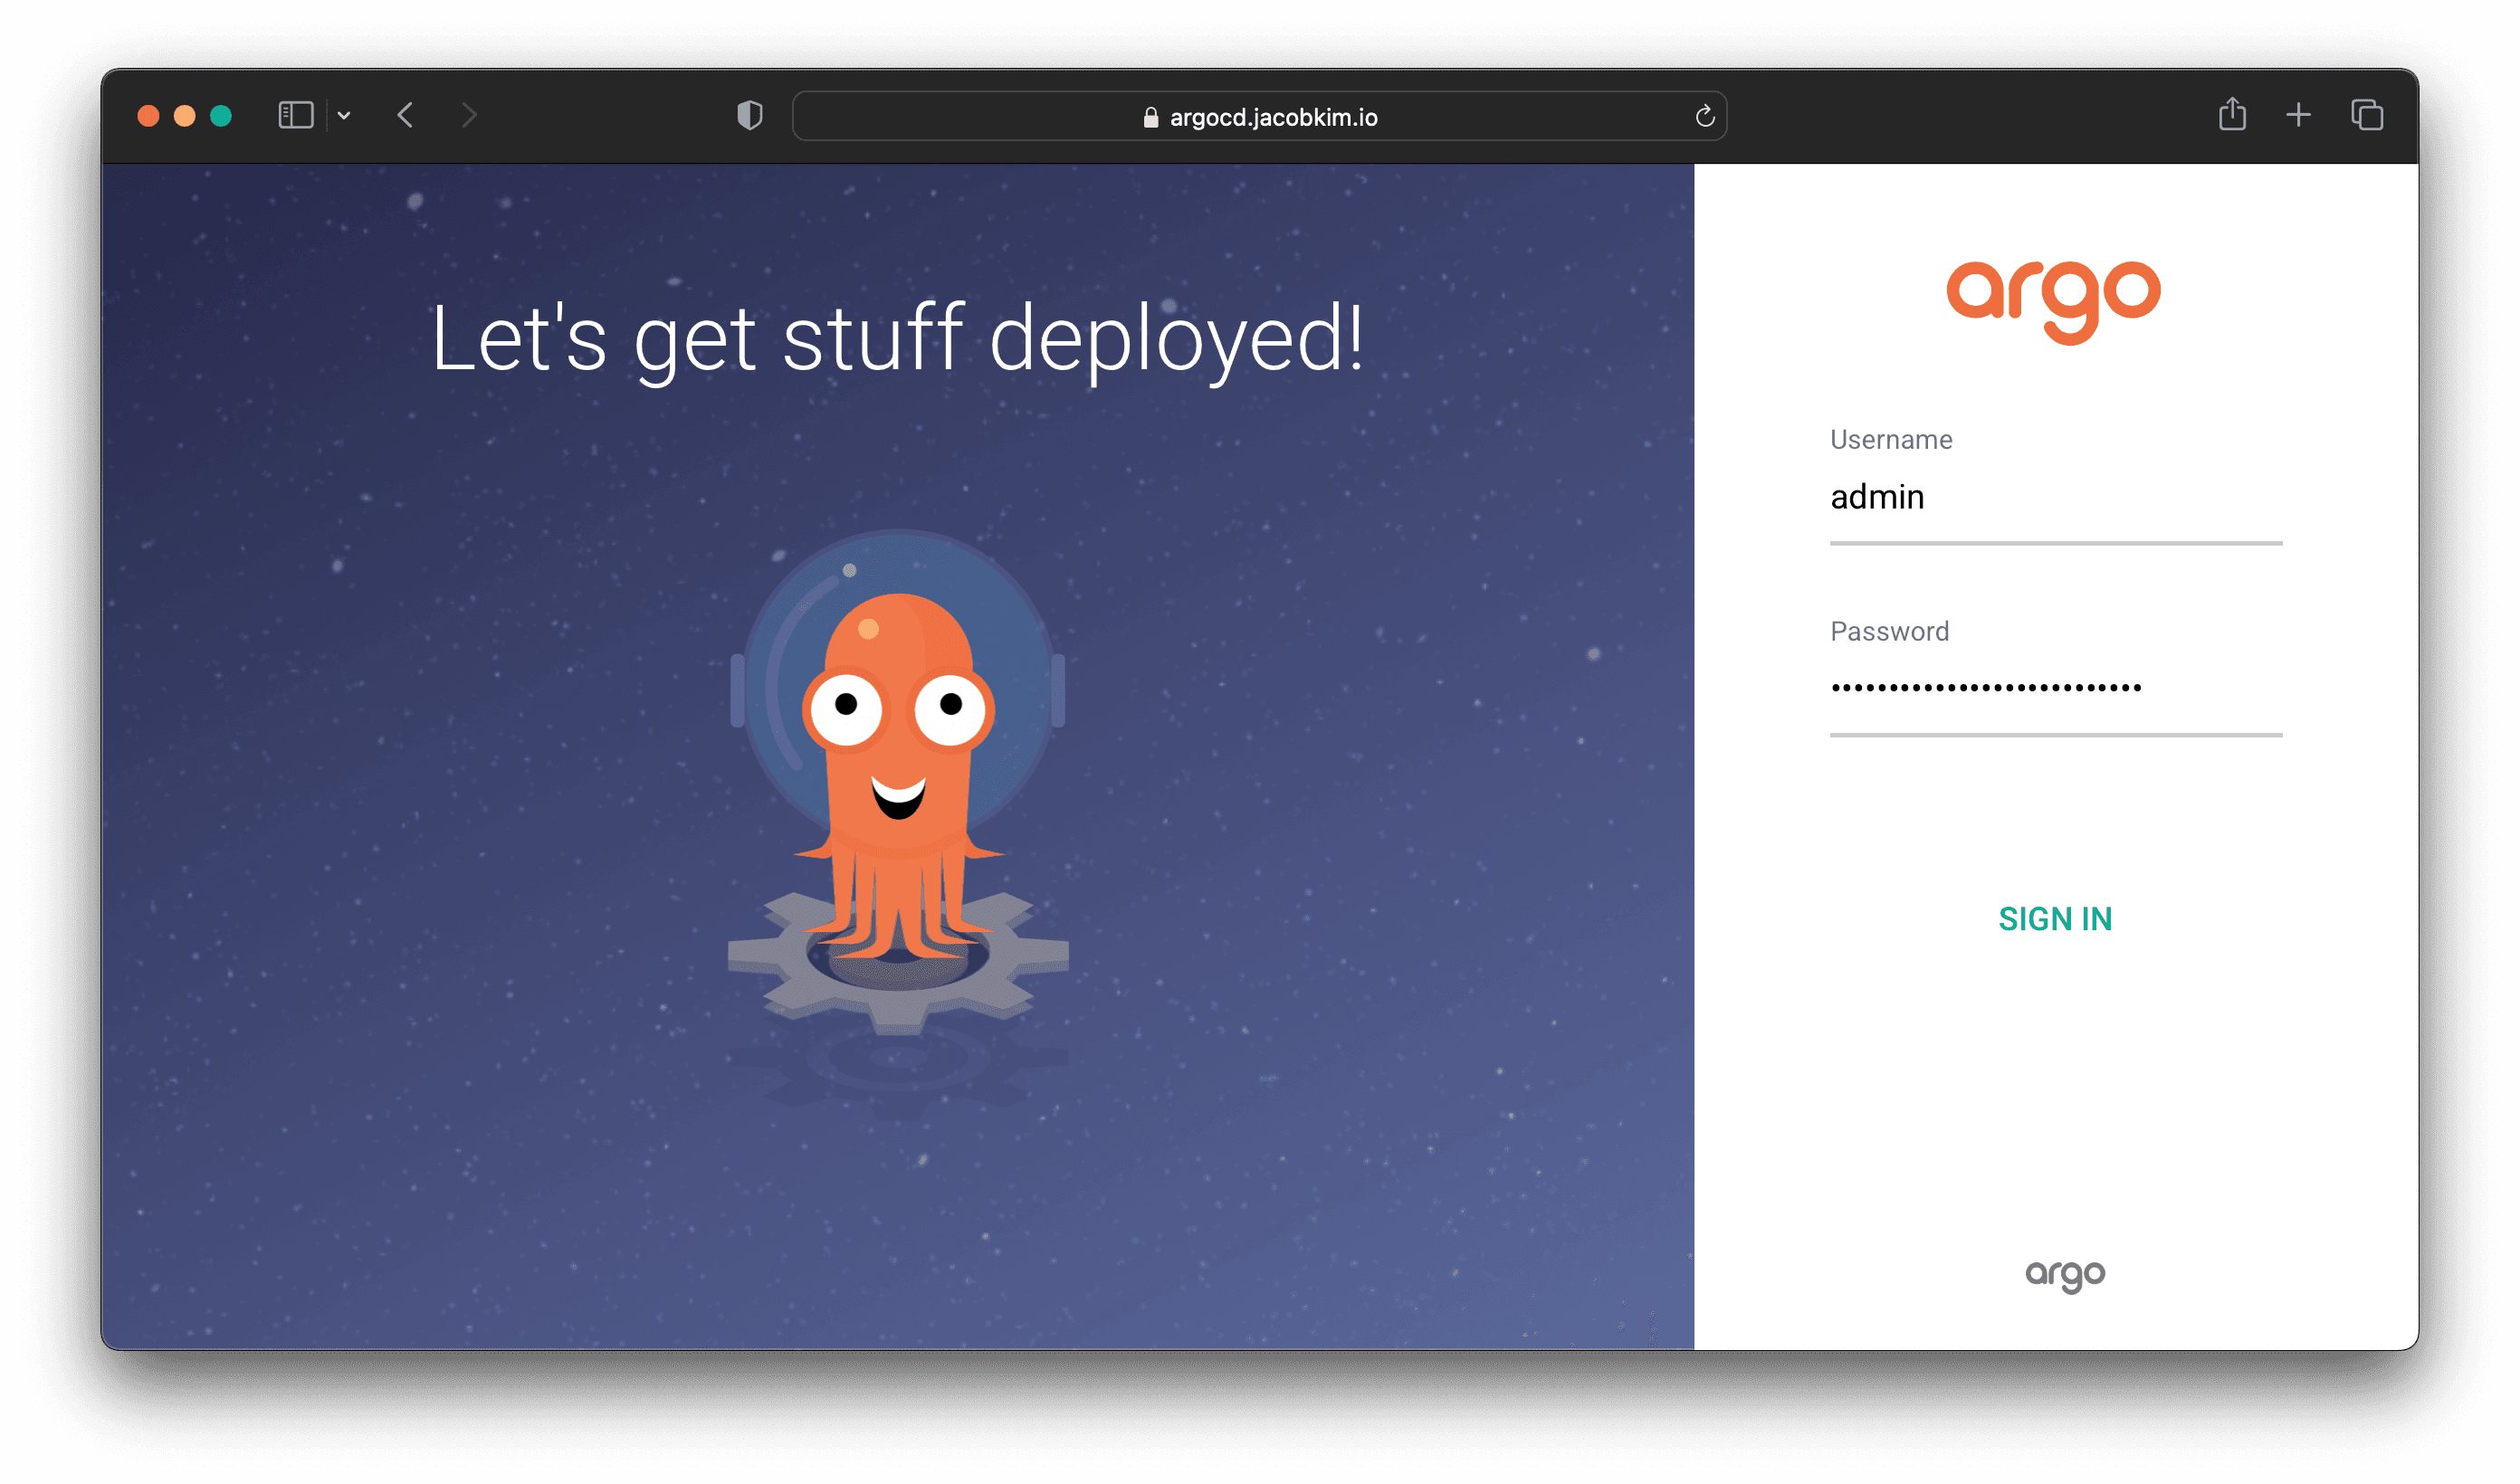
TEST SUITE: NoneOnce Argo CD is installed, you can access the UI by visiting https://argocd.[YOUR_DOMAIN_NAME]. You will be greeted with a login screen. Enter the admin password you saved earlier to log in. Note that the admin password is not the one that looks like ”$2b$12$...”, it’s what you have passed in the bcrypt command. For example, bcrypt.hashpw(b"foo"... if you created your password like this, foo is your password.
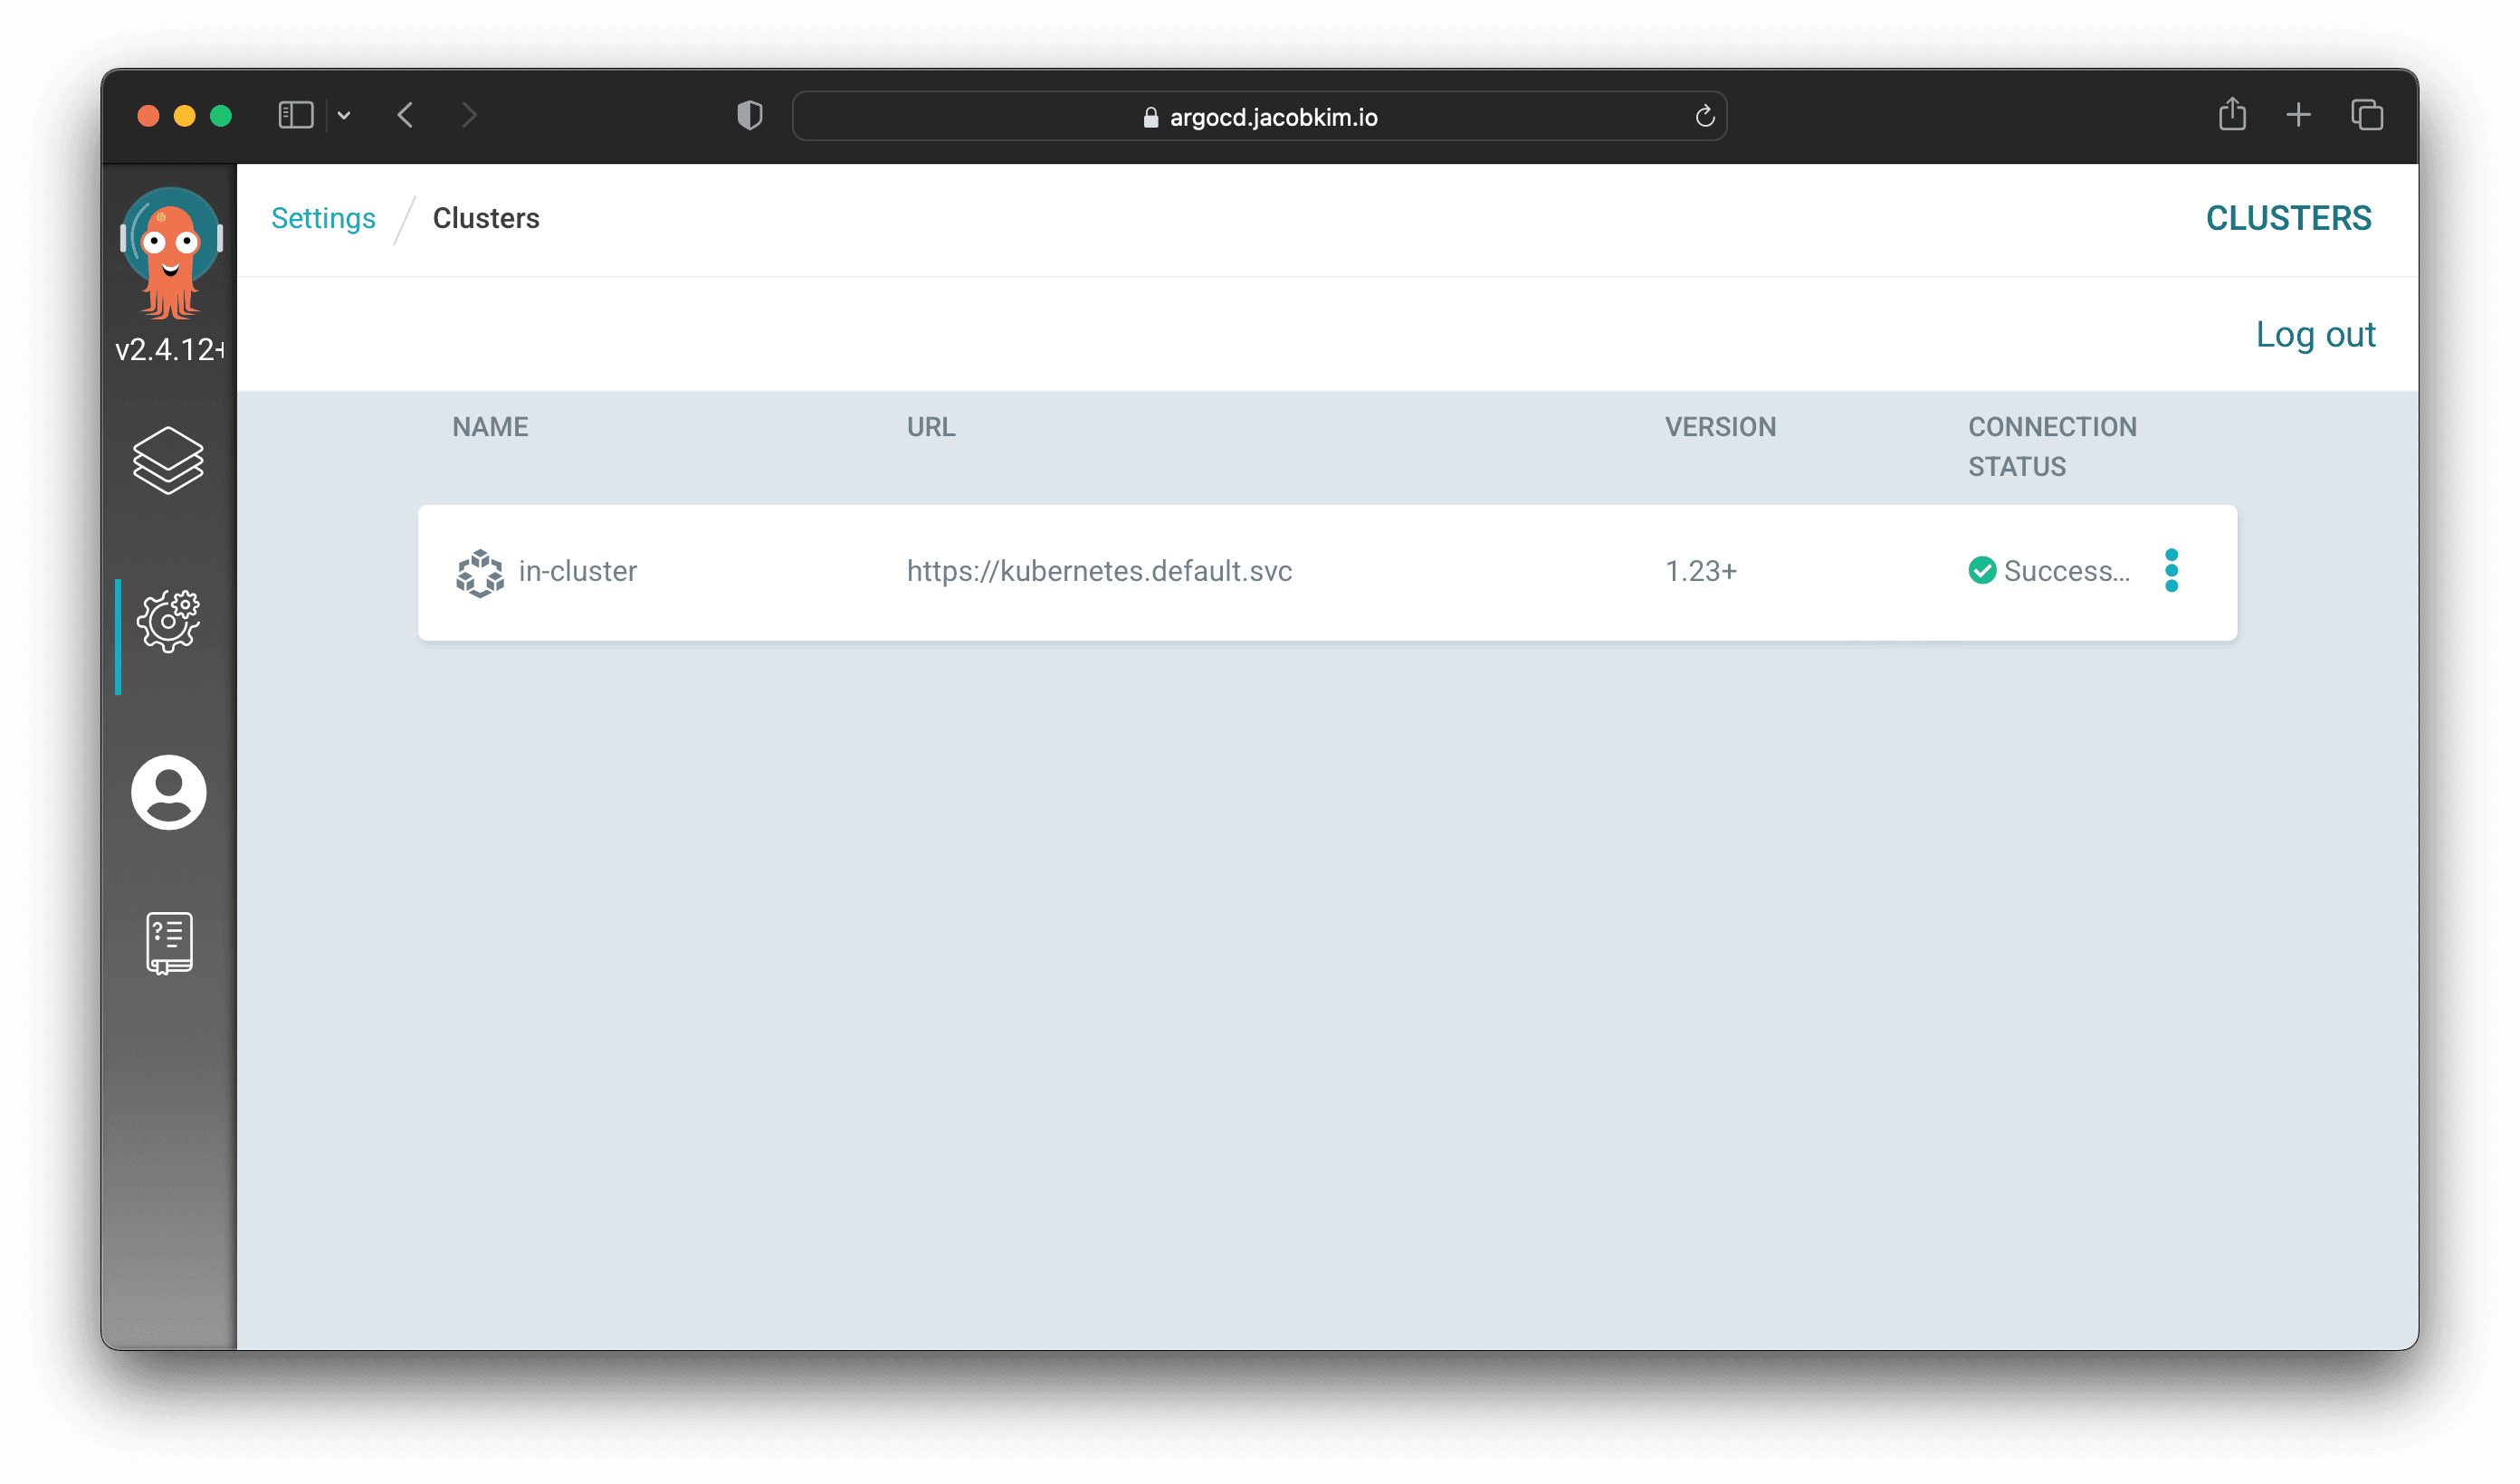
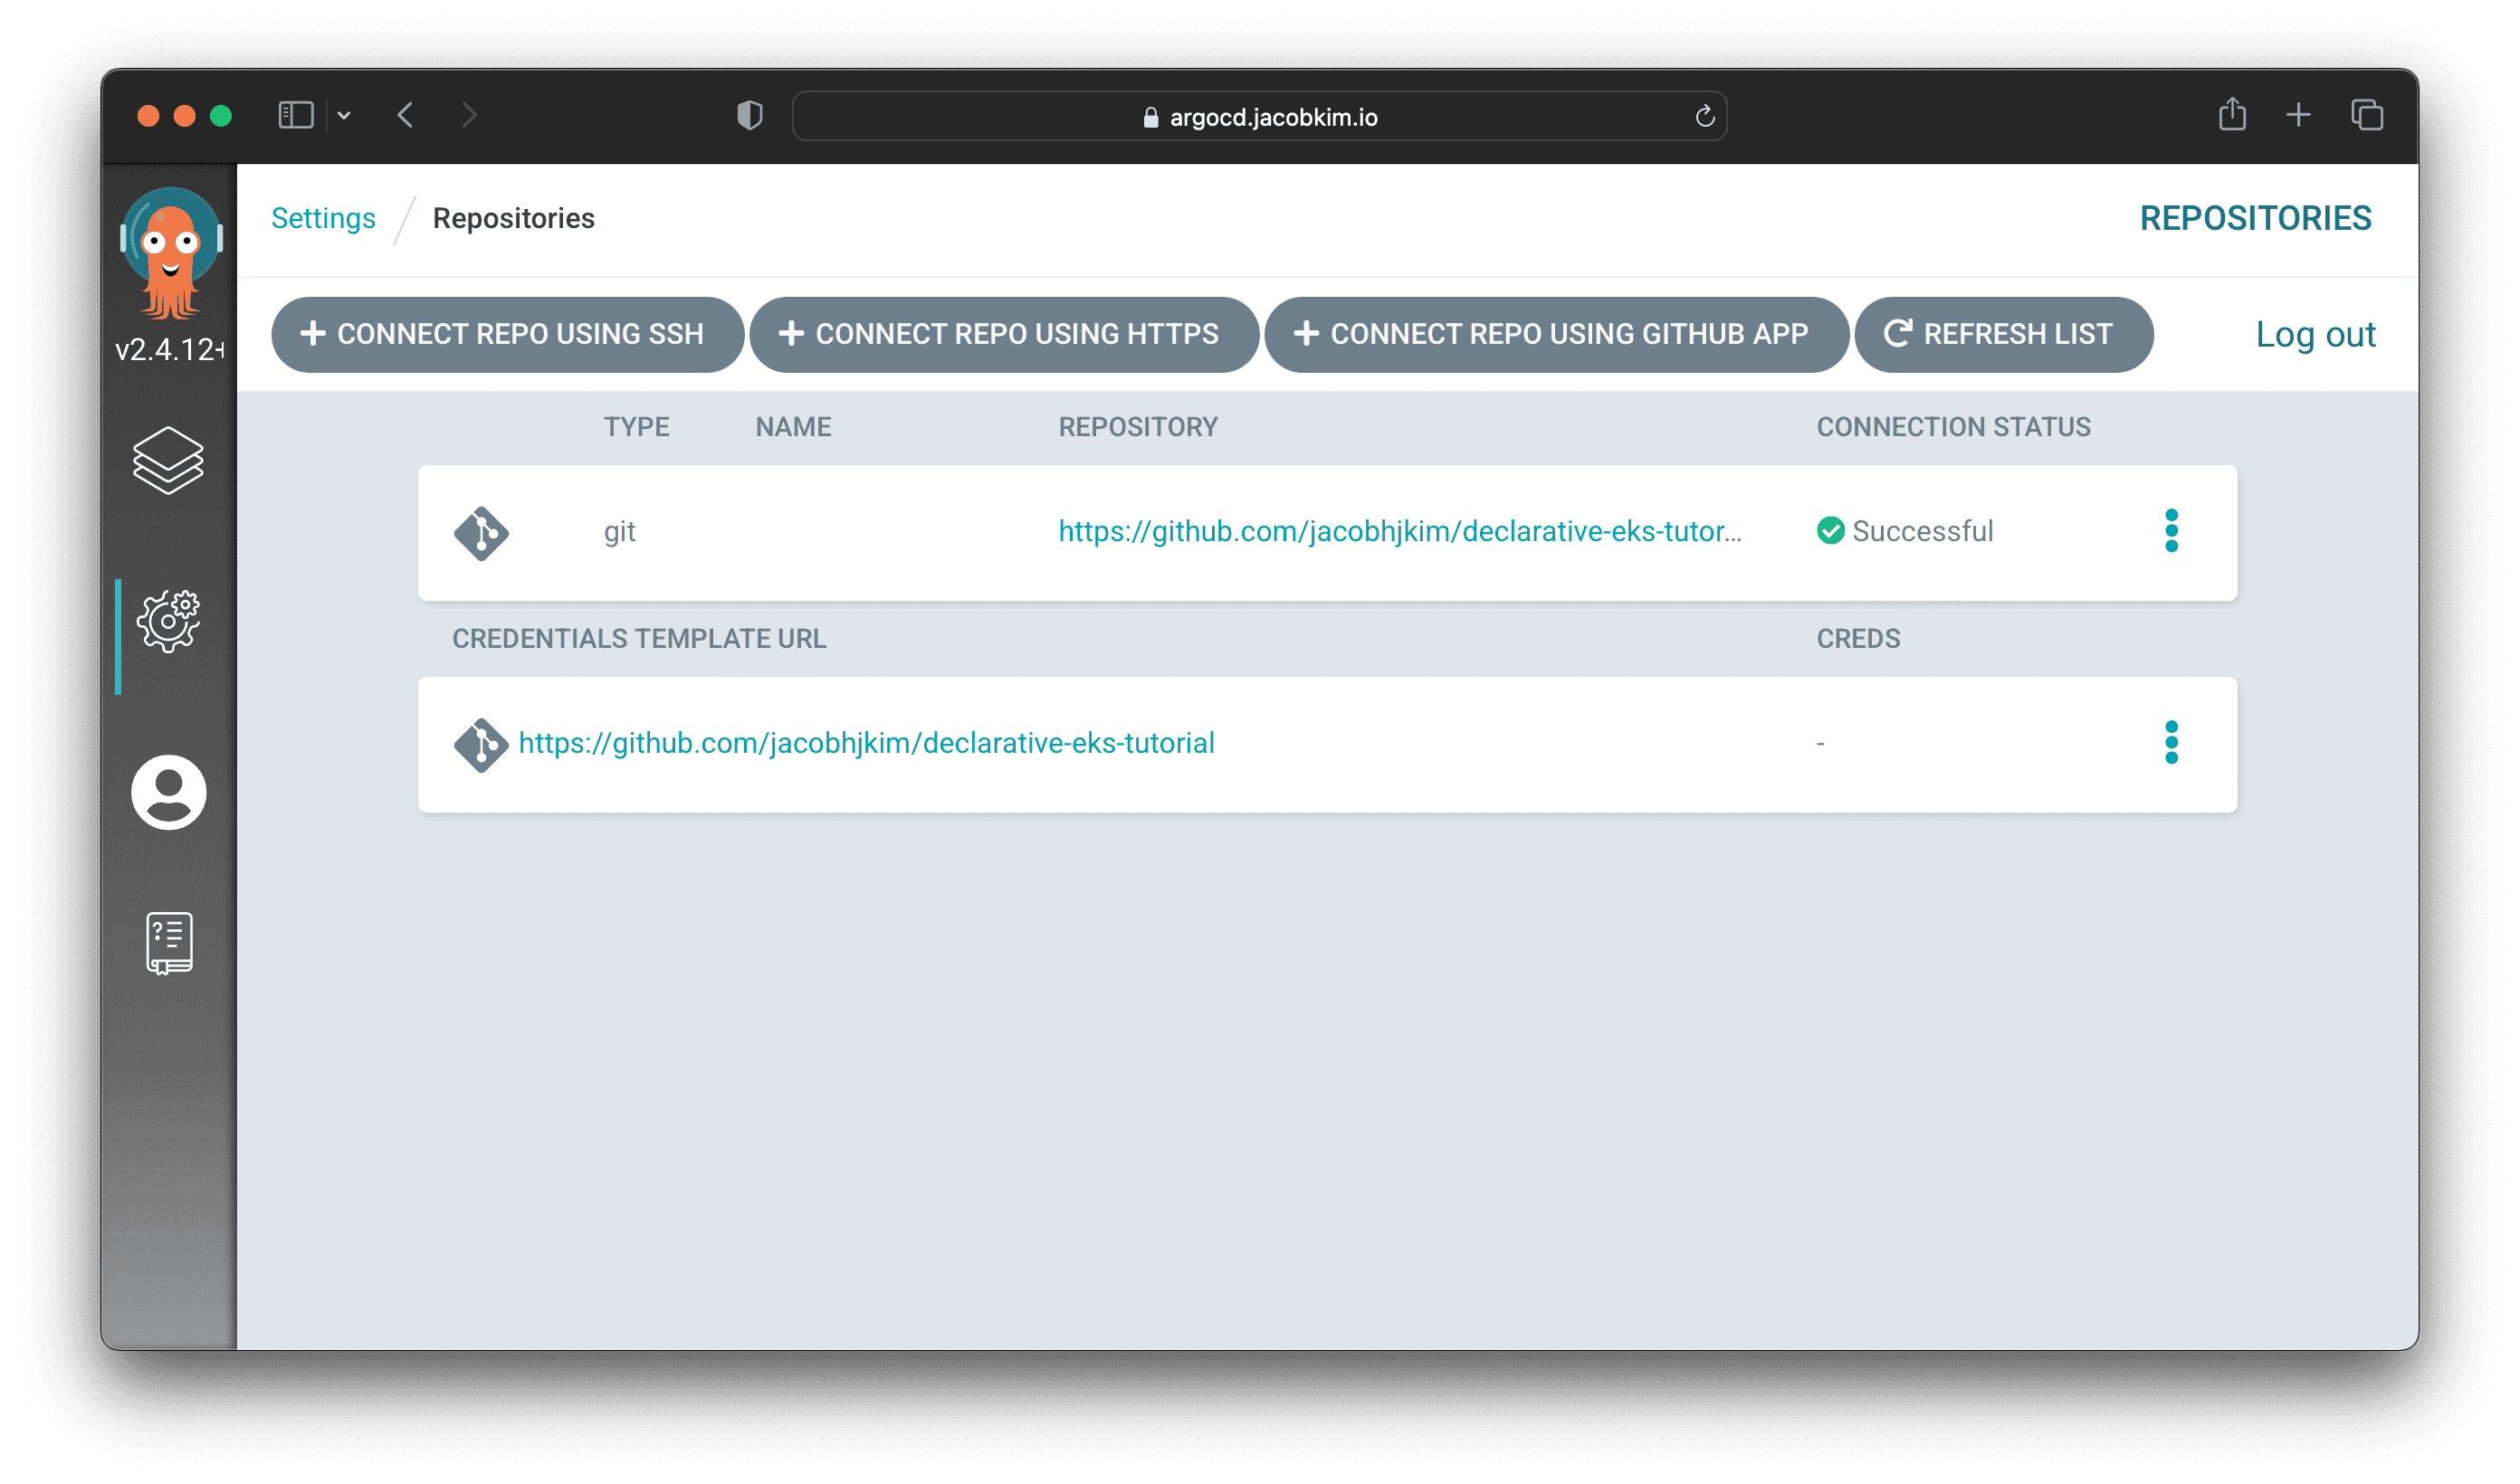
Check if cluster connection and repo connection is valid.
Go back to your GitHub repo and create a webhook like below. This webhook will notify Argo CD whenever there are changes in our repo. Use the secret you used in secret/argocd for webhook_github_secret.
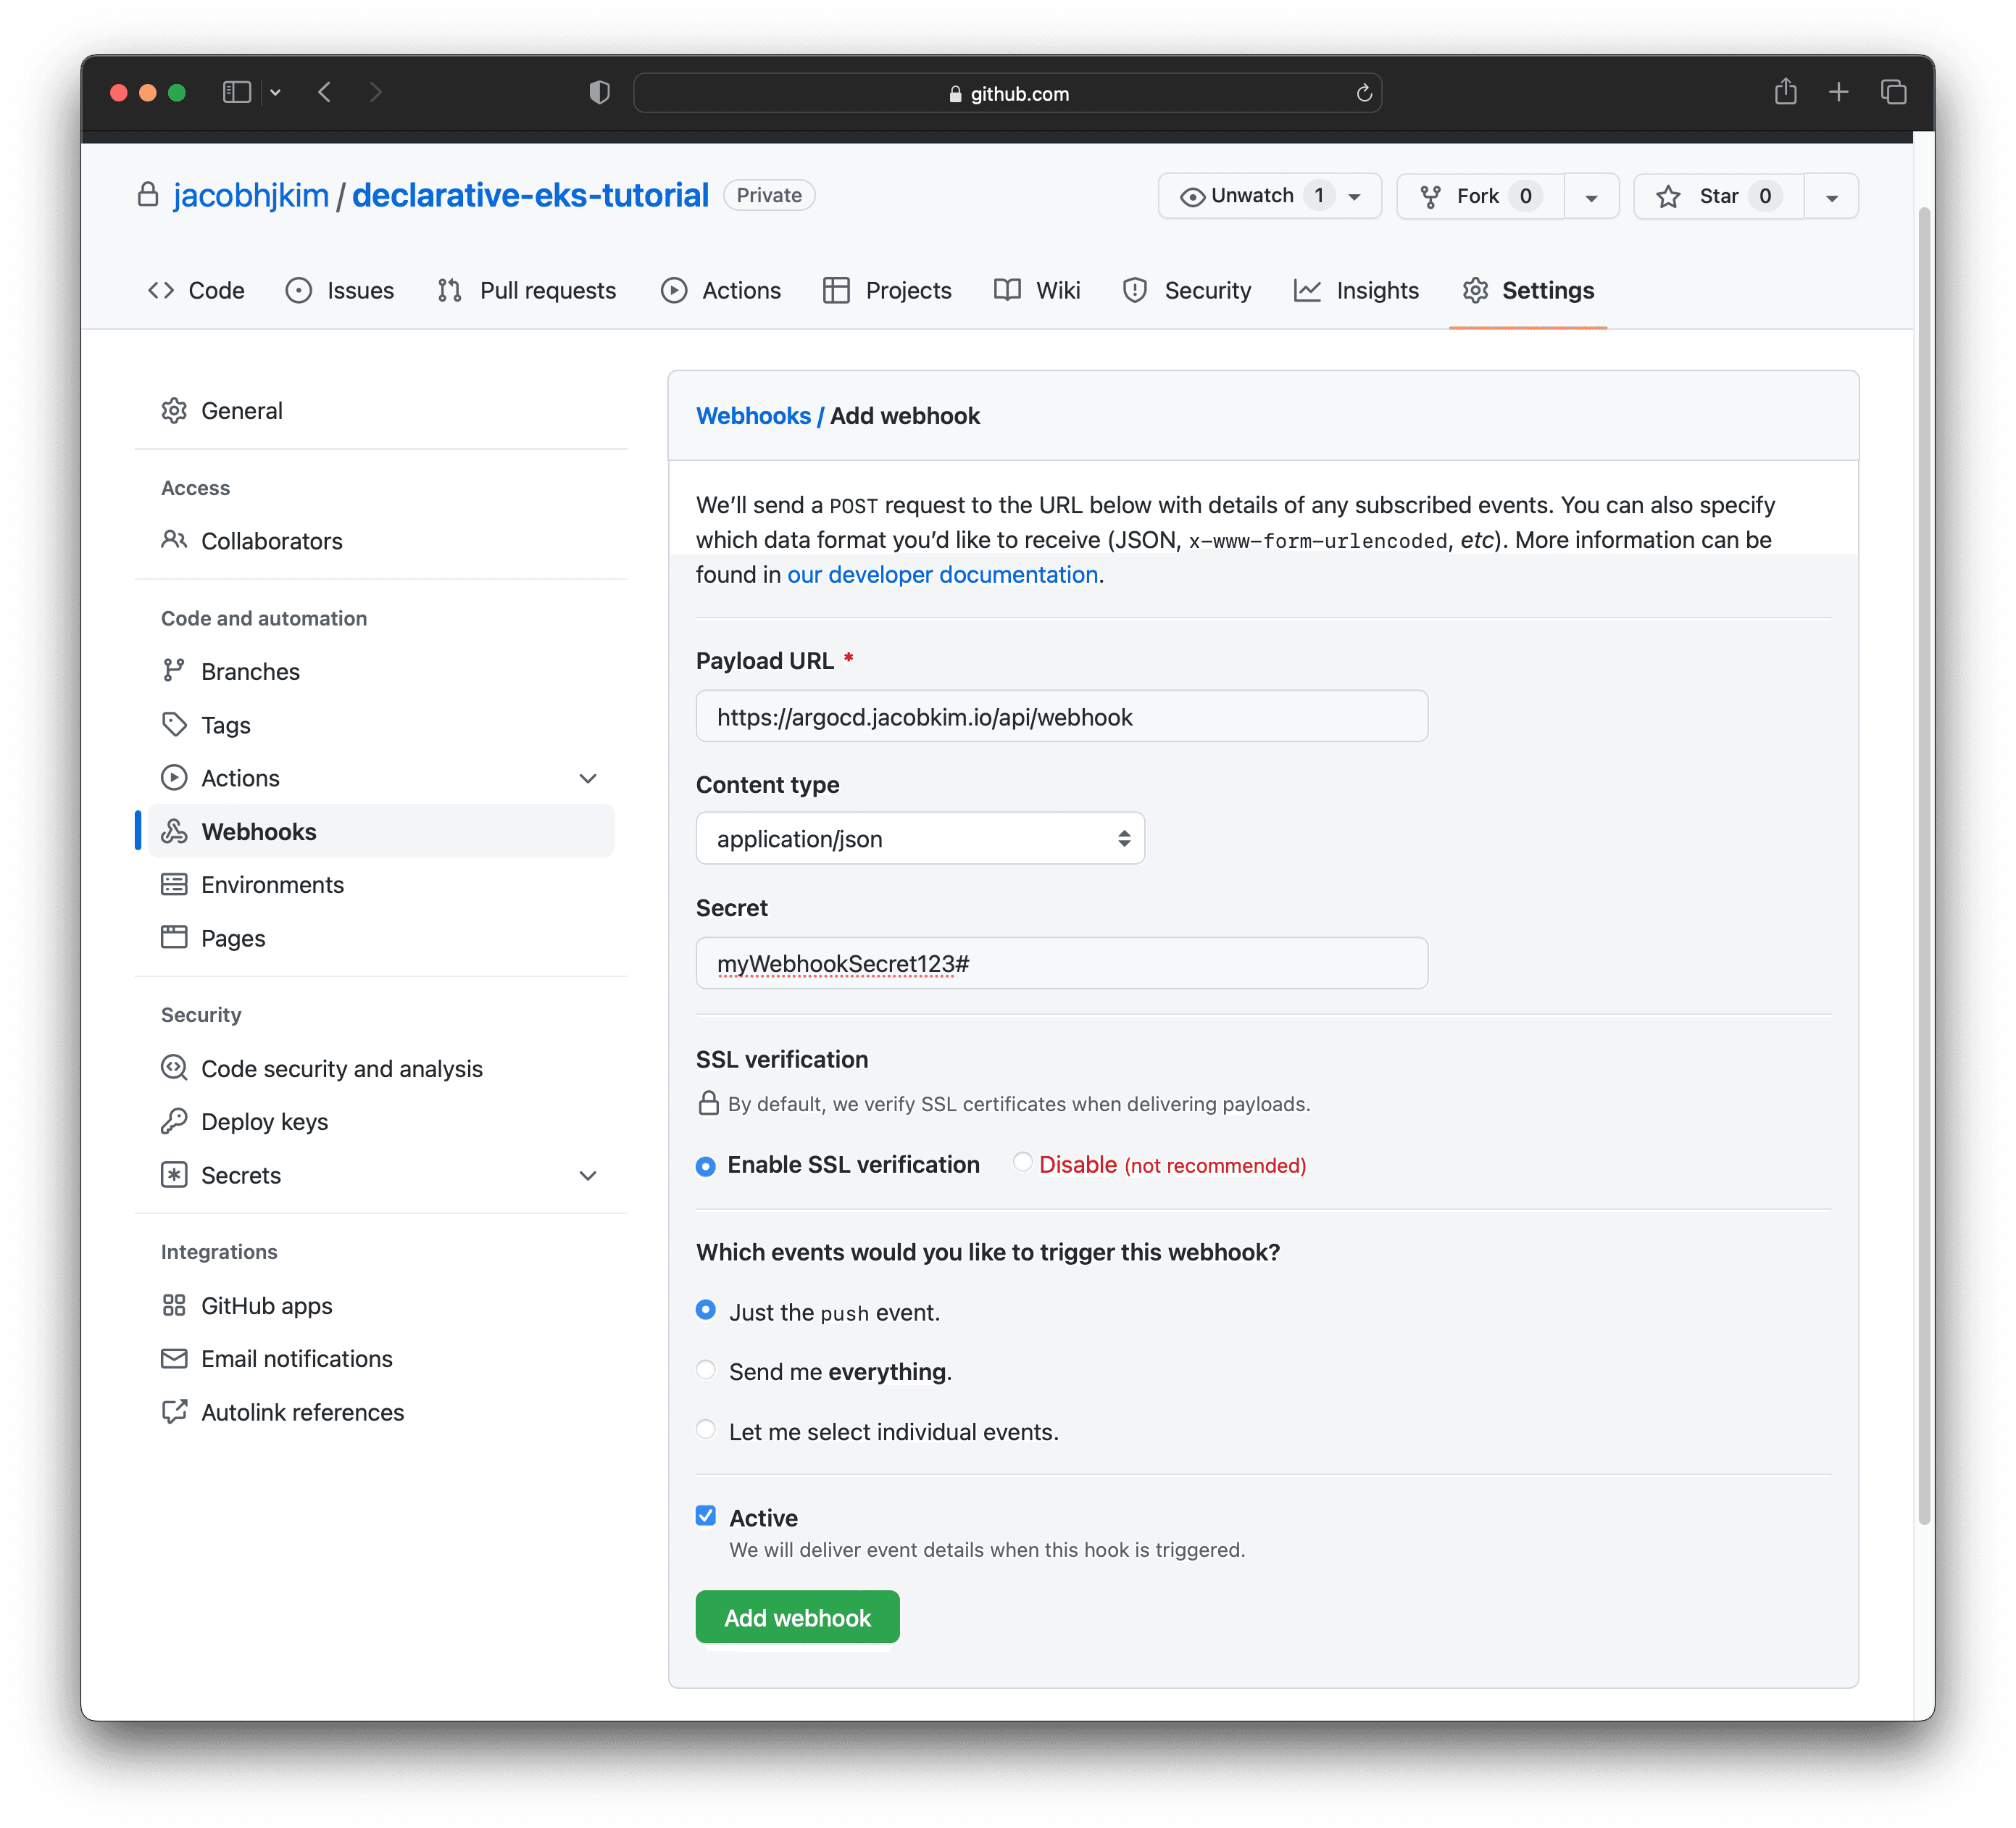
Now we can deploy things the GitOps way! 🎉
Cert Manager
Cert manager will be our first application to be deployed the GitOps way!
Add the following configuration to charts/argocd-gitops/values-central.yaml file. This will deploy the cert-manager application to our cluster.
defaultProject: central-apps
destinationServer: https://kubernetes.default.svc
- apps: []
+ apps:
+ - name: cert-manager
+ namespace: kube-system
+ source:
+ path: kubernetes/charts/cert-manager
+ valueFiles:
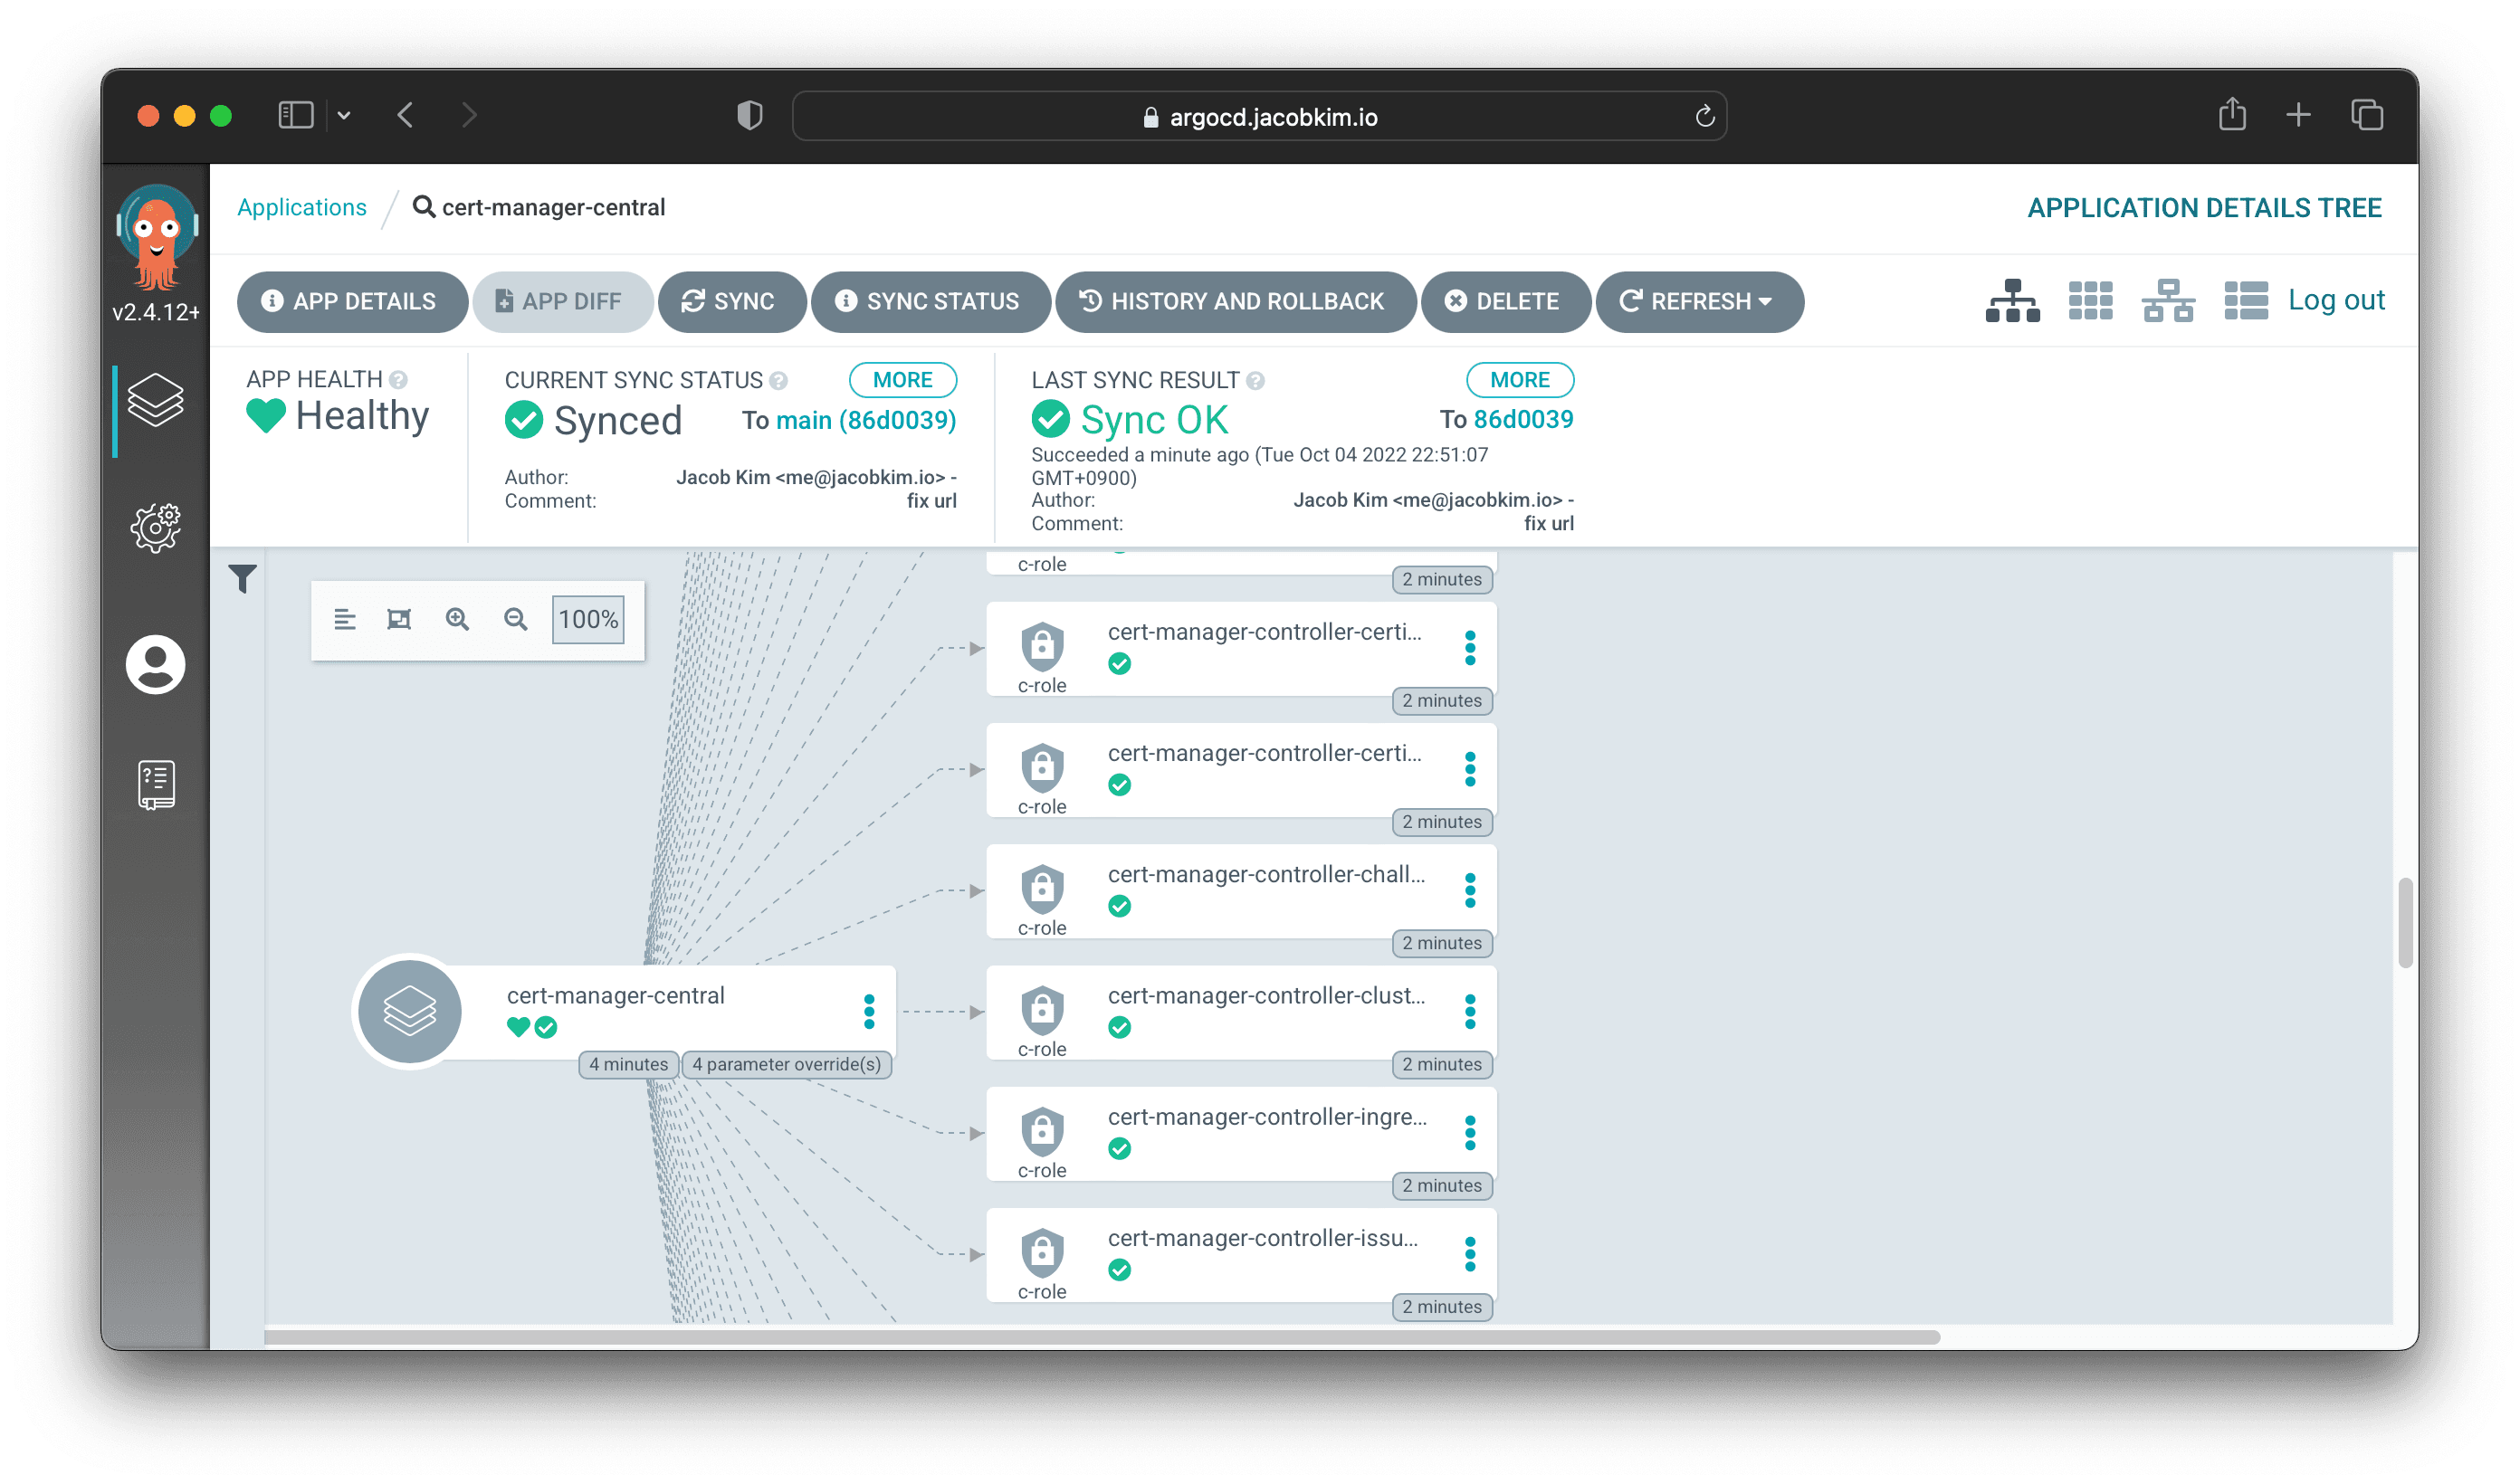
+ - values-central.yamlCommit and push the changes to your GitHub repo. Argo CD will automatically deploy the application to the cluster. You can check the status of the application by visiting https://argocd.[YOUR_DOMAIN_NAME]/applications/cert-manager-central.
GitHub Actions Runner
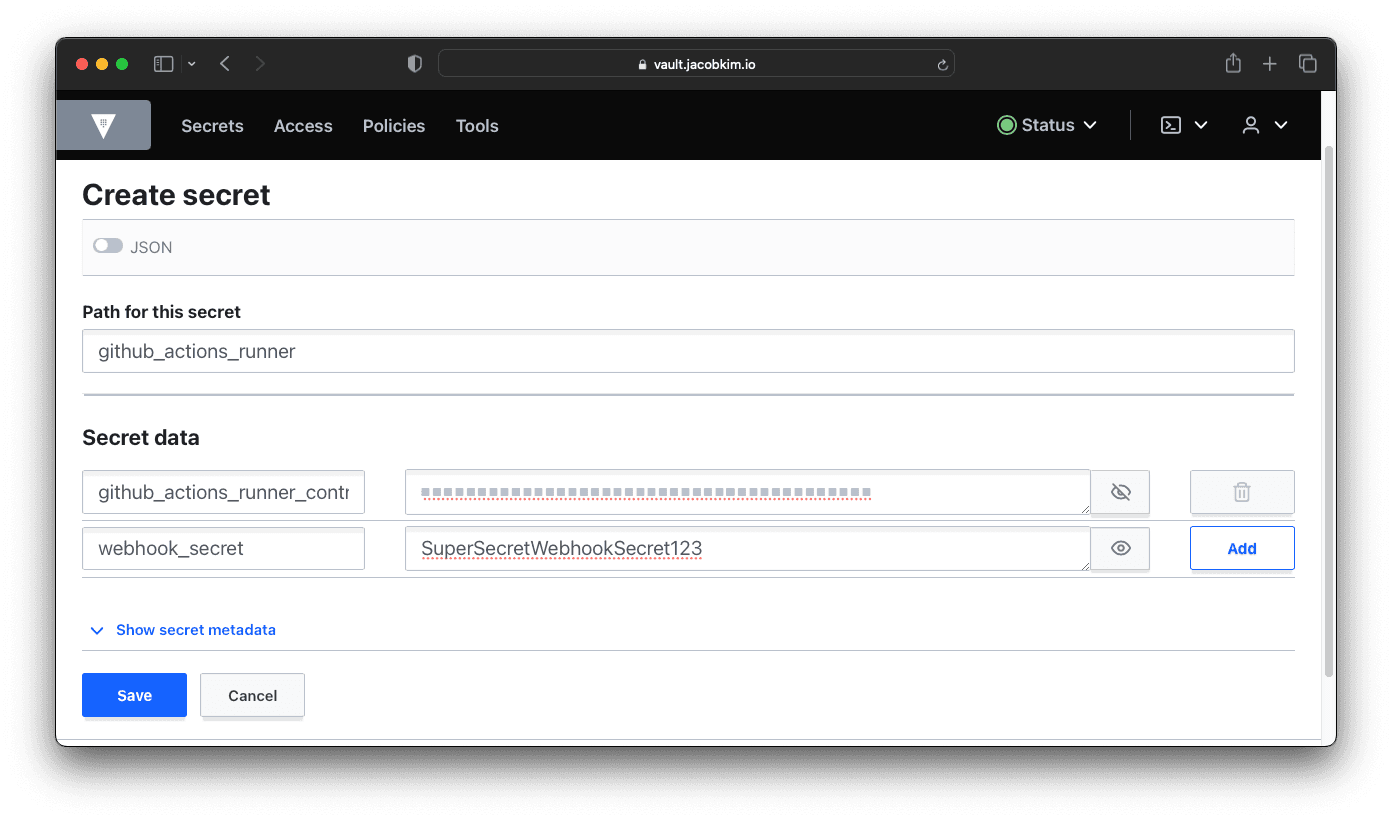
We are going to use GitHub Actions to deploy our applications. We need a runner to run our GitHub Actions workflows. GitHub Actions Runner Controller manages our GitHub Actions runners on Kubernetes. Create a GitHub Personal Access Token with repo scope as we did earlier. Then, create a secret in the Vault for the token.
Update the charts/actions-runner-controller/values-central.yaml file with appropriate values.
1actions-runner-controller:
2  replicaCount: 1
3  certManagerEnabled: true
4  githubWebhookServer:
5    enabled: true
6    ingress:
7      enabled: true
8      ingressClassName: alb
9      annotations:
10        alb.ingress.kubernetes.io/scheme: internet-facing
11        alb.ingress.kubernetes.io/certificate-arn: arn:aws:acm:ap-northeast-2:765355018960:certificate/757c8b86-0316-419a-947a-e182e6f1f1a7
12        alb.ingress.kubernetes.io/target-type: ip
13        alb.ingress.kubernetes.io/listen-ports: '[{"HTTP": 80}, {"HTTPS":443}]'
14        alb.ingress.kubernetes.io/ssl-redirect: '443'
15      hosts:
16        - host: github-actions-webhook.jacobkim.io
17          paths:
18            - path: "/"
19              pathType: "Prefix"
Then add the following configuration to charts/argocd-gitops/values-central.yaml file. This will deploy the GitHub Actions Runner Controller application to our cluster.
apps:
+ - name: actions-runner-controller
+   namespace: actions-runner-controller
+   source:
+     path: kubernetes/charts/actions-runner-controller
+   valueFiles:
+     - values-central.yaml
+   skipCrds: true
+   ignoreDifferences:
+     - kind: Secret
+       name: actions-runner-controller-serving-cert
+       jsonPointers:
+         - /data/ca.crt
+         - /data/tls.crt
+         - /data/tls.key
+     - group: admissionregistration.k8s.io
+       kind: MutatingWebhookConfiguration
+       jsonPointers:
+         - /webhooks/0/clientConfig/caBundle
+         - /webhooks/1/clientConfig/caBundle
+         - /webhooks/2/clientConfig/caBundle
+         - /webhooks/3/clientConfig/caBundle
+     - group: admissionregistration.k8s.io
+       kind: ValidatingWebhookConfiguration
+       jsonPointers:
+         - /webhooks/0/clientConfig/caBundle
+         - /webhooks/1/clientConfig/caBundle
+         - /webhooks/2/clientConfig/caBundle
  - name: cert-manager
    namespace: kube-system
    source:
      path: kubernetes/charts/cert-manager
    valueFiles:
      - values-central.yaml
Before you commit your changes manually deploy actions runner controller CRD like below. There is an issue with deploying actions runner controller CRD with Argo CD. See issue #1317 for more details.
$ kubectl create -f charts/actions-runner-controller/crds/Once CRDs are deployed, commit and push the changes to your GitHub repo. Check deployment status from the Argo CD UI.
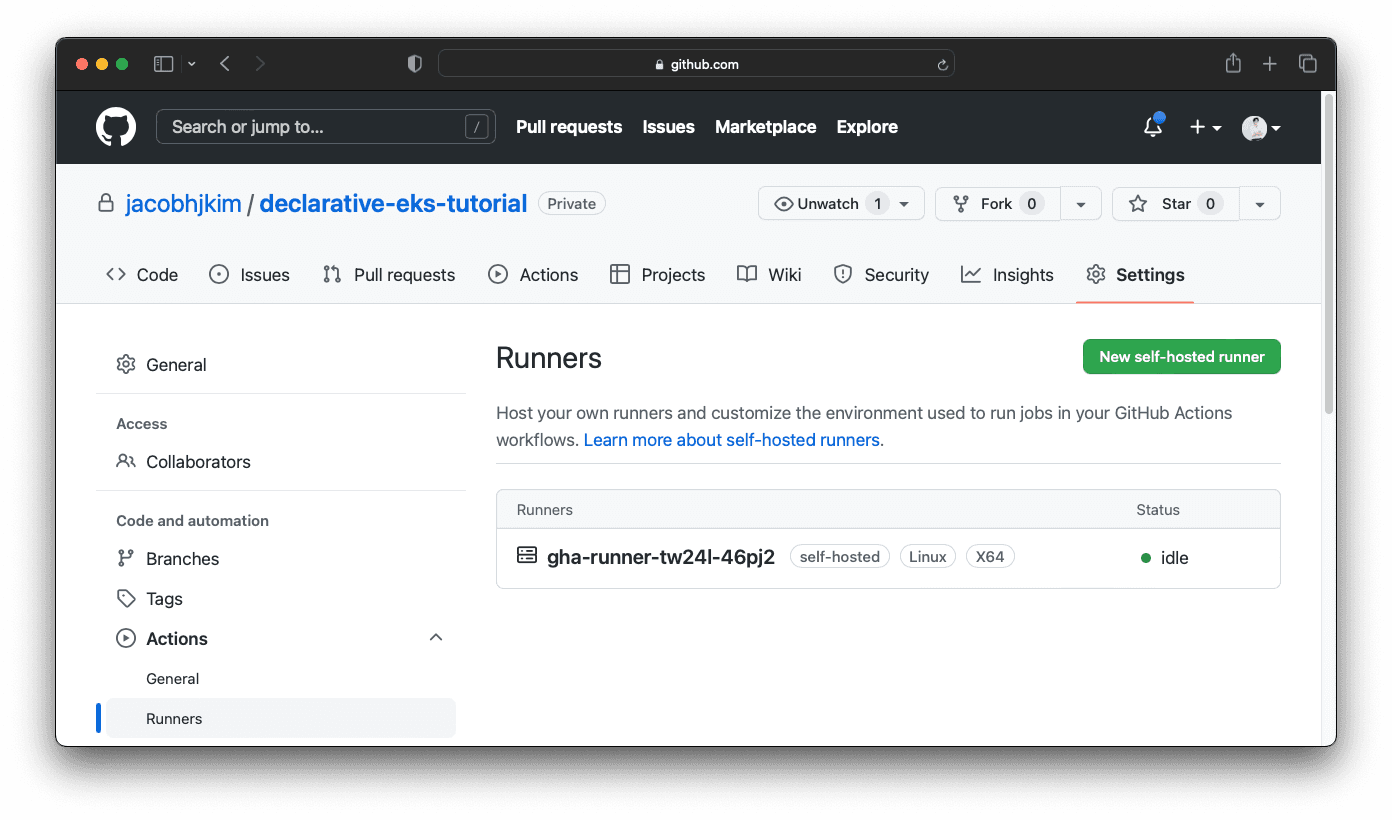
Once everything is deployed successfully, check your GitHub Actions Runner configuration page. You should be able to see a self-hosted runner added to your repository like below.
Atlantis
We have discussed Atlantis which is a tool to automate Terraform workflow with pull requests. Again, create a GitHub personal access token with repo scope. Also, get the Vault token used for Atlantis. You can get the token with the following command:
$ VAULT_TOKEN=hvs.QRD4PZKroM3JX0Husmsqllk4
$ VAULT_ADDR=https://vault.jacobkim.io
$ vault token create -policy='cicd/terraform-write'
Key Value
--- -----
token hvs.CAESIMCOMjpgqmBnucLLLhO6T3Ma9FdbLevEuxfKzUUfqlfGGh4KHGh2cy5NaTRVVDlsMFZiUlZJNEkzSTdGb1pWRGI
token_accessor 3UlnnWC1JXaCv396Rs82nINO
token_duration 768h
token_renewable true
token_policies ["cicd/terraform-write" "default"]
identity_policies []
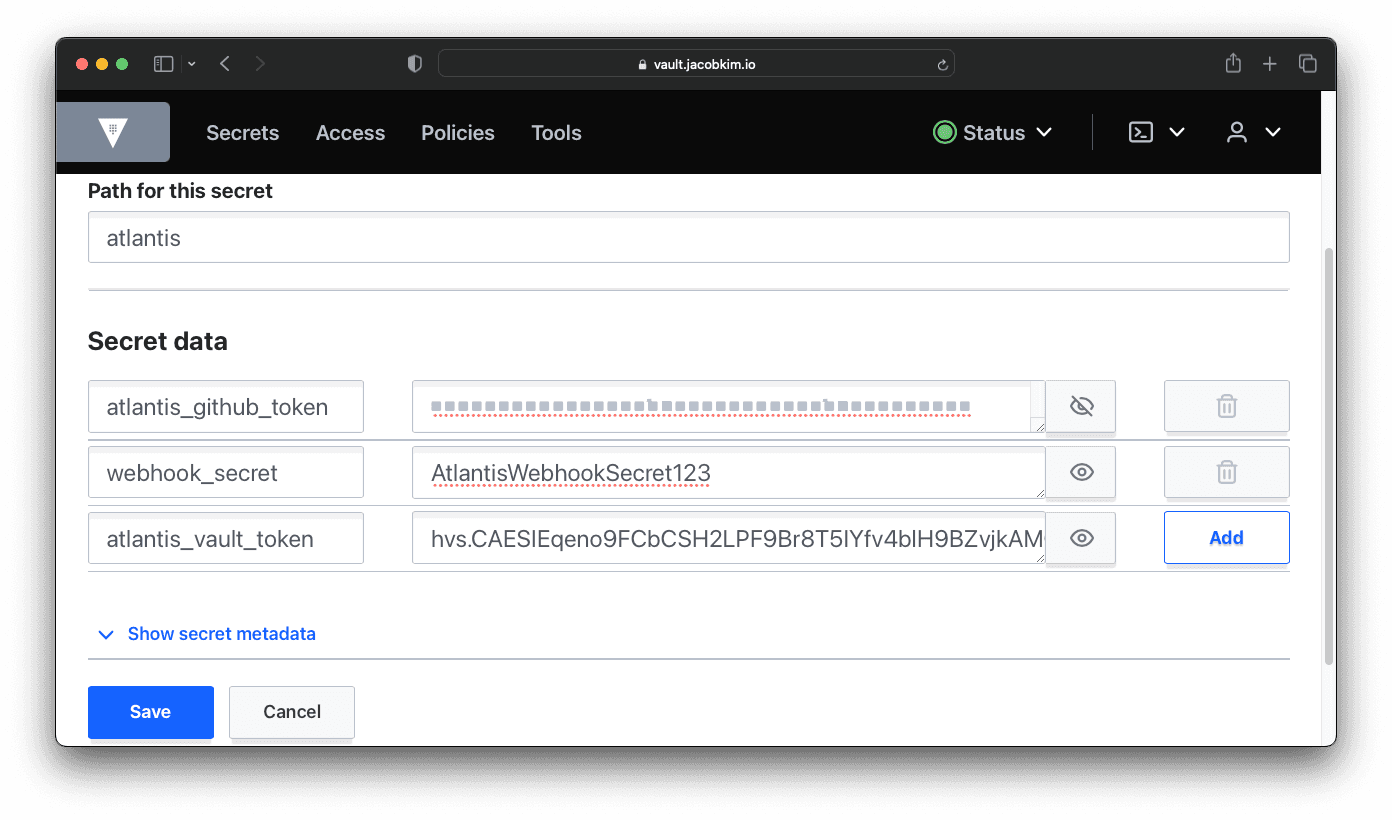
policies ["cicd/terraform-write" "default"]Create a secret in Vault for the GitHub PAT, webhook secret, and Vault token.
Update the charts/atlantis/values-central.yaml file with appropriate values.
1atlantis:
2  logLevel: info
3  orgAllowlist: github.com/jacobhjkim/declarative-eks-tutorial
4  vcsSecretName: atlantis-vcs-secret
5  allowForkPRs: true
6  hidePrevPlanComments: true
7  enableDiffMarkdownFormat: true
8  defaultTFVersion: 1.3.1
9
10  serviceAccount:
11    annotations:
12      eks.amazonaws.com/role-arn: arn:aws:iam::765355018960:role/central-atlantis
13  service:
14    type: ClusterIP
15    port: 80
16    targetPort: 4141
17  ingress:
18    ingressClassName: alb
19    annotations:
20      alb.ingress.kubernetes.io/scheme: internet-facing
21      alb.ingress.kubernetes.io/certificate-arn: arn:aws:acm:ap-northeast-2:765355018960:certificate/757c8b86-0316-419a-947a-e182e6f1f1a7
22      alb.ingress.kubernetes.io/target-type: ip
23      alb.ingress.kubernetes.io/listen-ports: '[{"HTTP": 80}, {"HTTPS":443}]'
24      alb.ingress.kubernetes.io/ssl-redirect: "443"
25    path: /*
26    pathType: ImplementationSpecific
27    host: atlantis.jacobkim.io
Then add the following configuration to charts/argocd-gitops/values-central.yaml file. This will deploy the Atlantis application to our cluster.
- name: atlantis
namespace: atlantis
source:
path: kubernetes/charts/atlantis
valueFiles:
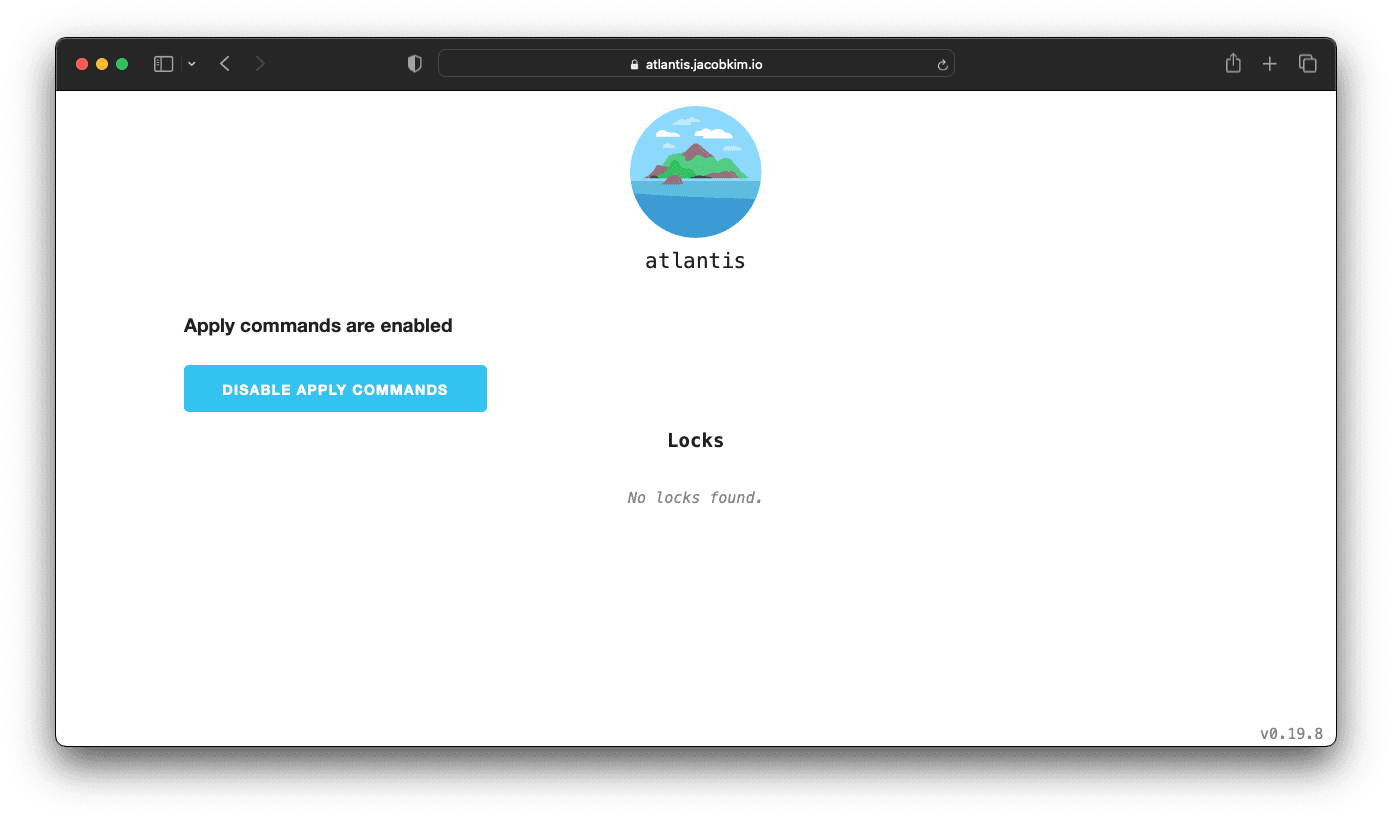
- values-central.yamlCommit and push the changes to your GitHub repo. When everything is deployed, visit the Atlantis UI at https://atlantis.[YOUR_DOMAIN_NAME]. You should be able to see the Atlantis UI like below.
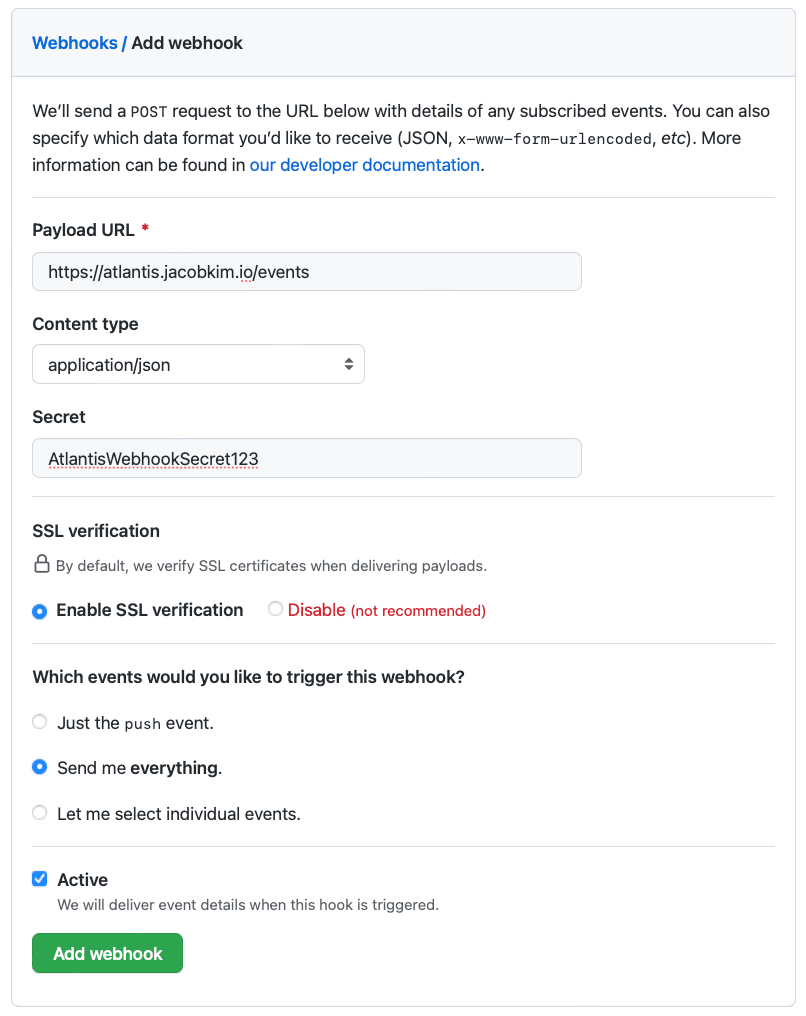
Create a GitHub Webhook for Atlantis with webhook secret we chose before.
Now you can create a Terraform plan and apply Terraform changes with Atlantis. We will see Atlantis in action when we deploy dev and prod clusters.
move to section well-done Well Done!

If you came this far, you are awesome 🙌! You have successfully deployed a central cluster with Vault, Argo CD, and Atlantis. Creating dev and prod clusters is very similar to the central cluster, but unlike the central cluster we will now use Atlantis to apply AWS infrastructure changes. All of the Kubernetes applications are deployed via Argo CD.
Other Declarative Multi-region EKS Series :
- Manage multi-region EKS the Declarative Way - Part 0: Introduction
- Manage multi-region EKS the Declarative Way - Part 1: Central Infrastructure
- Manage multi-region EKS the Declarative Way - Part 3: Dev & Prod Clusters
- Manage multi-region EKS the Declarative Way - Part 4: CI/CD