We have come a long way! To briefly recap what we have done so far: ...
All the code for this article can be found on jacobhjkim/declarative-eks-tutorial.
Table of Contents
- GitHub Actions CI/CD on Kubernetes
- Deploy Our Own Helm Chart
- Argo CD Application Monitoring Page
- Infra Clean Up
move to section github-actions-cicd-on-k8s GitHub Actions CI/CD on Kubernetes
We have deployed GitHub Actions Runner Controller on our central cluster. Let’s see how it works.
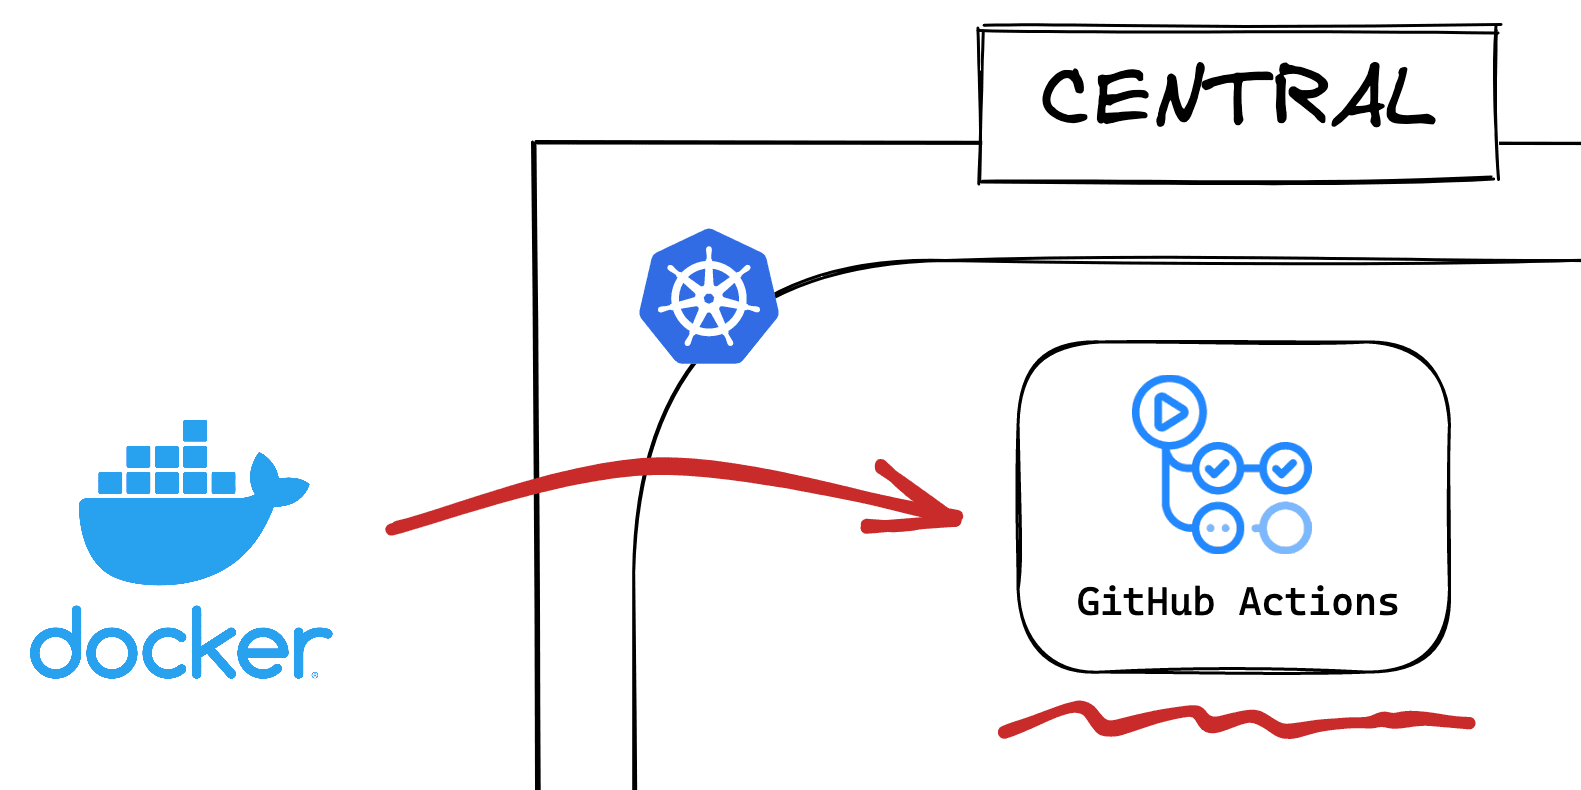
Check web-app folder. It contains a simple Next.js app with a Dockerfile. This Dockerfile is used to build a standalone Next.js image. Whenever there is a change under the web-app folder, our GitHub Actions CI will run and push an updated image. The GitHub Actions CI specification is in .github/workflows/web-app-ci.yaml.
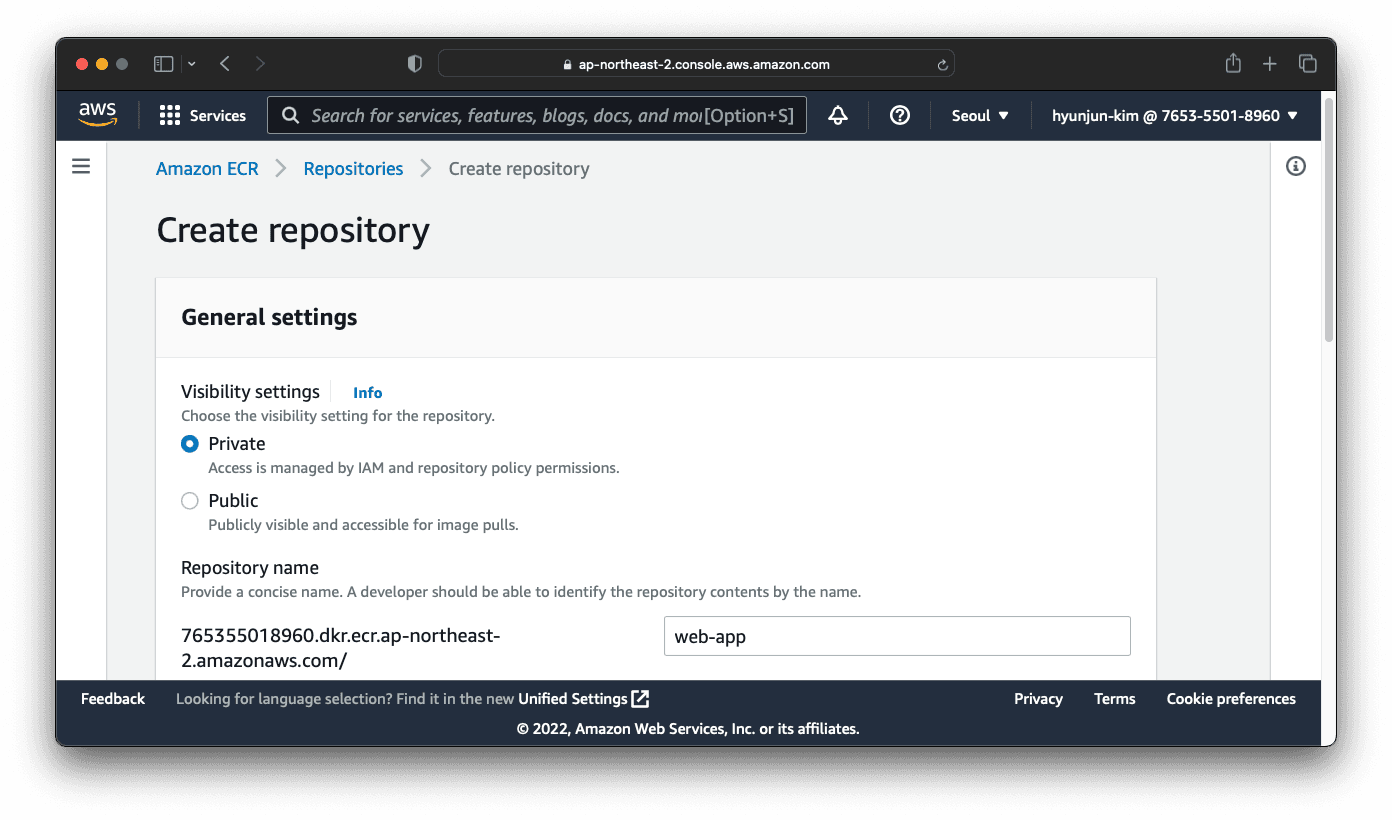
In order to push a container image, you need a container registry. Let’s use AWS Elastic Container Registry. Create a new ECR registry with the AWS console like below.
Once the registry is created, update web-app/.github/workflows/web-app-ci.yaml with the correct registry name and AWS region.
1 - name: Docker meta
2 id: meta
3 uses: docker/metadata-action@v4
4 with:
5 # list of Docker images to use as base name for tags
6 images: 765355018960.dkr.ecr.ap-northeast-2.amazonaws.com/web-app
7 # generate Docker tags based on the following events/attributes
8 tags: |
9 type=sha
10 ...
11 - name: Login to Amazon ECR
12 id: login-ecr
13 uses: aws-actions/amazon-ecr-login@v1
14 with:
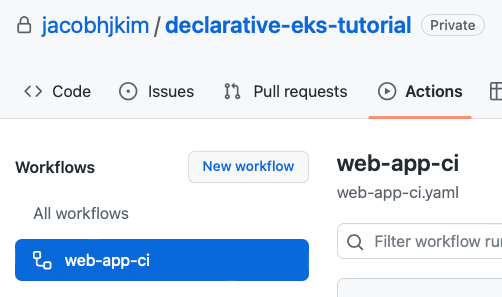
15 registries: 765355018960Commit and push the changes. You should be able to see the GitHub Actions CI registered like below.
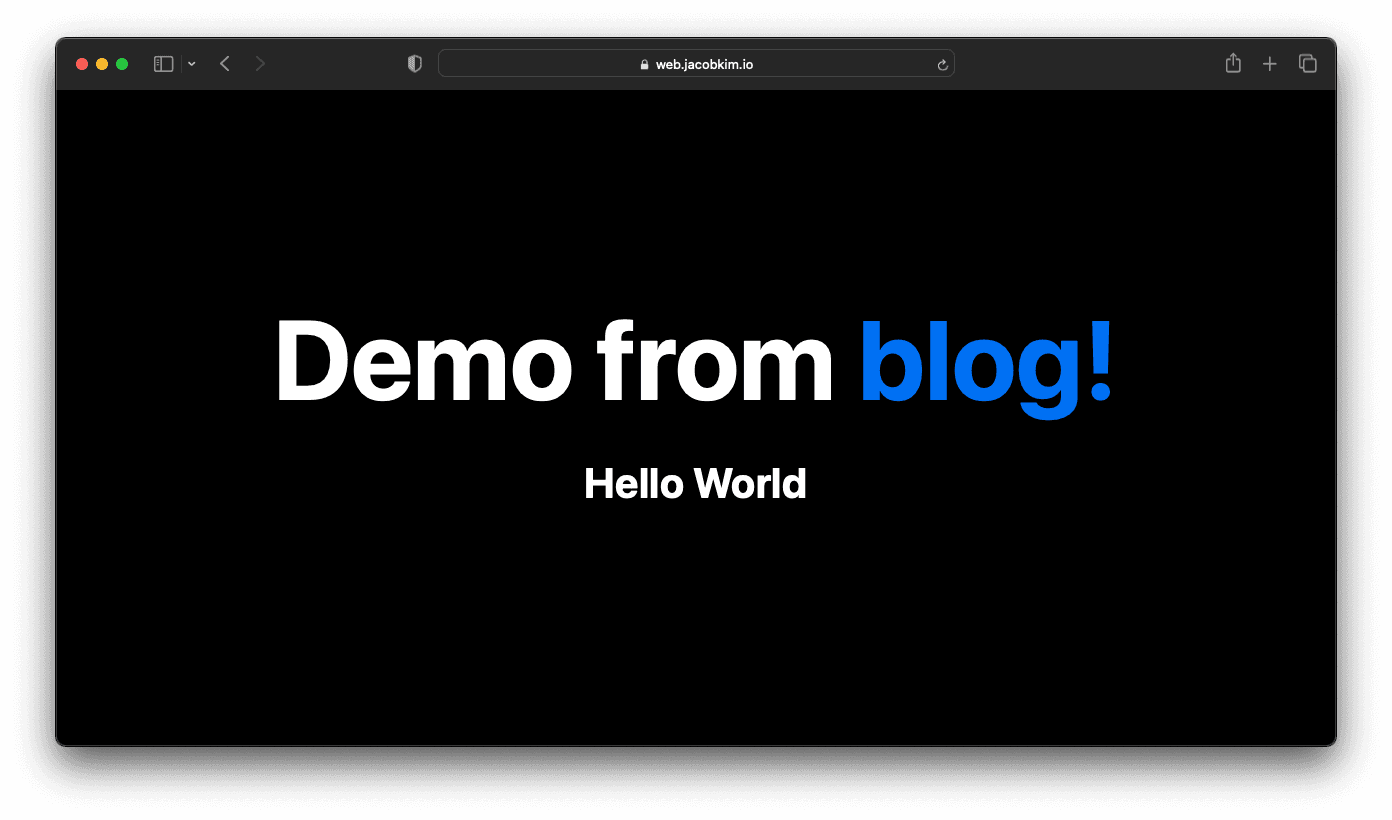
To trigger the CI, update web-app/src/pages/page.tsx to your preference. I simply added a subheading to the page.
1<main className={styles.main}>
2 <h1 className={styles.title}>
3 Demo from <a href="https://jacob.kim/blog/declarative-multi-region-eks">blog!</a>
4 </h1>
5 <h2>
6 Hello World
7 </h2>
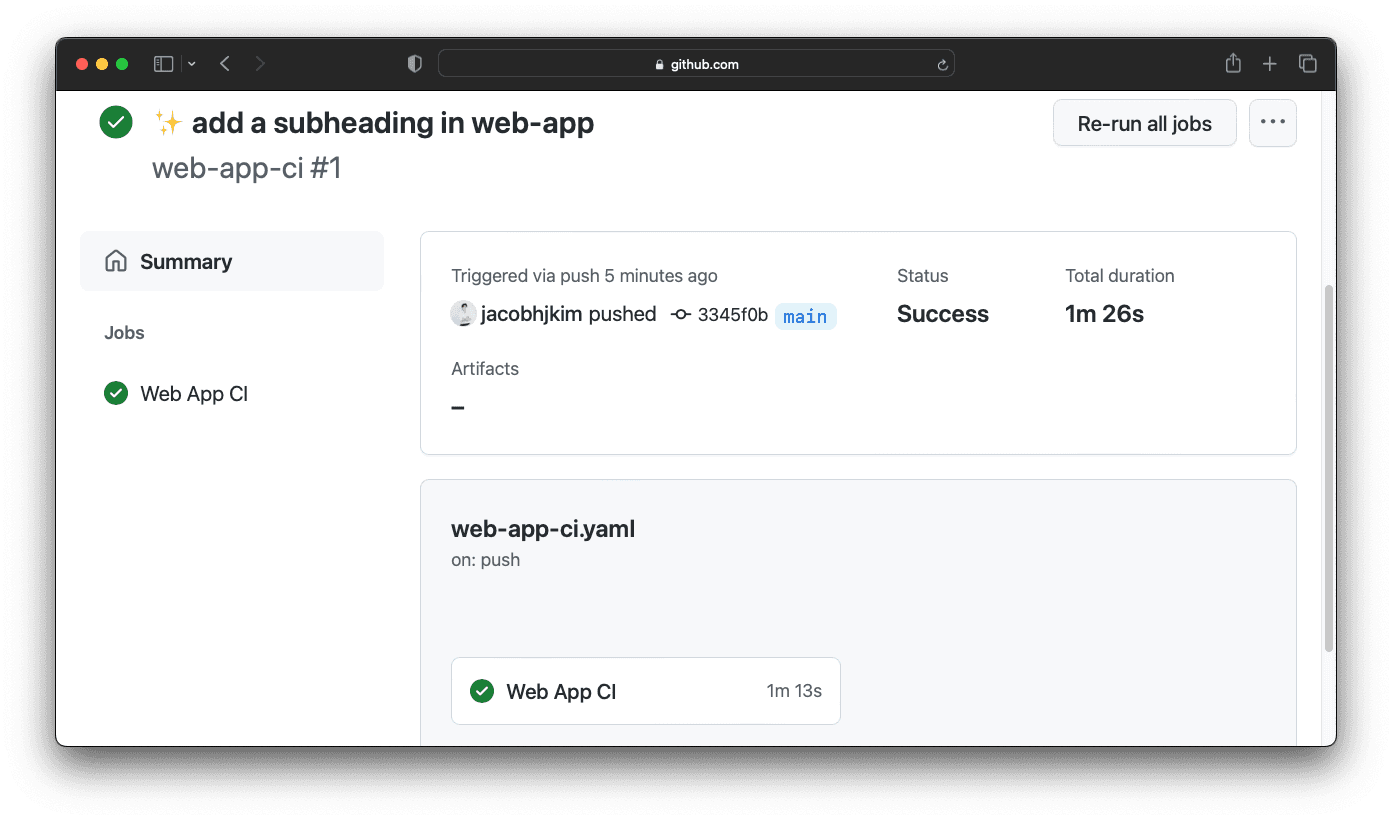
8</main>Commit and push the changes. You should be able to see the CI running like below.
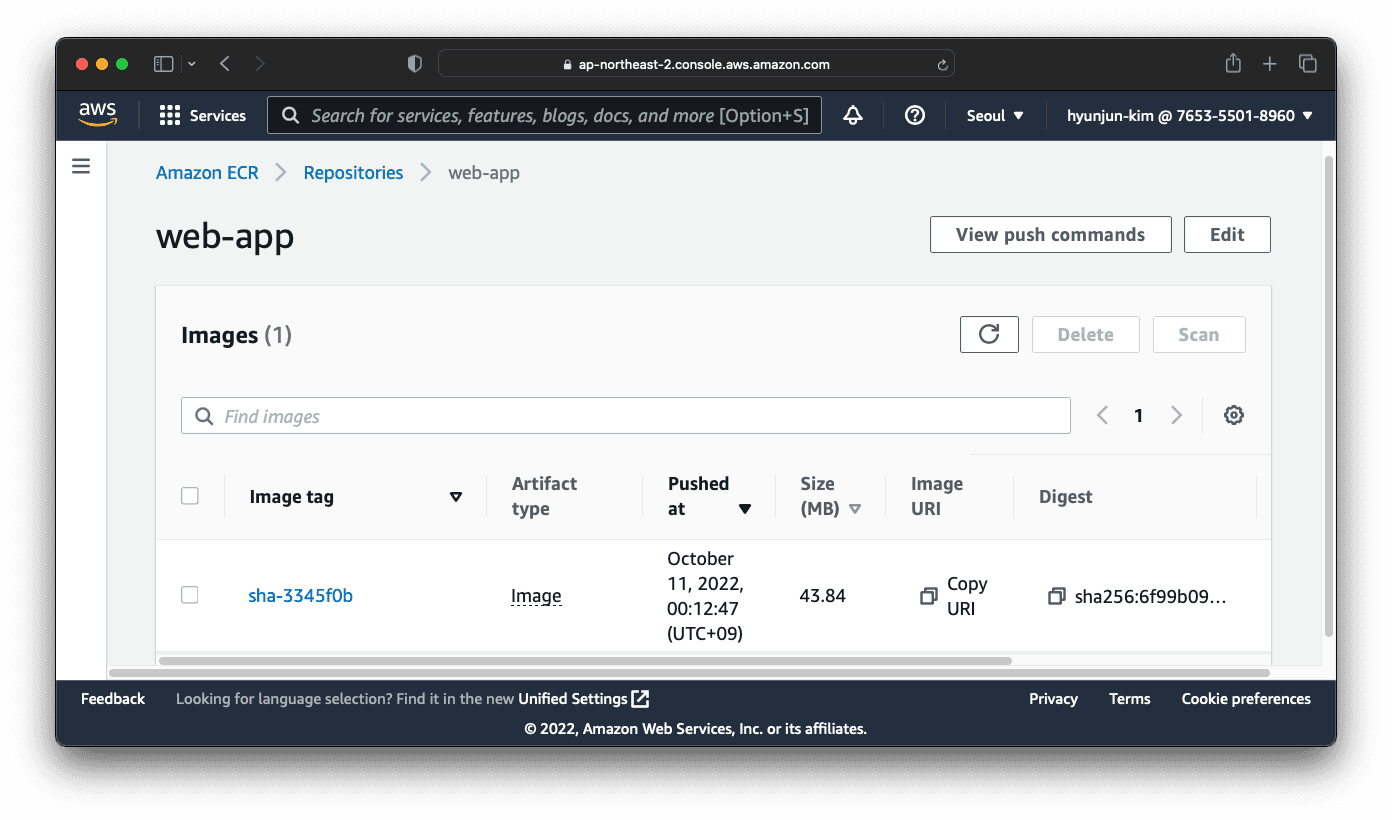
Once the CI runs successfully, you should be able to see the new image in the ECR registry.
We have a working CI/CD pipeline setup with GitHub Actions and Kubernetes! 👏
move to section deploy-our-own-helm-chart Deploy Our Own Helm Chart
We have deployed a multiple Helm Charts to our clusters, but most of them were pre-built charts. Let’s deploy our own Helm Chart. We will deploy the Next.js web app that we just built with our CI/CD pipeline to the dev cluster.
The Helm Chart is in kubernetes/charts/web-app. It is a simple Helm Chart with a Deployment, an Ingress and a Service. The Deployment uses the web-app image we built in the previous section. The Helm Chart itself is generated by helm create web-app.
Update kubernetes/charts/web-app/values-dev.yaml like below. Use the URI from the ECR you created in the previous section and the image tag auto-generated by GitHub Actions CI.
image:
  repository: 765355018960.dkr.ecr.ap-northeast-2.amazonaws.com/web-app:sha-3345f0b
  pullPolicy: IfNotPresent
  # Overrides the image tag whose default is the chart appVersion.
  tag: "sha-3345f0b"

ingress:
  enabled: true
  className: alb
  annotations:
    alb.ingress.kubernetes.io/scheme: internet-facing
    alb.ingress.kubernetes.io/certificate-arn: 'arn:aws:acm:ap-northeast-2:765355018960:certificate/757c8b86-0316-419a-947a-e182e6f1f1a7'
    alb.ingress.kubernetes.io/target-type: ip
    alb.ingress.kubernetes.io/listen-ports: '[{"HTTP": 80}, {"HTTPS":443}]'
    alb.ingress.kubernetes.io/ssl-redirect: '443'
  hosts:
    - host: web.[YOUR_DOMAIN_NAME]
      paths:
        - path: /
          pathType: Prefix
  tls: []
Don’t forget to update argocd-gitops/values-dev.yaml. Commit and push the changes. After a few minutes, you should be able to see the web app deployed successfully. Visit web.[YOUR_DOMAIN_NAME] to see the web app.
Congratulations! You have deployed your own Helm Chart to Kubernetes with a custom image you built with your own CI/CD pipeline.
move to section argocd-application-monitoring-page Argo CD Application Monitoring Page
Argo CD provides a nice badge for each application. It shows the application status and the sync status. We can use this badge to create a monitoring README page for all applications.
kubernetes/README.md is an example of such a monitoring page.
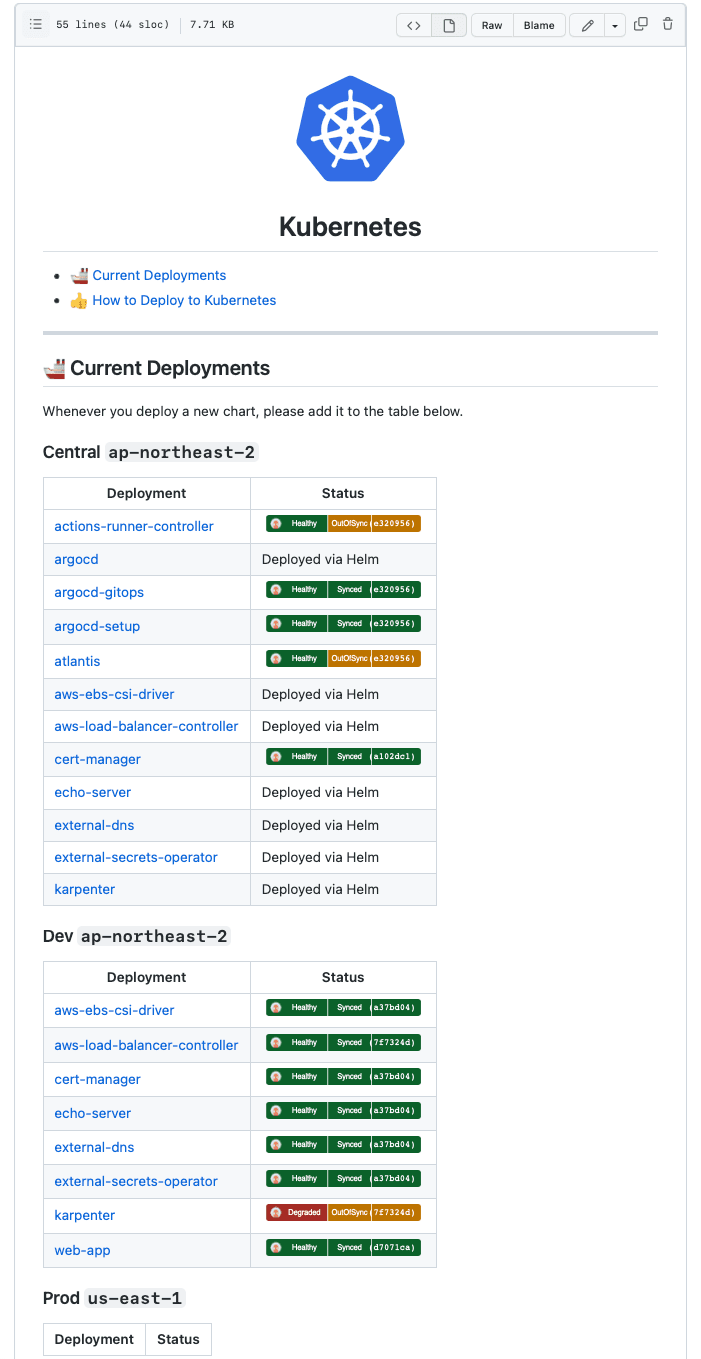
I find being able to see the status of all applications with one README page very useful. Though it should not be considered as a replacement for a proper monitoring system.
move to section infra-clean-up Infra Clean Up
We have deployed a lot of resources to AWS. If you are not planning to use them, you should clean them up. Because we used Terraform, it is easy to clean up all resources. Simply run terraform destroy in each Terraform folder. Note that you should destroy in the reverse order of deployment. For example, destroy EKS first, then VPC and Dynamo DB last.
Use Atlantis for terraform destroy
terraform destroy for you. However, it is a bit confusing to use Atlantis to run destroy. So I prefer to use the Terraform CLI. You can read more about it in Issue #193.If your VPC refuses to be deleted, try deleting the Load Balancers manually. You can find them in the AWS console under EC2 > Load Balancers.
In my personal experience, terraform destroy often fails due to various reasons. You can always manually delete the resources in the AWS console if it fails. Also, there are some resources that Terraform does not manage. For instance, an S3 bucket created with the AWS console at the beginning of this tutorial or Route 53 resources which are managed by external-dns. You should manually delete them as well.
move to section conclusion Conclusion

We have deployed Kubernetes clusters in different regions declaratively. How cool is that? There are still a lot of things to do. For instance, we can use a proper multi-cluster monitoring system like Prometheus and Thanos. We can also add a logging system, fine-grained RBAC, and more. There is so much more to learn, but I hope this article has given you a good starting point.
If you have any questions or feedback, please leave a comment below. I would love to hear from you.
Other Declarative Multi-region EKS Series :
- Manage multi-region EKS the Declarative Way - Part 0: Introduction
- Manage multi-region EKS the Declarative Way - Part 1: Central Infrastructure
- Manage multi-region EKS the Declarative Way - Part 2: Central Helm
- Manage multi-region EKS the Declarative Way - Part 3: Dev & Prod Clusters